

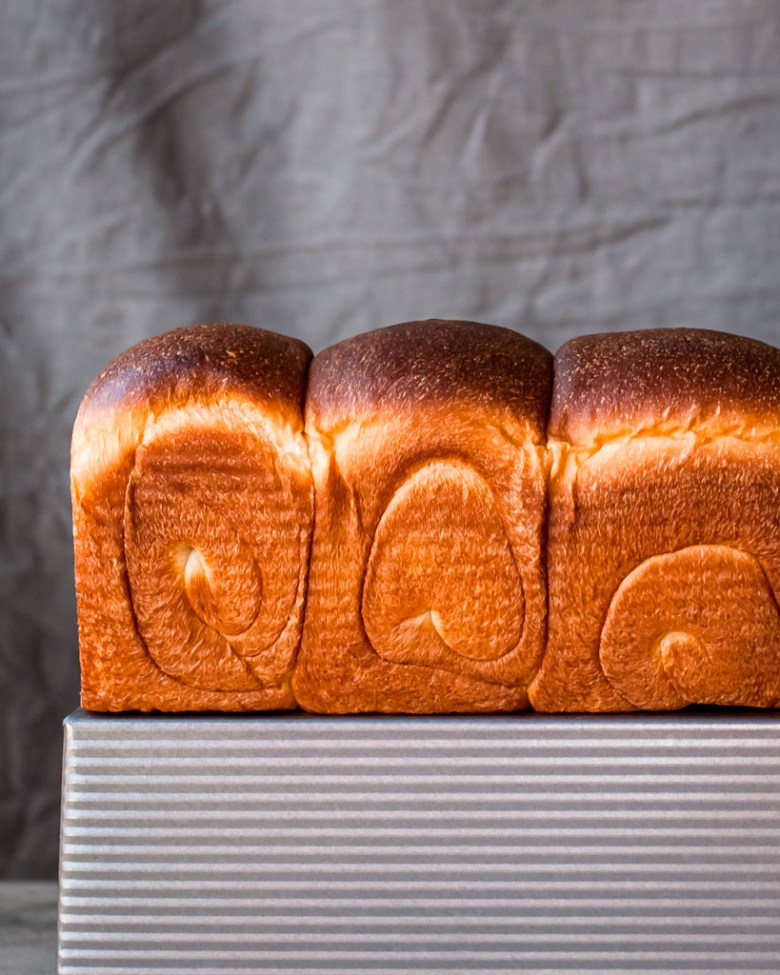
Many variations of this soft sourdough bread already exist on this site, but not one for good old white sourdough sandwich bread. This recipe makes a wonderfully soft loaf that my kids gladly eat plain, but it makes a mean sandwich and french toast as well. Using sourdough adds depth of flavor and keeps it fresh for multiple days! You can see me mix a similar style of dough in my Instagram story highlights (“Swirl Bread”), and there are lots of tips in previous posts on how to successfully make this style of bread. In summary, a thorough kneading, proper shaping, and full proofing are key to getting the right “shreddable” texture. It takes a little practice but I think it’s well worth the effort!
Suggested baking schedule:
You can make this bread in one day (there are a couple suggested schedules in my book, Baked to Order), but my preference is to make this loaf over two days. Resting the dough in the refrigerator overnight makes the dough easier to shape and adds an extra depth of flavor. I suggest you try to follow this schedule a couple of times until you’ve made it successfully, then adjust to fit your schedule.
- Day 1, morning: Build stiff levain (note that you need an active and fed 100% hydration starter to build the levain, so feed as necessary so it will be ready)
- Day 1, late afternoon/evening: Mix dough and let rise at room temperature for 2 hours, then refrigerate overnight
- Day 2, morning: Shape dough and proof
- Day 2, afternoon: Bake
.

Baker’s notes:
- The stiff levain is…stiff! It should resemble bread dough. I like using a stiff levain as it adds additional strength to this enriched dough, which helps for the extended periods of fermentation.
- Due to the enrichments in this dough (which slow fermentation), the final proof for this loaf must be done at room temperature (ideally 78-80F).
- It is possible to knead this dough by hand, though it will take considerably longer and can be quite sticky especially once the butter is added. If kneading by hand, I suggest using a slap and fold technique as demonstrated here. Consider it your workout for the day!
- If you have a 13x4x4 pullman pan, make 1.5x this recipe. Baking time might be a few minutes longer.
- Please note that as with all recipes (but particularly sourdough ones), timings are only estimates. The amount of time your bread takes to proof will depend on the strength of your starter, kneading, and dough/room temperature. Also, starters that are not sufficiently strong enough and dough that is under/overkneaded can result in bread that does not rise as high — though the resulting loaf is usually still delicious!
Soft Sourdough Sandwich Bread
Makes one 9x4x4 or 9×5 loaf (I absolutely love using my Pullman Pan for this!)| Adapted from Baked to Order and The Fresh Loaf
Ingredients:
For the stiff levain:
- 18g ripe, active sourdough starter (100% hydration)
- 31g milk
- 57g bread flour
Final dough:
- 142g bread flour
- 142g all-purpose flour
- 35g granulated sugar
- 1 large egg (~50g)
- 135g milk, cold
- 21g milk powder
- All of the levain, fully ripened
- 7g salt
- 35g unsalted butter, softened
To finish:
- Milk, for brushing
- Melted butter, for brushing
Method
- Make the stiff levain: In a medium bowl, mix the starter, milk, and flour together to form a stiff dough. Cover the bowl and ferment the levain at warm room temperature until more than doubled in volume, puffy, and domed, about 8 to 12 hours.
- Autolyse the dough: In a bowl of a stand mixer fitted with a dough hook, mix together all final dough ingredients except the salt and butter until just combined. Cover and autolyse (rest) for 30-60 minutes.
- Mix the dough: Add salt, and knead dough on low until gluten is moderately developed, about 5 minutes. The dough will start out sticky and rough but should gradually come together and feel smooth and stretchy. Add the butter in two batches, mixing in the first portion completely before adding the second. Continue kneading on low/medium-low until the gluten is very well developed and the dough passes the windowpane test as demonstrated here. Timing will depend on your flours and mixer, but usually takes about 5-10 minutes after the butter has been added. The dough should be smooth and supple (and quite lovely to handle!). Desired dough temperature is ~76-78F.
- Bulk rise and refrigerate dough: Transfer to a clean and lightly oiled bowl, cover, and bulk rise at warm room temperature for 2 hours. The dough will be noticeably puffed, but not doubled. Stretch and fold once, cover tightly with plastic wrap, and refrigerate overnight (at least 6 hours, and up to 24).
- Bring dough to room temperature: The next day, take the dough out and transfer to a lightly floured surface. Divide it into 3 or 4 equal parts and lightly shape each into a ball. Rest for one hour, covered by lightly oiled plastic.
- Shape the dough: Using a lightly floured rolling pin, roll each ball into an oval and roll up (like a jelly roll). Rest for 10 minutes. Roll each piece into an oval again, along the seam, and re-roll as tightly as possible. Transfer rolls to a loaf pan, seam sides down. Cover loosely with plastic and allow to rise about 6-8 hours at warm room temperature (78-80F). The dough should roughly triple in volume and nearly fill the tin (if using a Pullman Pan
).
- Preheat the oven: About 1 hour before baking, preheat oven to 400F with a rack in the middle. After the dough has finished proofing, brush lightly with milk, transfer to oven, and bake for 20 minutes. After 20 minutes, reduce the heat to 350F and continue baking for 10-15 minutes, or until the internal temperature is at least 195F. If the loaf is browning too quickly, tent a piece of foil over the top to keep from burning. When the loaf is finished, immediately remove from the pan and turn onto a wire rack. Brush melted butter over the top and sides while the loaf is still warm, if desired (this helps create a soft crust). Allow to cool completely before slicing. Store leftovers in a sealed plastic bag.


