Blueberry Rye Scones

blueberry rye scones

Meet my favorite coffee companion. Crisp on the outside, tender and fruit-studded on the inside, these blueberry rye scones are everything I want in a breakfast treat. As with pie dough, I always make scones with a portion of wholegrain flour for an extra dimension of flavor. I love the pairing of earthy rye with berries; but spelt, einkorn, or whole wheat work fine as well. The lemon glaze is optional for me, but not for my kids. If you’re going with the glaze, feel free to add the zest of the lemon into the scone dough.

Baker’s notes:

  • If you’re like me and don’t even think about baking BC (before coffee), prep the scones in advance through the chilling and cutting step. Freeze directly on the sheet tray until solid, then transfer the frozen scones to a ziplock bag and bake them off as needed (they’ll likely need a few extra minutes of bake time).
blueberry rye scone

Blueberry Rye Scones

Makes 8 scones | Adapted from Baked to Order

Ingredients:

For the blueberry rye scones:

  • 250g (2 c) all-purpose flour
  • 63g (2/3 c) whole rye flour
  • 50g (1/4 c) granulated sugar
  • 1 Tbsp baking powder
  • 3/4 tsp kosher salt (Diamond Crystal; use half as much for table salt)
  • 1/2 tsp ground ginger
  • 1/4 tsp grated nutmeg
  • 85g (6 Tbsp) unsalted butter, cold and cut into 1/2-inch cubes
  • 170g (1 1/4 c) fresh blueberries
  • 120g (1/2 c) cold heavy cream, plus more for brushing
  • 60g (1/4 c) sour cream, cold
  • 1 large egg, cold
  • 1 tsp vanilla extract
  • 1/4 tsp almond extract (optional)
  • Coarse sugar, for sprinkling

For the lemon glaze (optional):

  • 60g (1/2 c) icing sugar, sifted
  • 2-3 tsp freshly squeezed lemon juice, plus more as needed

Method:

  • Make the scone dough: Line a 6-inch cake pan with plastic wrap and set aside. In a medium bowl, whisk together the flours, sugar, baking powder, salt, ginger, and nutmeg.
  • Add the cold, cubed butter to the dry ingredients and cut it into the dry ingredients using a pastry cutter or your fingers. You should have varying sizes of butter pieces, ranging from pea to nickel shaped. Gently fold in the blueberries.
  • Whisk together the heavy cream, sour cream, egg, and extracts. Pour over the dry ingredients and gently fold in with a spatula until combined. The dough should be a bit shaggy, but should hold together. If not, add more cold cream 1 teaspoon at a time until it does. Gently fold the dough onto itself until it becomes a cohesive mass.
  • Chill the dough and preheat the oven: Transfer dough to the prepared cake pan and freeze for about 20-30 minutes or until slightly hardened. While scones are chilling, preheat the oven to 425°F with a rack in the middle. Stack two baking sheets together and line the top one with parchment paper. (I like to bake these scones with an extra baking sheet underneath to keep the bottoms from browning too much.)
  • Cut and bake the scones: When scone dough is chilled, invert onto a cutting board and use a sharp knife to cut like a pie into eight wedges. Transfer scones to prepared sheet pan. Lightly brush the tops with cream and sprinkle with coarse sugar.
  • Bake for 22-30 minutes, rotating pan halfway through, until the tops and bottoms are golden brown. Cool on a wire rack for 10 minutes.
  • Glaze and enjoy: While the scones are cooling, make the glaze. Sift the icing sugar into a medium bowl. Add 2 tsp lemon juice and whisk until smooth. Add more lemon juice, a teaspoon at a time, until the glaze is smooth and pourable. Drizzle or spoon over the scones. Enjoy immediately.
  • Storage: Scones are best freshly baked, but you can store them well wrapped at room temperature for a few days. (I would hold off on glazing until you’re ready to eat them.) Reheat for 5 to 10 minutes in a 350°F (175°C) oven. You can also freeze scones unbaked and bake them straight from frozen (you may need to add a few extra minutes of baking time).
unglazed blueberry rye scones

Related recipes and pages:

Apple and Ginger Loaf

sliced apple ginger loaf

This post is sponsored by Weight Watchers Canada. Find out more about the WW Freestyle program, which encourages the freedom to eat the foods you love while nudging you towards healthier choices using the SmartPoints system. As always, all ideas and opinions expressed here are my own.

Around this time of year I tend to have a few extra apples / apple butter lying around, the products of slightly-over-enthusiastic orchard trips. Not that I mind at all — I really enjoy baking with apple butter (in addition to spreading it on toast). Like applesauce, apple butter adds moisture and flavor to baked goods. I actually think the flavor you get with apple butter is better than applesauce, because the fruit is much more concentrated!

This time around I wanted to use apple butter to make a hearty breakfast quick bread, full of spice and whole grains. Enter this Apple and Ginger Loaf! I’ve been crushing on ginger lately, so it’s a major player here. I ground some fresh ginger up with the sugar to see what would happen, and I love the fragrance and spice it adds (and that grinding it with the sugar avoids those gingery strings)! If ginger isn’t your thing feel free to cut back or substitute with your favorite fall spice (I think cardamom would be lovely here). Conversely if you’re really into ginger, you could go wild and toss in a handful of chopped candied ginger, or sprinkle some on top.

apple ginger loaf from top

apple ginger loaf grab slice

Apple and Ginger Loaf

Makes one loaf, about 16 servings

Ingredients

  • 60g dark brown sugar
  • 60g granulated sugar
  • 50g fresh ginger, peeled and roughly chopped
  • 2 large eggs, at room temperature
  • 30g molasses
  • 1/4 teaspoon baking powder
  • 1/2 teaspoon baking soda
  • 1 teaspoon cinnamon
  • 1/2 tsp ground ginger
  • 1/4 teaspoon allspice
  • 1/4 teaspoon nutmeg
  • 3/4 teaspoon kosher salt
  • 99g neutral vegetable oil (I prefer grapeseed)
  • 1 1/2 teaspoons vanilla
  • 170g apple butter
  • 177g white whole wheat flour or sifted whole wheat flour
  • 50g rolled oats (not instant)
  • 57g chopped, toasted pecans (optional)

For the topping:

  • 1 Tbsp rolled oats
  • 1 Tbsp coarse sugar

Method

  1. Preheat the oven to 350F. Lightly grease and line a loaf or Pullman pan with a parchment paper sling.
  2. Place the sugars and ginger in a food processor. Pulse until ginger is completely broken down. Transfer mixture to the bowl of a stand mixer fitted with the whisk attachment.
  3. To the sugar-ginger mixture, add the eggs, molasses, baking powder, baking soda, spices, and salt. Mix on low to combine, then turn up the speed to medium and whip until the mixture is thick and expanded, about 5 minutes.
  4. Turn the speed down to low and slowly stream in the oil and vanilla. Mix until homogeneous. Add the apple butter and whisk on low until combined. Scrape down the sides of the bowl and add the flour and oats. Mix on low just until combined. Add the nuts if using and use a silicone spatula to mix just until the batter is smooth and combined. Be sure to scrape the bottom of the bowl to ensure the batter is evenly mixed.
  5. Pour the batter into the prepared pan. Sprinkle the rolled oats and coarse sugar evenly over the top.
  6. Bake for 45-60 minutes, or until a skewer inserted into the center of the loaf comes out clean.
  7. Transfer the pan to a wire rack to cool for 15 minutes. Using the parchment sling, lift the loaf out of the pan to finish cooling completely on the rack.

Financiers

marcus eating financiers

I let out an audible “Oh, yay!” when I first received Mardi Michel’s delightful cookbook In the French Kitchen with Kids: Easy, Everyday Dishes for the Whole Family to Make and Enjoy. As I’ve mentioned a couple times on this blog, my older child is, as he reminds me often now, “Almost 3” and eager to help in the kitchen whenever possible. I’ve been looking for more recipes to try out with him, so this cookbook was truly a welcome delivery.

marcus reading in the french kitchen with kids

One of the things I appreciated most about In the French Kitchen with Kids is that it assumes kids are capable. There are recipes for quick croissants, creme caramel, eclairs, and steak frites — dishes one might not normally think of as “kid-friendly” but written up in a way that makes them very achievable for young people (with assistance). The book is thoughtfully well-written; the recipes are easy to follow and are peppered with historical tidbits and anecdotes to enhance the learning experience.

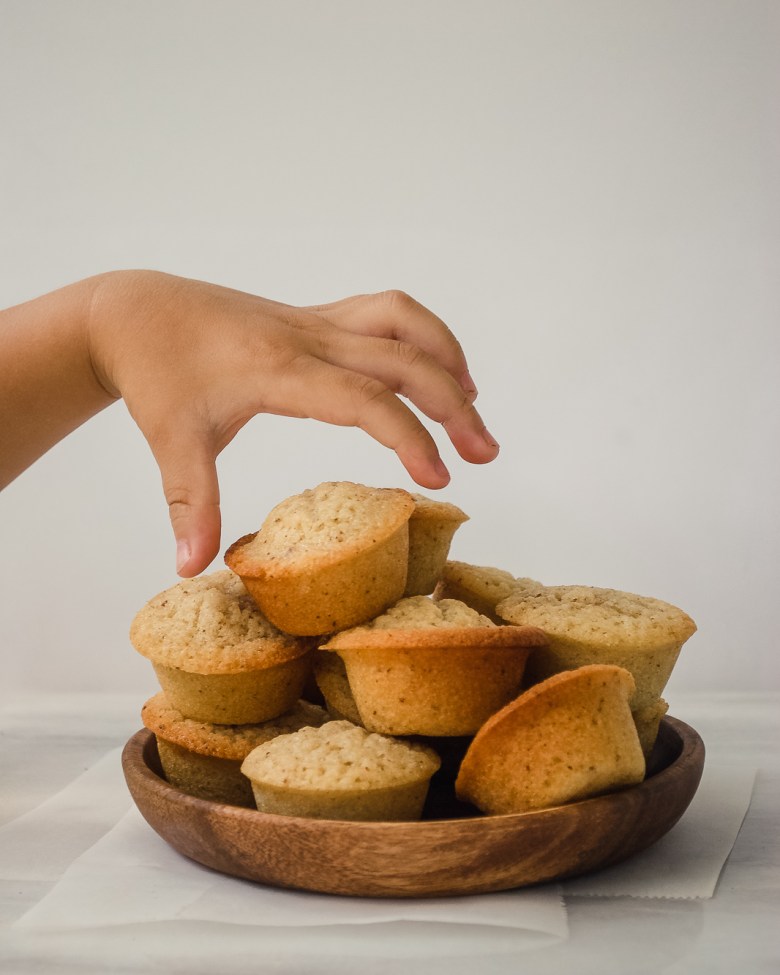
The first recipe we decided to make was financiers, or little almond cakes, because my son is currently very into muffin shapes and we had a few extra egg whites to use up. Buttery and nutty, financiers are the perfect little teatime treat and it’s all too easy to keep popping them into your mouth — they’re addictively delicious.

financiers

A couple of notes:

  • Michels’ recipe calls for melted butter, but I went the extra step to brown the butter. I love the extra nuttiness it lends and it’s worth the extra couple of minutes to me. Incorporate the browned butter while it’s still a little warm; this makes it easier to fold into the other ingredients.
  • I refrigerated the batter for a few hours after mixing because of time constraints (and I wanted to bake them off fresh for some guests). This isn’t necessary, but the batter does hold nicely in the fridge for a few days — it just might take a little longer to bake. My financiers took about 15 minutes to bake.
  • The recipe yield is 24 mini muffins, but naturally it depends on the size of your tin. I used this Wilton mini muffin pan and got 15 cakes, using OXO cookie scoop to portion the batter.

marcus mixing bowl
marcus pouring

Financiers

From Mardi Michels’ In the French Kitchen with Kids: Easy, Everyday Dishes for the Whole Family to Make and Enjoy. Reprinted by permission.
Makes 15-24 mini muffin financiers (see notes, above)

Ingredients

  • Unsalted butter, for greasing the pan
  • 1/2 cup (113 g) unsalted butter
  • 4 large egg whites
  • 3/4 cup (150 g) granulated sugar
  • 1/2 cup (50 g) almond meal
  • 1/3 cup (50 g) all-purpose flour
  • 1/4 teaspoon fine sea salt
  • 1/4 tsp pure vanilla extract (optional; my addition)
  • Icing sugar, for sprinkling

Method

  1. Preheat the oven to 400˚F (200˚C). If you are using a nonstick mini muffin pan you may not need to butter them, but otherwise generously butter the cups of the pan.
  2. Melt the butter either in a small pot on the stovetop over medium heat or in a microwave-safe bowl in the microwave for about 1 minute. Set aside to cool. (Note: I browned the butter and let it cool until slightly warm.)
  3. Beat the egg whites until frothy with handheld electric beaters on high speed, 1 to 2 minutes.
  4. In a separate bowl, whisk together the sugar, almond meal, flour and salt.
  5. Add the dry ingredients to the wet and fold them in gently with a rubber spatula until just combined.
  6. Add the cooled, melted butter to the batter and use a rubber spatula to gently mix until the butter is completely incorporated. (Note: at this point, I refrigerated the batter for a couple of hours.)
  7. Divide the batter between the cups of the muffin pan. You can do this with a 1 1/2-tablespoon cookie scoop or a small spoon. Fill each cup almost to the top.
  8. Bake for 10 to 12 minutes, or until the center is slightly puffed and the edges are golden and slightly crispy and coming away from the pan. There may be cracks in the tops. That’s totally okay!
  9. Remove the financiers from the muffin pan immediately and allow to
    cool on wire racks.
  10. Once they have cooled completely, sprinkle them with icing sugar to serve. These are best eaten the day they are made, although they can keep for a couple of days in an airtight container at room temperature.

Option: Raspberry financiers

  • Just before you bake the financiers, cut 12 raspberries in half and place one half, cut side down, on top of each financier. Press down gently.

marcus reaching for financiers

Spelt Buttermilk Biscuits

This post is sponsored by Weight Watchers Canada. Find out more about the WW Freestyle program, which encourages the freedom to eat the foods you love while nudging you towards healthier choices using the SmartPoints system. As always, all ideas and opinions expressed here are my own.

Biscuits aren’t something I ate much growing up. Not that I was deprived or anything — it’s just that we were more a Denny’s Grand Slam or banana pancakes kind of family when it came to special breakfasts. So it’s only been the last few years when I’ve started to appreciate the humble biscuit — and not just for breakfast.

These spelt buttermilk biscuits are both versatile and and quick to whip up. While there’s a time and a place for big, buttery biscuits, these lean towards light and fluffy thanks to a modest amount of butter and a good dose of buttermilk; a bit of spelt flour adds a wholesome nuttiness. Use them for breakfast sandwiches or berry shortcakes, or simply split and slather with butter and jam. These biscuits also take less than 45 minutes to make and bake, which is perfect for busy weekdays or unexpected guests.

spelt buttermilk biscuits split

Spelt Buttermilk Biscuits

Makes 6

Ingredients

  • 120g / 1 c AP flour
  • 95g / 3/4 c spelt flour
  • 3/4 tsp kosher salt
  • 1 Tbsp baking powder
  • 57g / 1/4 c cold, unsalted butter, cubed
  • 3/4 to 1 c cold buttermilk

Method

  1. Preheat your oven to 425F. Have ready an 8-inch cast iron skillet or line a cake pan with parchment paper.
  2. In a medium bowl, whisk together the flours, salt, and baking powder.
  3. Add the cold, cubed butter and use your fingers to flatten the butter. You want dime to nickel-sized pieces.
  4. Drizzle in 3/4 c of buttermilk and use a fork or spatula to combine until no dry bits of flour remain. You should have a shaggy, soft, and slightly tacky dough. If the dough won’t come together, drizzle in the remaining 1/4 c of buttermilk a teaspoon at a time until you have a cohesive mass.
  5. Lightly dust your counter with flour and turn the dough out. Using lightly floured hands, gently pat the dough into a square about 1” thick. Using a bench scraper, fold the dough in half. Rotate the dough 90 degrees and repeat the patting and folding 2 to 3 more times. Work gently and quickly; the idea is to build in some layers while still keeping the butter cold.
  6. After you’ve patted out the dough 1” thick for the final time, trim the edges of the dough so you have a neat rectangle with clean edges. This helps the biscuits rise evenly in the oven. If the dough feels sticky or warm at all, stick it in the freezer for 10 minutes. Then, using a bench scraper, cut the dough into 6 even pieces. Use firm, downward strokes to preserve the layers.
  7. Arrange the biscuits closely together in the skillet or prepared pan. Bake for 20-30 minutes, or until the tops are golden brown. Let them cool a few minutes in the pan before devouring. Biscuits are best served warm, but any not eaten right away can be stored in an airtight container overnight and toasted the next day.

Whole grain banana bread, and baking with kids


Over the last few months, my two year old has started “helping” me in the kitchen. This is kind of a big deal because for the first almost two years of parenthood, the kitchen was my safe place. Not just because I would cook / bake to relax, but because we literally put up a gate to keep our inquisitive toddler out of the kitchen.

But when we moved earlier this summer, my husband and I, figuring we’d have to teach kitchen safety sooner or later, decided it was time to rip off the band-aid and go gate-free in our new house. I’ll be honest — those first couple of months were a struggle. Being a normal 2-year-old, Marcus wanted to touch everything and open all the cabinet doors. (I found toys in the freezer a couple of times.) Now, about 6 months later, I can’t remember the last time I had to say, “Don’t touch the stove!” Progress.

So now we’ve graduated to Mommy-Marcus kitchen adventures. I’m trying to make it a point to choose one or two recipes a week where he can actively participate. At first I was concerned with the mess, the safety, and the unpredictability of it all. I quickly realized that I just needed to let go. Baking with kids is not about being picture-perfect or detailed or anything close to fancy. It is about creating memories, teaching independence, and having fun. Marcus absolutely loves helping, and I’m thrilled to be able to share one of my hobbies with such an eager little buddy.

Marcus with flour

One of our current favorite things to make together is banana bread. Marcus likes it because he gets to smash bananas and later eat the banana bread. I like it because there’s no mixer or special ingredients required. I’ve been making our house banana bread for years, but we tried this King Arthur recipe recently and it was a hit — it’s a little more cake-like and moist (thanks to a full pound of bananas). Both will be in our recipe rotation this year.

Marcus eating

Some tips:

  • When baking with Marcus, I prepare some things in advance: I pre-measure the ingredients, toast/chop the nuts and fruit, and line the pan. I’ll give him a few tasks like smashing up the bananas, pouring in the pre-measured ingredients, stirring, and sprinkling on the topping. And he definitely helps with clean-up too (I give him a damp cloth to help wipe down the counter).
  • I used 100% sifted red spring wheat flour and it worked beautifully — not heavy or stodgy like completely whole grain products can be. I think you can definitely play around with the flours in this recipe; white whole wheat or spelt would be good choices, or you could mix regular AP and regular WW.
  • I like baking quick breads in my 9x4x4 pullman pan for nice straight sides (baking time is generally about the same for me), but this recipe certainly works in a regular loaf pan.
  • Like a good banana bread, this recipe holds up well to substitutions. Switch up the nuts and dried fruit for chocolate or omit them completely. Change the spices to suit your tastes. I’d love to try this with a teaspoon of espresso powder.
    One of Marcus’ favorite things about helping in the kitchen is getting to wear his apron (and making me wear mine). I absolutely love the aprons from Hedley & Bennett — not sponsored, though they can if they want. 😉
  • The key to really good banana bread is really ripe bananas. Like so ripe they’re “dead” — basically black all over. I usually let them get to that state then pop them into the freezer. When I want to bake with them, I measure out the amount I need into a bowl and defrost in the microwave. There will be a lot of liquid; just add it to the recipe.
  • I generally lower the sugar in my baked goods a bit, so if you like a sweeter loaf you can increase the sugar to 200g (1 cup). I think this recipe would actually be fine with even less sugar and will probably lower to 150g next time (especially if dried fruits are added).
  • Please don’t skip the topping! The caramelized crunchy lid is one of my favorite parts of this banana bread.

Other kid-helper-friendly recipes on Cook Til Delicious:

Whole Grain Banana Bread

Makes one 9×5 loaf | Barely adapted from King Arthur Flour

Ingredients:

  • 454g thoroughly mashed, very ripe banana (4 – 5 medium bananas)
  • 99g vegetable oil (I prefer grapeseed)
  • 175g light brown sugar
  • 2 large eggs, at room temperature
  • 1 teaspoon vanilla extract
  • 226g sifted whole grain flour (see note above)
  • 1 tsp baking soda
  • 1/2 tsp baking powder
  • 3/4 tsp kosher salt
  • 1 tsp ground cinnamon
  • 57g chopped, toasted walnuts (optional)
  • 57g chopped dates (optional)

For topping:

  • 15g coarse or granulated sugar
  • 1 tsp ground cinnamon

Method:

  1. Preheat the oven to 350°F with a rack in the center position. If your nuts aren’t yet toasted, put them in while the oven is preheating (just don’t forget about them!). Lightly grease or line a pullman pan/loaf pan with parchment.
  2. Place the bananas in a large bowl and mash them with a wooden spoon or fork until mostly smooth (a few lumps are ok). Whisk in the oil, sugar, eggs, and vanilla until smooth.
  3. Mix the flour, baking soda, baking powder, salt, and cinnamon together. Pour the dry ingredients into the wet and use a silicone spatula or wooden spoon to combine gently. When the batter is almost completely combined (there should still be a few streaks of flour visible), add the nuts and dried fruit. Mix until just combined.
  4. Pour the batter into the prepared pan and level the top with a palette knife. Mix together the sugar and cinnamon, and sprinkle over the batter.
  5. Bake the bread for about 60 to 75 minutes, until the bread feels set on the top, and a paring knife (or other thin knife) inserted into the center comes out clean, or with just a few moist crumbs (but no wet batter). If the bread appears to be browning too quickly, tent it with aluminum foil for the final 15 to 20 minutes of baking.
  6. Remove the bread from the oven. Cool it in the pan for 15 minutes, then loosen the edges, and turn it out of the pan onto a rack to cool completely. Store leftover bread, tightly wrapped, at room temperature for several days. Freeze for longer storage.

Meyer Lemon and Raspberry Scones

lemon raspberry scones

Scones are one of those coffeeshop items that I love to order but often find disappointing. Either they’re too cakey or over-the-top heavy. My ideal scone is crisp on the outside and tender on the inside, slightly sweet but able to withhold a generous amount of jam/curd/clotted cream. After yet another recent disappointing scone purchase, I decided it was time to scour the interwebs and find a go-to scone recipe for myself.

It’s not too often I succeed on the very first try, but, boy, were these good scones. I based them off the very well-reviewed Royal Wedding Scones on Food52. Lemon and raspberry is a favorite combination in this household, but you could easily change up the fruit and spices based on season and preference.

Scones are definitely best the day you make them (preferably while still a little warm from the oven), but you can freeze these unbaked and bake straight from frozen (you may need to add a few minutes of baking time). I’ve also had success freezing baked scones and reheating them in a 350F oven for 12-15 minutes or so.

Meyer Lemon and Raspberry Scones

Adapted from Food 52 | Makes 8

Ingredients

  • 2 1/2 cups / 313g AP flour (I’ve successfully replaced about 1/3 of this with spelt flour)
  • 1/4 cup / 50g granulated sugar
  • 1 Tablespoon baking powder
  • 3/4 teaspoon kosher salt
  • 6 tablespoons / 86g chilled unsalted butter, cut into small cubes
  • 3/4 cup frozen raspberries
  • Zest of 1 meyer lemon
  • 1/2 cup cold heavy cream, plus more for brushing on tops of scones
  • 1/2 cup cold buttermilk
  • 1 large egg
  • 1 1/2 teaspoons pure vanilla extract
  • Coarse sugar, for sprinkling

Method:

  1. Line a 6-inch round cake pan with plastic wrap. Set aside.
  2. Put sugar and lemon zest in the bottom of a large bowl. Rub the zest into the sugar to release the oils.
  3. Add the remaining dry ingredients to the sugar-zest mixture and whisk to combine.
  4. Add the cold butter to the dry ingredients and cut it in using a pastry cutter or your fingers. You should have varying sizes of butter pieces, ranging from pea to nickel shaped.
  5. Gently fold in the frozen raspberries.
  6. Combine the wet ingredients in a small bowl and whisk well to combine. Add the wet ingredients to the dry, gently folding in with a fork. Do not overmix.
  7. When a shaggy dough begins to form, dump the contents onto a lightly floured surface. Gently fold the dough onto itself just enough so it becomes a cohesive mass. Transfer to the prepared cake pan, cover, and freeze for about 30 minutes or until slightly hardened.
  8. While scones are chilling, preheat oven to 425F and line a baking sheet with parchment paper or a Silpat. When scones are chilled, invert round onto a lightly floured surface and cut like a pie into eight wedges. Transfer to prepared sheet pan. Lightly brush the tops with cream and sprinkle with coarse sugar.
  9. Bake for 20-25 minutes, rotating pan halfway through. Scones are done when a skewer inserted into the middle comes out clean.

Strawberry Yogurt Bread

strawberrybreadLately I’ve been working a lot of early morning shifts, so I wanted to make something I could easily pack for breakfast. Bonus points for something that could be created from the contents of our fridge (and pantry). My default is our House Banana Bread, but I didn’t have any bananas and thought it would be fun to make something seasonal. BTW, I’m so excited for berry season! (One of the best parts of summer, IMO.)

The result was this Strawberry Yogurt Bread. Since this was envisioned as a breakfast bread, my goal was for something not too sweet and reasonably healthy (minimal oil/butter, some whole grains). I’m quite happy with how this turned out, and three days later it’s almost finished…so that’s that! Next time, I might try walnuts or pecans in place of the nuts, or swapping out the strawberries for blueberries or whatever berry is lurking in the fridge. We had a partial tub of sour cream in the fridge, so that got added in — but if you don’t have that lying around, I think you could easily add another 1/4 cup of oil or replace with more yogurt. Yay flexible recipes!

Strawberry Yogurt Bread

Makes 1 9×5 loaf

Ingredients

  • 1/2 c plain Greek yogurt (I used fat free)
  • 1/4 c sour cream
  • 1/4 c vegetable oil
  • 1/4 c granulated sugar
  • 1/4 c dark brown sugar
  • 2 eggs, room temperature
  • 1 Tbsp vanilla extract
  • 1 1/3 c all purpose flour
  • 2/3 c whole wheat flour
  • 2 tsp. baking powder
  • ½ tsp. baking soda
  • ½ tsp. salt
  • 1 c strawberries, chopped
  • 1 handful sliced almonds

Topping:

  • 1 Tbsp. Turbinado Sugar
  • 1 strawberry, sliced

Method

  • Preheat oven to 350°.
  • In a medium bowl, mix yogurt, sour cream, oil, sugar, eggs and vanilla extract until blended.
  • In a separate bowl add flours, baking powder, baking soda and salt. Mix together.
  • Make a well in the center of the flour mixture and slowly incorporate the yogurt mixture, being careful not to overmix.
  • Fold in strawberries and almonds.
  • Spoon batter into a greased and floured 9×5-inch loaf pan. The batter will be thick.
  • Arrange sliced strawberry on top, and sprinkle with turbinado sugar.
  • Bake for 50 minutes to 1 hour, or until a wooden pick inserted into center comes out clean. Cool in pan on a wire rack 10 minutes; remove from pan to wire rack.

House Banana Bread

bananaConfession: I don’t like plain bananas. I don’t like the mealy texture in my mouth, especially when they’re overripe. But I don’t mind the taste of bananas, so I’m happy to indulge in smoothies containing bananas, banana “ice cream” (basically, a frozen banana pureed til it tastes like ice cream), and — of course — banana bread.

My mom’s banana bread was a family favorite, and I thought her recipe would be the one I would end up using in my own home. While I still intend on making her version someday, I’ve found a new House Banana Bread that has quickly become a favorite for our little family. I like that it’s reasonably healthy (no trans-fats and some whole grains), not overly sweet, and adaptable depending on what you’ve got available in your kitchen. Examples of previous adaptations:

  • Dropped the oil to 1/4 c and added a couple spoonfuls of sour cream
  • Added a splash of bourbon
  • Made one batch vegan by simply replacing the egg with another ripe banana. (It worked beautifully — even non-vegan friends gobbled it up!)

An added bonus: everything is mixed in one bowl, and there’s no hand mixer (i.e. extra dishes to clean) needed!

House Banana Bread

Adapted from Smitten Kitchen | Makes one 9×5″ loaf

  • 3 large ripe-to-over-ripe bananas
  • 1 large egg
  • 1/3 cup (80 ml) olive oil
  • 1/3 cup (65 grams) light or dark brown sugar
  • 1/4 cup (60 ml) maple syrup
  • 1 teaspoon (5 ml) vanilla extract
  • 1 teaspoon (5 grams) baking soda
  • 1/2 teaspoon kosher salt
  • 1 teaspoon ground cinnamon
  • 1/4 teaspoon freshly grated nutmeg
  • Pinch of ground cloves or all spice
  • 1 1/2 cups (180 grams) white whole-wheat flour (I usually use half all purpose, half whole wheat)
  • 1/4 cup (50 grams) uncooked millet

Method:

Preheat your oven to 350°F and butter a 9×5-inch loaf pan. In the bottom of a large bowl, mash bananas with a potato masher or the back of a wooden spoon until virtually smooth but a few tiny lumps remain. Whisk in egg, then oil, brown sugar, syrup and vanilla extract. Sprinkle baking soda, salt, cinnamon, nutmeg and cloves over mixture and stir until combined. Sift in flour and stir until just combined, then stir in millet.

Pour mixture into prepared pan and bake until a tester comes out clean, about 40 to 50 minutes. Cool loaf in pan on rack.