Apple Frangipane Galette with Salted Caramel

Thanks to moving, prepping for baby #2, and some unusually mild Canadian weather, this summer has disappeared just like that. I can’t say I’m sad about it. While there’s nothing like summer produce, fall is by far my favorite season. I love the crisp mornings, changing colors, and chunky sweaters.

Oh, and apple pie.

I don’t usually make my first apple dessert until a little later in the year. But last week I took my little guy to a nearby farm, and to my surprise they had a couple varieties of apples ready for picking. I couldn’t resist taking home a small bag full of Zestars! (yes, the “!” is an official part of its name), which I’d never tasted before but read were good for eating and baking. And they are lovely — mildly tart and crisp with a firm texture that holds up well in the oven.

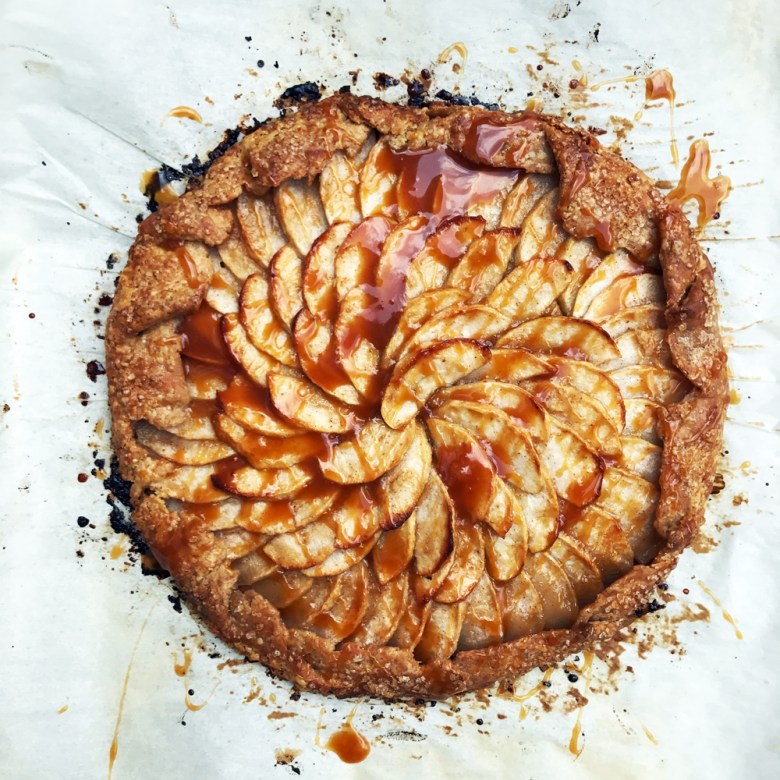
I didn’t quite have enough apples for a full-on pie, but these babies were just begging to be baked up in a buttery crust. (OK, maybe that was me begging.) And so this galette was born.

I know galettes are supposed to be unfussy and casual; and the many components of this one may be off-putting. But seriously. I think this is one of the best apple desserts I’ve ever made, and it really looks harder than it is. You could definitely use store bought salted caramel sauce if you wanted, but it’s so delicious and easy to make yourself that you really won’t regret cooking up a batch. (Plus, this recipe makes more than enough for the galette so you’ll have extra for stirring into coffee, drizzling over ice cream, or just eating from the jar.) I’m also having a moment with frangipane — not only is it just plain delicious, but in the case of a galette it acts as a moisture barrier, keeping the bottom crust beautifully crisp.

Speaking of the crust — it may sound weird to use sourdough starter in a pastry recipe, but trust me, it’s delicious! I really do believe sourdough adds a depth of flavor to pie crust; and if your starter is healthy and fresh you shouldn’t notice any tang. But if you don’t have sourdough starter lying around, you can certainly use your favorite pie crust recipe instead.

Apple Frangipane Galette with Salted Caramel

Serves 6-8

Ingredients

For the sourdough crust (makes enough for 2 galettes):

  • 300g flour (I use 100g whole grain, 200g AP)
  • 227g unsalted butter, cold and cubed
  • 1 Tbsp granulated sugar
  • 1 tsp kosher salt
  • 200g ripe sourdough starter, cold (100% hydration)
  • 2 Tbsp cold milk or water

For the salted caramel sauce:

  • 200g granulated sugar
  • 1/2 c heavy cream, at room temperature
  • 54g unsalted butter, at room temperature
  • 1 tsp flaky sea salt, such as Maldon

For the frangipane:

  • 95g almond flour
  • 50g granulated sugar
  • 20g flour (AP or whole grain)
  • 30g unsalted butter, at room temperature
  • Pinch of salt
  • Splash of vanilla extract
  • 1 large egg, at room temperature

For the fruit:

  • 3 medium-large baking apples, cored, peeled, and thinly sliced
  • Juice of 1/2 a lemon
  • 50g brown sugar
  • 1 Tbsp AP flour
  • Pinch of cinnamon
  • 1/4 c salted caramel sauce

To finish:

  • 1 Tbsp cream
  • 1 Tbsp coarse sugar
  • Salted caramel sauce

Method

For the sourdough crust:

  1. In a large bowl, whisk together the flour, sugar and salt. Add the cubed butter and smash into flat pieces with your fingers, tossing to distribute evenly. Don’t overwork — you want to keep the butter pieces fairly large (nickel to quarter size) for flakiness.
  2. Use a fork to whisk the cold milk/water and starter together. Pour the wet mixture over the butter-flour mixture and, using a silicone spatula or wooden spoon, gently toss to combine. The dough will seem shaggy at first, but should hold together if you squeeze it. If not, dribble in additional cold water/milk a teaspoon at a time (tossing after each addition) until it does.
  3. Using the heel of your hand, take handfuls of dough and smear them up the side of the bowl (this “fraisage” method creates streaks of butter that makes for an extra flaky crust). Once all the dough has been smeared, divide the in half and gently press and flatten each portion into a circle. Wrap one half in plastic and chill or freeze for a future galette or pie. If your remaining dough feels at all soft or melty at this point, wrap it in plastic and chill for about 10 minutes before proceeding (you want it cold, but not hard).
  4. On a piece of floured parchment paper or Silpat, roll the dough into a circle about 12-14 inches in diameter, about 1/4-in thick. Roll from the middle and rotate the dough about 1/4 turn between rolls to help keep the shape and even thickness. Flour your pin and dough as needed to avoid sticking. When you’re done rolling, transfer the dough still on the parchment/Silpat to a sheet pan, cover with plastic, and chill for at least 2 hours before assembling the galette.

For the salted caramel sauce:

  1. In a medium saucepan, melt the sugar over medium-high heat. Swirl the pan occasionally for even heating.
  2. When the sugar reaches a copper color, remove it from the heat and add the salt and butter, whisking continuously. Be careful as the mixture will bubble up! Return the pot to medium-low heat and whisk for a minute or so.
  3. Still continuously whisking, add the cream in a slow, steady stream — again, taking caution as the mixture will bubble and rise. Continue whisking over medium-low heat to thicken the mixture slightly.
  4. Remove from the heat and transfer to a heat-safe container. Once cool, cover and refrigerate. Sauce will thicken as it cools. Rewarm in the microwave for about 20 seconds for easy pouring.

For the frangipane:

  • Whisk together the flours, sugar, and salt in a small bowl. Rub the butter in with your fingers until the mixture resembles wet sand. Add the egg and vanilla and mix with a spatula to combine.

For the fruit:

  • Juice the lemon into a medium bowl and add the apple slices, tossing to coat. Add the sugar, flour, and cinnamon and toss to combine.

To assemble:

  1. Preheat the oven to 375F. Remove the chilled pastry from the fridge. Spread the frangipane evenly in a circle in the center of the pastry, leaving a 1.5-2 inch border. Starting from the outermost edge of the frangipane, arrange the apple slices in concentric, overlapping circles. Fold the edges of the pastry over the filling to create a crust. Refrigerate the galette for 15-20 minutes to firm the pastry.
  2. When the pastry is firm, brush the crust with the heavy cream and sprinkle with coarse sugar. Drizzle 1/4 c of salted caramel sauce over the apples (not on the crust). Bake in the preheated oven for 40-45 minutes, rotating the pan halfway through, until the pastry is a deep, golden brown and the apples are bubbling. Transfer to a cooling rack. Serve at room temperature with extra salted caramel sauce.

Soft and Chewy Sourdough Pretzels

I have a soft spot for pretzels. I don’t know how it started; it’s not like we ate pretzels that often growing up. But every time I see pretzels on a menu there’s a good chance I’ll order them; and if I attend a baseball game I’m more likely to get a pretzel than a hot dog. What can I say? I have a weakness for warm, chewy carbs.

Making sourdough pretzels has been on my to-do list for awhile; and after quite a few batches I’ve finally come up with a version that I’m pretty pleased with. For awhile I was tinkering with an authentic pretzel recipe, which produces a more chewy and dense product. Call me inauthentic, but I like my pretzels a bit softer — so the recipe here reflects that. If you prefer a denser pretzel, you can use the ingredients below but skip the bulk rise — divide right after mixing, let the dough rest for 45 minutes, shape the pretzels, and refrigerate overnight. Then proceed with baking as directed below.

One final thing — I would love to try making lye-dipped pretzels because I hear it’s the bee’s knees, but I can’t find a reasonably priced source for food grade lye in Toronto (ordering online will cost me about $70). One day I’ll find a way to do it, but for now baked baking soda is my dip of choice. Just spread out a box of baking soda on a baking sheet at bake at 250F for an hour, then store in an airtight container to use whenever your pretzel cravings hit.

Making sourdough pretzels with lye

sourdough pretzel lye

Updated, October 9, 2020: I have now made these pretzels several times using a lye dip and it is delicious! Lye is a strong alkali which, in the case of pretzels, speeds up the Maillard reaction (browning) during baking, giving pretzels a gorgeous bronzed crust and distinctive texture. I purchased food grade lye from Amazon; you only need a small amount for each batch so one order will last you awhile. Please note that lye is caustic and can cause chemical burns if not handled with care. Make sure to wear protective gear (gloves and long sleeves) when using it and keep it away from children and animals.

When you make these pretzels with lye they only need to be dipped (not boiled) so I make the following schedule changes.

  1. On step 3 (on day 1), let the pretzel dough proof until increased by ~50-60%, about 3.5-4.5 hours. Divide the dough and shape as directed in steps 1-2 for day 2. Once shaped, let the pretzels sit at room temperature for about 1 hour, or until noticeably puffed. Cover with lightly oiled plastic and refrigerate until cold, at least 4 hours but up to 24.
  2. When ready to bake, preheat the oven to 500F with a rack in the middle. Set a large wire rack set over a large sheet tray.
  3. Note: Be very careful when working with lye as it is corrosive! Wear gloves and make sure the kitchen is clear of small children and animals.
  4. Pour 1000g cold water into a large stainless steel bowl. Add 35g food grade lye and use a spoon to carefully stir until the lye dissolves.
  5. With gloved hands, dip pretzels in the lye solution one at a time for 15-20 seconds each. After dipping, transfer to the prepared wire rack.
  6. Once all the pretzels have been dipped, carefully flush the lye solution down the toilet. Move the pretzels (still with gloved hands) back to the parchment-lined baking sheet, spacing at least an inch apart. (At this point I also like to clean all the equipment that may have come in contact with lye, still with gloved hands.)
  7. Using a razor blade or sharp knife, make about a 1-inch long slash at the thickest part of each pretzel (the bottom of the “U”). Sprinkle with flaky salt.
  8. Bake for about 10-15 minutes, rotating the pan halfway through baking, or until pretzels are well browned. Transfer pretzels to a cooling rack for about 10 minutes before serving. Pretzels taste best within an hour of baking, but leftovers can be wrapped tightly with plastic and frozen for up to a month. Reheat for about 10 minutes in a 350F oven.

Thanks to Maurizio at The Perfect Loaf for the instructions for using lye! For more background on the lye dip and how it creates that beautiful distinctive crust, see this article from NPR.

sourdough pretzels with lye

Soft and Chewy Sourdough Pretzels

Makes 8 | Adapted from various sources, including Tasting Table and The Fresh Loaf

For the dough:

  • 175g Pilsner-style beer (room temperature is fine)
  • 120g mature sourdough starter (100% hydration)
  • 14g barley malt syrup (or honey)
  • 30g lard (or softened butter)
  • 360g flour (I use half bread, half all purpose)
  • 8g sea salt

To finish:

  • 1/4 c baked baking soda
  • 1 egg yolk + 1 Tbsp milk/water (for egg wash)
  • Pretzel salt / flaky sea salt, for sprinkling

Method

Day 1:

  1. Combine the beer, starter, barley malt syrup, and lard in a medium bowl and whisk to combine.
  2. Whisk together the flour and salt in a large bowl. Add the liquid mixture and stir to combine with a silicone spatula or wooden spoon. Knead, by hand or with the dough hook in a stand mixer, until the dough is smooth and the gluten is well developed (about 10 minutes with a mixer, longer if by hand). The dough is fairly stiff and should be slightly tacky, but not sticky.
  3. Transfer the dough to a clean, oiled bowl, cover with plastic, and allow to rise at room temperature for about 2 hours, folding once an hour. Refrigerate overnight (or for at least 8 hours).

Day 2:

  1. Line a large sheet tray with parchment paper. On a clean work surface, divide and round the dough into 8 equal portions, about 85g each.
  2. To shape, flatten a round into a rough rectangle about 3″ x 5″. Starting from a long edge, roll the rectangle up into a tight log and pinch to seal the seam. Roll the log out to about 12 inches and set aside to relax while you repeat the process with the remaining rounds.
  3. Once all the rounds have been initially rolled out, return to the first log and continue rolling it out into a rope roughly 26 inches long, tapering the ends slightly. If you’re having trouble getting enough traction, lightly mist your work surface with water (you don’t want to use flour, which will actually make it harder to roll out the dough).
  4. Form the rope into a “U” shape. Holding the ends, twist together twice about 3-inches from the ends, then fold the ends down and press them into the “U” at about 4 and 8 o’clock. Transfer to the prepared baking sheet. Cover and let proof until noticeably puffed, about 45-60 minutes. Meanwhile, preheat oven to 500 degrees with a rack in the center.
  5. When the pretzels are nearly ready, fill a large pot with 8 cups of water (I like to use the leftovers from the can of beer used to make the dough, plus enough water to equal 8 cups). Stir in the baked baking soda, then bring the mixture to a simmer over medium-high heat, stirring occasionally to make sure the baking soda is dissolved.
  6. Once the liquid is simmering, turn the heat down to medium to maintain a gentle simmer. Use a slotted spoon to dip the pretzels in one or two at a time for about 20 seconds each. Remove the dipped pretzels from the liquid, drain, and return to the baking sheet, spacing at least an inch apart.
  7. Brush the pretzels with egg wash and sprinkle with salt. Using a razor blade or sharp knife, make about a 1-inch long slash at the thickest part of each pretzel (the bottom of the “U”).
  8. Bake for about 10-15 minutes, rotating the pan halfway through baking, or until pretzels are well browned. Transfer pretzels to a cooling rack for about 10 minutes before serving. Pretzels taste best within an hour of baking, but leftovers can be wrapped tightly with plastic and frozen for up to a month. Reheat for about 10 minutes in a 350F oven.