Ultra-soft sourdough sandwich bread (sourdough shokupan)

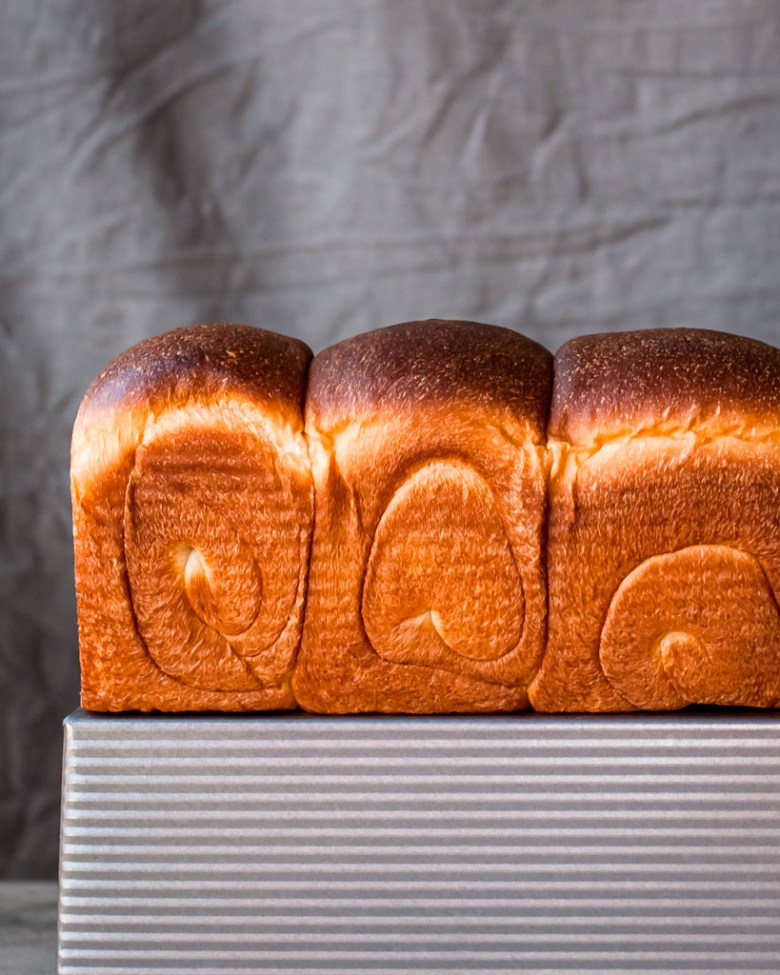
Introducing: the “fast” and ultra-soft version of my soft sourdough sandwich bread! Enriched with milk, milk powder, cream, egg, and butter, this sourdough shokupan style loaf boasts a smooth, bouncy crumb and mildly sweet taste. It’s perfect for sandwiches, grilled cheese, or the best ever French toast.

Compared to previous versions of this bread, I’ve upped the amount of starter in this bread so the bulk fermentation and rising is all done in one day. You will need to build a sweet stiff levain, which I do the night before I plan to mix the dough. While I’ll still continue to use my older formulas (especially when I want to do an overnight proof), I love this new recipe for its speed!

sourdough shokupan crumb

Thanks to the warm fermentation and sweet starter, this bread is very mild with a hint of sweetness, even with a large amount of prefermented flour. I’m happy to add this formula to my arsenal and excited for you to try it!

Tips for sourdough shokupan success:

Sweet stiff levain: For all my enriched sourdough breads I prefer to use a stiff levain — this just means that there is a higher proportion of flour to water in the starter. I don’t maintain a separate stiff starter — whenever I want to make an enriched bread, I just prepare a stiff levain using my 100% hydration starter. In this particular loaf, I add a little sugar to the starter as well to tame the acidity.

Thorough kneading: For best rise and texture, the dough should be fully kneaded to windowpane stage. I first knead the dough without butter until the dough is smooth and the gluten is well-developed; then add the butter slowly and continue kneading until the dough is very strong, smooth, and supple. Please note that the exact timings will vary depending on your flour and mixer; and it is possible to overknead this dough. I suggest checking the dough every couple minutes after all the butter has been added so you get a feel for how the dough is changing and developing.

Warm fermenatation: I keep this dough warm throughout bulk fermentation and proofing, about 80-82F. Because of the high percentage of starter the dough should rise fairly steadily; if not, it may come down to strength of starter, under/over-kneading, or too cool an environment.

Degassing during shaping: For the tightest, bounciest crumb, the dough should be very well degassed at the shaping stage. I also keep the bench rest and shaping times short, as this dough ferments fairly quickly. If you start getting air bubbles under the skin while the dough is resting, it is harder to get a really smooth, even crumb. When rolling the dough, use quick and firm movements with the pin and try to push all the bubbles out from the dough. You shouldn’t need any flour for shaping.

fully fermented sourdough shokupan

Sourdough shokupan (ultra-soft sourdough sandwich bread)

Makes one 9x4x4 pullman loaf or 9×5 loaf

Ingredients:

For the sweet stiff levain:

  • 35g active, ripe sourdough starter (100% hydration)
  • 58g milk
  • 13g granulated sugar
  • 105g bread flour

For the final dough:

  • 114g bread flour
  • 114 all-purpose flour
  • 40g granulated sugar
  • 21g milk powder
  • 75g milk, cold
  • 81g heavy cream, cold
  • 50g egg (about 1 large), cold
  • 7g salt
  • 46g unsalted butter, at room temperature

To finish:

  • Milk, for brushing
  • Melted butter, for brushing (optional)

Method:

  1. Make the sweet stiff levain: In a medium bowl, mix the starter, milk, sugar and flour together to form a stiff dough. Cover the bowl and ferment the levain at warm room temperature until more than doubled in volume and puffy, about 8 to 12 hours.
  2. Autolyse the dough: In a bowl of a stand mixer fitted with a dough hook, mix together all final dough ingredients except the salt and butter until just combined. Cover and autolyse (rest) for 20-30 minutes.
  3. Mix the dough: Add salt, and knead dough on low until gluten is moderately developed, about 5-7 minutes. The dough will start out sticky and rough but should gradually come together and feel smooth and stretchy. Add the butter in three batches, mixing in each portion completely before adding the next. Continue kneading on low/medium-low until the gluten is very well developed and the dough passes the windowpane test. Timing will depend on your flours and mixer, but usually takes about 5-10 minutes after the butter has been added. The dough should be smooth and supple. Desired dough temperature is ~75-76F.
  4. Bulk fermentation: Transfer to a clean and lightly oiled bowl, cover, and bulk rise at warm room temperature (80-82F) for 2 hours, or until roughly doubled.
  5. Shape the dough: Transfer dough to a clean surface. Divide into 3 parts, shape into balls, and rest for 5 minutes, covered by lightly oiled plastic. Using a rolling pin, roll the first ball into an oval about 9″ x 5″, doing your best to degas the dough. (Roll from the center out, which should push the air bubbles to the edges. Pop any air bubble you see; this will help create a tight and smooth crumb.) Fold the two long edges to the center, slightly overlapping. Roll to a rectangle about 10″ x 4″, again doing your best to fully degas the dough, then roll up tightly like a jelly roll. Pinch seam to seal. Repeat with other two portions. (See photos above for visual cues.)
  6. Proof the dough: Transfer rolls to a loaf pan, seam sides down. Cover loosely with plastic and allow to rise at warm room temperature (~80-82F) until dough roughly triples in volume and nearly fills the tin (if using a Pullman Pan; in a 9×5 pan it should rise about 1″ above the rim), about 3.5-4 hours.
  7. Preheat the oven and bake the loaf: About 45-60 minutes before baking, preheat oven to 400F with a rack in the middle. After the dough has finished proofing, brush lightly with milk, transfer to oven, and bake for 20 minutes. After 20 minutes, reduce the heat to 350F and continue baking for 10-15 minutes, or until the internal temperature is at least 195F. If the loaf is browning too quickly, tent a piece of foil over the top to keep from burning. When the loaf is finished, immediately remove from the pan and turn onto a wire rack. Brush melted butter over the top and sides while the loaf is still warm, if desired (this helps create a soft crust). Allow to cool completely before slicing. Store leftovers in a sealed plastic bag.

Related recipes and links:

side view sourdough shokupan

100% Whole Wheat Sourdough Sandwich Bread with Maple and Oats

whole wheat sourdough sandwich bread

Making a 100% whole wheat sourdough sandwich bread has been on my baking bucket list for a long time. With cookbook recipe testing finished, the time was finally right! Although this loaf took many, many trials, I am pleased with how wholesomely delicious it turned out!

While I often replace about 30% of the flour in my go-to soft sourdough sandwich bread with whole grains, I knew making a completely whole wheat loaf would require some adjustments. One adjustment was amount of dough — because whole wheat does not rise as much as white flour, I had to increase the amount of dough in the tin to end up with slices that I considered tall enough.

Another adjustment was fermentation timetable. There is less “wiggle room” when it comes to whole wheat — the added nutrients cause fermentation to move quickly, which can cause the dough to overproof if you aren’t paying attention. Overproofing whole wheat doughs can lead to unpleasant sourness and a rougher crumb. For these reasons, I make this loaf all in one day (minus building the levain and soaker, which I prepare the night before). I experimented with refrigerating the dough partway through bulk fermentation (which I often do with other enriched doughs), but even with my fairly cold fridge the dough rose more than I expected and I ended up with overly sour loaves.

In addition to whole wheat flour, I decided to include an oatmeal soaker — I love the nutty tenderness oats add! Oats also hold on to moisture, helping this bread stay soft for days (though I especially enjoy this bread toasted)! I also used milk powder, maple syrup, and oil for additional softness and subtle sweetness. You can omit the milk powder if you want to keep this bread completely vegan, or try substituting a non-dairy milk powder. All in all, this loaf is nutty, wholesome, and just subtly sweet — — perfect for sandwiches and toast!

A few additional notes:

  • If you’ve made any of the enriched sourdough loaves on this site, you may remember that two keys to a soft crumb and good rise are thorough mixing and full proofing. This is still the case with this loaf. However, it is easy to overknead whole wheat dough, especially using a stand mixer; go slowly and check the dough often for the windowpane. (Alternatively, you can knead this dough by hand.)
  • If you follow me on Instagram, you may know that I worked quite a bit on trying to eliminate some small dense areas that can show up on the bottom and sides of pan loaves, particularly when using a 9x4x4 pullman loaf tin. After talking to some other bakers, a lot of reading, and additional tests, I’ve concluded that provided your fermentation is on point, this probably happens because the dough is being compressed as it rises and bakes. I don’t notice this issue in a standard 9×5 loaf tin (see comparison photos below), which has tapered sides (allowing the loaf to relax outwards). To me, this is an aesthetic issue — I don’t notice these areas when I eat the bread. Personally, I am willing to sacrifice a “perfect” crumb for a nice, tall slice; so I will continue to happily use my Pullman pan for this loaf! Keep in mind that there may be other reasons for dense spots — underfermentation or underbaking being the main ones.
  • There are many different ways to shape a sandwich loaf; I describe one I like below. It is similar to how I shape my soft sourdough sandwich bread; but instead of dividing the dough into three pieces, I keep it in one piece — the dough seems to compress a little less this way.
  • It’s important to bake and cool this loaf fully. Make sure the very center of the loaf registers 205F — there’s a lot of moisture in this loaf with the oat soaker, and if you underbake the insides will turn out gummy and the sides may cave in. Additionally, wait for the loaf to cool fully before slicing so the crumb can fully set — I like to give it at least 3 hours.
  • As with all recipes but especially sourdough ones, the times listed below are for guidance/general ballpark. Exact timings will vary depending on the strength of your starter, how fresh your flour is, and the temperature of your environment. Paying attention to the physical cues — the appearance and feel of the dough and amount of rise — is much more important than sticking to a strict timetable!

ww sandwich loaf proofing
ww sandwich loaves two tins
ww sandwich loaf crumb comparison

100% Whole Wheat Sourdough Sandwich Bread with Maple and Oats

Makes one 9x4x4 or 9×5 loaf

Ingredients:

For the stiff sweet levain:

  • 24g ripe 100% hydration sourdough starter
  • 39g water, at room temperature
  • 72g whole wheat flour
  • 11g sugar (I used brown sugar)

For the oatmeal soaker:

  • 60g rolled oats (regular, not quick)
  • 150g boiling water 

For the final dough:

  • 177g water, at room temperature 
  • 34g neutral vegetable or olive oil
  • 45g maple syrup 
  • All of the stiff sweet levain
  • 336g whole wheat flour (I used half organic hard whole wheat and half Flourist sifted red spring wheat)
  • 30g milk powder
  • 9g salt
  • All of the oatmeal soaker

To finish:

  • Additional rolled oats, for garnish (optional)
  • 14g / 1 Tbsp melted butter (optional)

Method:

  1. Make the stiff sweet levain (Day 1, evening): In a medium bowl, mix together the starter, water, whole wheat flour, and sugar until well combined. It should resemble a stiff dough. Cover and ferment at room temperature (74-76F) until tripled in volume and the top is starting to flatten, about 10-12 hours.
  2. Make the oatmeal soaker (Day 1, evening): Place the oats in a small bowl and pour the boiling water over them. Stir to make sure all the oats are hydrated. Cover and let sit until you are ready to mix the dough. (I do this at the same time I mix the levain.)
  3. Autolyse the dough (Day 2, morning): In the bowl of a stand mixer fitted with the dough hook, combine the water, oil, and maple syrup. Tear the ripe stiff levain into several pieces and add it to the liquid. Stir with a flexible spatula to disperse and break up the levain. Add the whole wheat flour and milk powder. Stir just until all the flour is hydrated and there are no dry spots. The dough should be fairly stiff at this point. Cover and let sit for 45 minutes.
  4. Mix the dough: Add the salt to the autolysed dough. Mix on low (speed 1 on a KitchenAid) until the salt is evenly dispersed and the dough begins to smooth out, about 3-4 minutes. Increase the speed to medium low (speed 2-3 on a KitchenAid) and mix until the dough is very smooth and supple and reaches windowpane stage, about 5 minutes. Scrape down the dough hook a couple of times during this process to make sure the dough is evenly mixed. (Alternatively, you can knead by hand — it will take longer, but this dough is easy to handle.)
  5. Add the oatmeal soaker: Add the oatmeal soaker and use your hands to squish it into the dough, folding the dough over onto itself several times to disperse the soaker evenly. Mix on low for one minute to make sure the dough is evenly mixed — do not overmix, or the gluten may start to break down. The dough may be a little sticky, but still strong and smooth and hold together easily. Transfer to a large oiled bowl or container for bulk fermentation. Desired dough temperature is 76-79F.
  6. Bulk fermentation: Let the dough rise at room temperature until it has risen 60-75%, about 2-3 hours at 75-77F. Because the dough was well-developed during mixing, there’s no need to do any stretches and folds (though you can if you want to). When ready to shape, the dough should feel airy and puffy, but still strong — do not push the bulk too far as the high whole-grain percentage can cause the dough to overferment quickly.
  7. Shape: Turn the dough onto a lightly floured surface. To create a very tight, even crumb (my preference for sandwich breads), use a rolling pin to roll the dough into a rectangle about 9 x 13. Starting with a short edge, roll the dough up tightly like a jelly roll. Let rest 10 minutes, uncovered. Roll into a rectangle again, along the seam, and re-roll like a jelly roll as tightly as possible. (Try to get the short edge as close to 9″ as possible, but a little under is fine — the dough will relax to fill the tin.)
  8. Coat: Lightly grease a 9x4x4 or 9×5 loaf pan. If you want to coat your loaf with oats, lay down a clean, lint-free tea towel and sprinkle with a thin, even layer of rolled oats. Lightly spritz the shaped loaf with water, then carefully flip the loaf onto the towel, seam side up. Use your hands to rock the loaf back and forth a few times so that the oats stick to the loaf. Transfer the loaf to the prepared pan, seam side down. Cover with lightly oiled plastic.
  9. Proof: Proof the loaf at room temperature until it has doubled in size and passes the “poke test” — when you gently poke the loaf with a floured finger, the indentation should fill back very slowly. In a 9x4x4 pan, the dough should have risen about 1 inch above the rim in the center (in a standard 9×5 pan, about 2 1/2 inches). This typically takes me about 1 1/2 to 2 1/2 hours; but exact timing will depend on the warmth of your kitchen and strength of your starter.
  10. Preheat the oven: About 45 minutes before you anticipate your loaf being ready to bake, preheat your oven to 425F with a rack in the middle and a rack below (for steaming, optional). About 10-20 minutes before baking, place a few small dishtowels (preferably ratty ones) in a roasting pan. Pour enough very hot or boiling water over the towels to fully saturate them. Place the roasting pan in the oven on the lower rack. (This is optional but helps create steam in the oven. I find this gives the loaf a better rise and shiny crust without needing to use an egg wash.)
  11. Bake and cool: Bake the loaf for 20 minutes, then remove the roasting pan. Turn the oven temperature down to 400F and continue baking for another 20-25 minutes, or until the top is well browned and the internal temperature of the very center of the loaf reaches 205F. (If the loaf is taking on too much color for your liking, tent it with foil midway through baking.) Once the center has reached 205F, remove loaf from the tin and return to the oven to bake for 1-2 more minutes (optional, for more color on the sides/bottom). Transfer the loaf to a wire rack and brush melted butter over the top and sides — this optional finish helps keep the crust soft and flavorful. Let the loaf cool completely before cutting, at least 3 hours. Store leftovers in a sealed plastic bag for 4 to 5 days, or freeze for longer storage.
WW sandwich loaf pullman profile

Soft sourdough sandwich bread

soft sourdough sandwich bread

Many variations of this soft sourdough bread already exist on this site, but not one for good old white sourdough sandwich bread. This recipe makes a wonderfully soft loaf that my kids gladly eat plain, but it makes a mean sandwich and french toast as well. Using sourdough adds depth of flavor and keeps it fresh for multiple days! You can see me mix a similar style of dough in my Instagram story highlights (“Swirl Bread”), and there are lots of tips in previous posts on how to successfully make this style of bread. In summary, a thorough kneading, proper shaping, and full proofing are key to getting the right “shreddable” texture. It takes a little practice but I think it’s well worth the effort!

Suggested baking schedule:

You can make this bread in one day (there are a couple suggested schedules in my book, Baked to Order), but my preference is to make this loaf over two days. Resting the dough in the refrigerator overnight makes the dough easier to shape and adds an extra depth of flavor. I suggest you try to follow this schedule a couple of times until you’ve made it successfully, then adjust to fit your schedule.

  • Day 1, morning: Build stiff levain (note that you need an active and fed 100% hydration starter to build the levain, so feed as necessary so it will be ready)
  • Day 1, late afternoon/evening: Mix dough and let rise at room temperature for 2 hours, then refrigerate overnight
  • Day 2, morning: Shape dough and proof
  • Day 2, afternoon: Bake

.

sliced soft sourdough sandwich bread

Baker’s notes:

  • The stiff levain is…stiff! It should resemble bread dough. I like using a stiff levain as it adds additional strength to this enriched dough, which helps for the extended periods of fermentation.
  • Due to the enrichments in this dough (which slow fermentation), the final proof for this loaf must be done at room temperature (ideally 78-80F).   
  • It is possible to knead this dough by hand, though it will take considerably longer and can be quite sticky especially once the butter is added. If kneading by hand, I suggest using a slap and fold technique as demonstrated here. Consider it your workout for the day! 
  • If you have a 13x4x4 pullman pan, make 1.5x this recipe. Baking time might be a few minutes longer.
  • Please note that as with all recipes (but particularly sourdough ones), timings are only estimates. The amount of time your bread takes to proof will depend on the strength of your starter, kneading, and dough/room temperature. Also, starters that are not sufficiently strong enough and dough that is under/overkneaded can result in bread that does not rise as high — though the resulting loaf is usually still delicious!  

Soft Sourdough Sandwich Bread

Makes one 9x4x4 or 9×5 loaf (I absolutely love using my Pullman Pan for this!)| Adapted from Baked to Order and The Fresh Loaf

Ingredients:

For the stiff levain:

  • 18g ripe, active sourdough starter (100% hydration)
  • 31g milk
  • 57g bread flour

Final dough:

  • 142g bread flour
  • 142g all-purpose flour
  • 35g granulated sugar
  • 1 large egg (~50g)
  • 135g milk, cold
  • 21g milk powder
  • All of the levain, fully ripened
  • 7g salt
  • 35g unsalted butter, softened

To finish:

  • Milk, for brushing
  • Melted butter, for brushing

Method

  1. Make the stiff levain: In a medium bowl, mix the starter, milk, and flour together to form a stiff dough. Cover the bowl and ferment the levain at warm room temperature until more than doubled in volume, puffy, and domed, about 8 to 12 hours.
  2. Autolyse the dough: In a bowl of a stand mixer fitted with a dough hook, mix together all final dough ingredients except the salt and butter until just combined. Cover and autolyse (rest) for 30-60 minutes.
  3. Mix the dough: Add salt, and knead dough on low until gluten is moderately developed, about 5 minutes. The dough will start out sticky and rough but should gradually come together and feel smooth and stretchy. Add the butter in two batches, mixing in the first portion completely before adding the second. Continue kneading on low/medium-low until the gluten is very well developed and the dough passes the windowpane test as demonstrated here. Timing will depend on your flours and mixer, but usually takes about 5-10 minutes after the butter has been added. The dough should be smooth and supple (and quite lovely to handle!). Desired dough temperature is ~76-78F.
  4. Bulk rise and refrigerate dough: Transfer to a clean and lightly oiled bowl, cover, and bulk rise at warm room temperature for 2 hours. The dough will be noticeably puffed, but not doubled. Stretch and fold once, cover tightly with plastic wrap, and refrigerate overnight (at least 6 hours, and up to 24).
  5. Bring dough to room temperature: The next day, take the dough out and transfer to a lightly floured surface. Divide it into 3 or 4 equal parts and lightly shape each into a ball. Rest for one hour, covered by lightly oiled plastic.
  6. Shape the dough: Using a lightly floured rolling pin, roll each ball into an oval and roll up (like a jelly roll). Rest for 10 minutes. Roll each piece into an oval again, along the seam, and re-roll as tightly as possible. Transfer rolls to a loaf pan, seam sides down. Cover loosely with plastic and allow to rise about 6-8 hours at warm room temperature (78-80F). The dough should roughly triple in volume and nearly fill the tin (if using a Pullman Pan).
  7. Preheat the oven: About 1 hour before baking, preheat oven to 400F with a rack in the middle. After the dough has finished proofing, brush lightly with milk, transfer to oven, and bake for 20 minutes. After 20 minutes, reduce the heat to 350F and continue baking for 10-15 minutes, or until the internal temperature is at least 195F. If the loaf is browning too quickly, tent a piece of foil over the top to keep from burning. When the loaf is finished, immediately remove from the pan and turn onto a wire rack. Brush melted butter over the top and sides while the loaf is still warm, if desired (this helps create a soft crust). Allow to cool completely before slicing. Store leftovers in a sealed plastic bag.

sliced sourdough sandwich bread

sandwich bread slice