Homemade Toaster Strudels

toaster strudels

In the world of packaged breakfast pastries, I have always maintained that toaster strudels > pop tarts. Give me flaky pastry and cream cheese icing over non-flaky pastry and royal icing any day, please and thank you!

My homemade version of toaster strudels feature all-butter rough puff pastry, a pleasantly tart fruity filling, and a colorful squiggle of cream cheese icing. If you want to serve these for breakfast I recommend making the pastry and jam the night before for best results — the pastry needs time to chillax (chill and relax), and you want your filling completely cold before assembling. Of course, if you wanted to serve these as dessert you could do this all in one day!

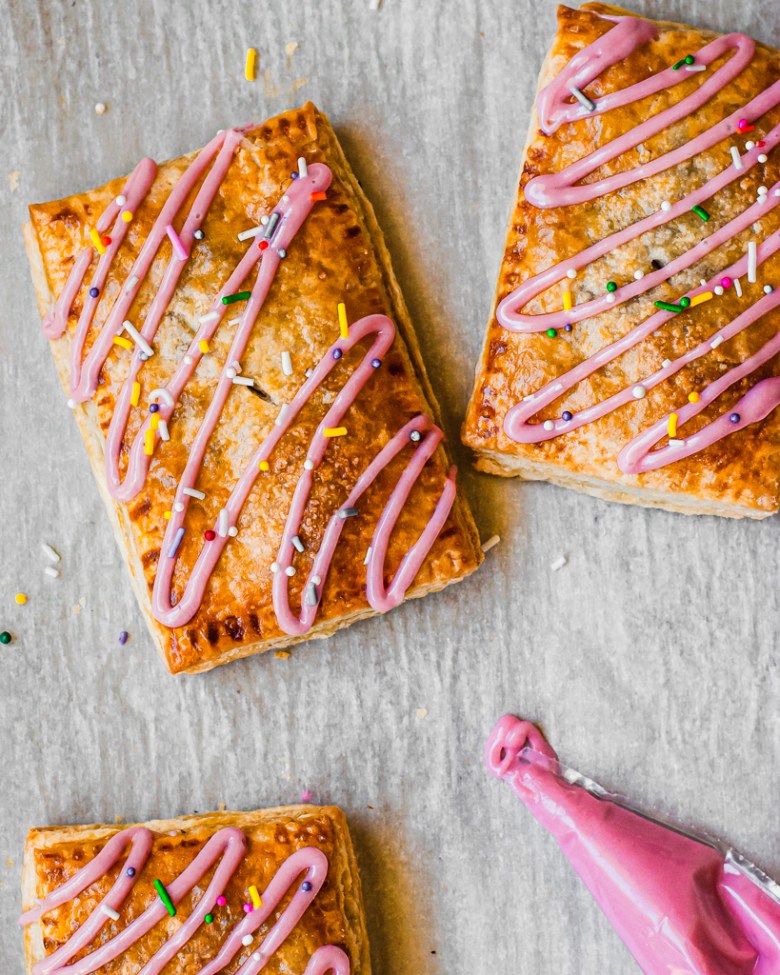
I filled my strudels with a thick rhubarb and berry jam, since that’s the fruit I had on hand. It was pleasantly tart, which contrasted excellently with the rich pastry and sweet icing. I also added a splash of elderflower liqueur for a fresh floral note — totally optional, but highly recommended if you have it on hand!

If you don’t have rhubarb and berries, you could sub in your favorite jamm-able fruits or even use some storebought preserves. If you’re using fresh fruit, cook down the filling enough so that it holds its shape, which will make assembly much easier. I’d love to try these with sour cherries and stone fruits later this summer! If you’re really looking to save time, you could also use store-bought puff pastry (for a standard box with 2 pieces, I’d cut each sheet into 6 rectangles). However, unless you spring for all-butter store bought puff pastry (which tends to be pricey), I highly recommend taking the time to make the rough puff — the taste is so much better!

Now, I will admit that pop tarts edge out toaster strudels in presentation — who can compete with colorful icing and sprinkles? So I stole a note from the pop tart playbook and added both for a little extra cheer to my pastries. My kids’ eyes practically popped out of their heads when they saw the pastries, and they were so excited to decorate their own. In other words: TOTALLY WORTH IT.

Homemade Toaster Strudels

Makes 6 strudels

Ingredients:

For the strudels:
  • 120g chopped rhubarb
  • 160g mixed berries (fresh or frozen)
  • 40g granulated sugar
  • Juice of half a lemon
  • Pinch of salt
  • 1 1/2 tsp elderflower liqueur (optional)
  • 1/2 recipe rough puff pastry
  • 1 egg, whisked with 1 tsp milk or water and a pinch of salt, for egg wash
  • Extra granulated sugar, for sprinkling
For the icing:
  • 60g cream cheese, at room temperature
  • 60g icing sugar, sifted
  • Pinch of salt
  • 1/2 tsp vanilla extract
  • Gel food coloring (optional)
  • Sprinkles (optional)

Method:

  1. Make the filling: In a medium saucepan, combine the rhubarb, berries, sugar, lemon juice, and salt. Cook over medium-high heat, stirring and mashing the fruit frequently, until the mixture comes to a boil. Reduce the heat to medium-low and continue cooking, still stirring frequently, until the mixture is very thick and the fruit has completely broken down, about 6-8 minutes. Remove from heat and add the elderflower liqueur, if using. Transfer to a heat-proof container. Cool to room temperature, then cover and refrigerate until completely cold, at least 1 hour.
  2. Assemble, bake, and ice the strudels: On a well floured surface, roll the pastry into a long rectangle slightly larger than 9″ x 19.5″. The pastry should be between 1/8″ and 1/4″ thick. Trim the edges to neaten, then use a pastry wheel or sharp knife to cut the pastry lengthwise into 2 long rectangles (each about 4.5″ x 19.5″). Cut each rectangle into 6 equal pieces. You should end up with twelve 4.5″ x 3.25″ rectangles. Transfer the rectangles to a parchment-lined sheet pan and chill for 10 minutes. Meanwhile, preheat the oven to 400F with a rack in the middle.
  3. Once the pastry has chilled, brush the edges of 6 rectangles with egg wash. Divide the filling among the 6 rectangles, about a heaping tablespoon each. Use the back of a spoon to spread into an even layer, keeping the egg washed edges exposed. Top each rectangle with one of the remaining rectangles, pressing the edges firmly to seal. Trim the edges with a sharp knife to neaten, if needed. Use the tines of a fork to crimp the edges all around. Freeze the strudels until the pastry is firm, about 20-30 minutes.
  4. When ready to bake, brush the strudels evenly with egg wash. Use a sharp paring knife to cut a small venting hole on the top of each one. Sprinkle the tops generously with granulated sugar. Stack the baking sheet on top of a second baking sheet to keep the bottoms from scorching during baking.
  5. Bake the strudels for about 25-30 minutes, or until the pastry is deeply golden. Rotate the sheet halfway through baking for even browning. Transfer the sheet to a wire rack to cool for 10-15 minutes before icing.
  6. When ready to ice, beat together the cream cheese, icing sugar, salt, and vanilla until smooth. Beat in a drop of food coloring, if desired. Transfer icing to a small piping bag and snip a small hole off the end. Pipe the icing onto the strudels and garnish with sprinkles, if desired. Let icing set for about 5 minutes before serving. Strudels are best served the day they’re baked.

Sourdough Fruit Danishes

diamond danish

Laminated dough is the perfect blank canvas for a baker. It can go sweet or savory, and you can shape it in so many ways. I’ve used this sourdough danish dough previously to make these delicious morning buns, and in this post I’m giving just a couple more ways to put this pastry to work.

While there are a ton of ways you can shape danishes, I’m partial to the pocket and diamond shapes because they accommodate a good amount of filling. I almost always fill my sweet pastries with either cream cheese filling or frangipane — both are simple to whip up and complement any number of fruits. I like using cream cheese with berries (or a dollop of jam or lemon curd) and frangipane with plums, pears, rhubarb, and apples — but experiment with what you have and come up with your own favorite combos! Enjoy!

A few notes:

  • The proofing time for these danishes can vary quite a bit depending on the temperature of your kitchen. For me it usually takes about 2 hours at warm room temperature (about 80F). Proof them until they’re double in size, very puffy, and jiggle when you shake the pan. The oven with the light on and a pan of warm water is a great proofing spot — just make sure to take the danishes out when preheating the oven!
  • To make sure the bottoms of the danishes don’t get too dark before they bake through, I bake these pastries on a two baking sheets stacked right on top of each other. If you like the bottoms extra crisp, this isn’t necessary.
  • I like finishing fruit danishes by brushing the fruit with a bit of simple syrup right after the danishes come out of the oven. It gives the fruit a little bit of shine and your pastries that special little bakery touch.
pocket danish
diamond danish prebake

Sourdough Fruit Danishes

Makes 6 danishes

Ingredients:

  • 1/2 recipe sourdough enriched danish dough
  • 1 recipe cream cheese filling or frangipane filling (see below)
  • Fresh fruit such as berries or plums — depending on type/size of fruit, you may need several berries or several slices of fruit per danish; can also use a not-too-runny jam/preserves
  • 1 egg beaten with 1 tsp milk or water and a pinch of salt for egg wash
  • Turbinado sugar, optional
  • Simple syrup, optional
  • Powdered sugar, optional
For the cream cheese filling:
  • 113g cream cheese, softened (about half a block)
  • 2 Tbsp sugar
  • Dash of vanilla extract
  • Pinch of kosher salt
  • Squeeze of lemon juice
For the frangipane filling:
  • 100g unsalted butter, softened
  • 100g caster sugar
  • 1 large egg
  • Pinch of salt
  • 1 tsp vanilla extract
  • 100g almond flour
  • 15g AP flour

Method:

For the cream cheese filling:
  1. Combine the cream cheese, sugar, salt, and vanilla in the bowl of a stand mixer fitted with the paddle attachment (a hand mixer also works). Mix on low until smooth. Scrape down the sides and add lemon juice a tsp at a time to taste. Transfer to a pastry bag. Filling can be prepared up to 3 days in advance and refrigerated; bring to room temperature before piping onto danishes.
For the frangipane filling:
  1. In a small bowl, beat together the butter and sugar until well combined. Add the egg, salt, and vanilla, and beat until combined. Add the almond and all purpose flour and fold in using a silicone spatula or wooden spoon. Transfer to a pastry bag. Filling can be prepared up to 3 days in advance and refrigerated; bring to room temperature before piping onto danishes.
For the danishes:
  1. On a lightly floured surface, roll the danish dough into a large rectangle about 10″ x 14″. Trim the edges so you have a neat rectangle measuring 9″ x 13.5″. Cut dough into six 4.5″ inch squares. Stack, cover with plastic wrap, and refrigerate for about 10 minutes to relax the gluten.
  2. Stack two large baking trays together (see notes above) and line the top tray with parchment paper. Remove the pastry from the refrigerator (I like to work with 2-3 squares at a time, leaving the rest refrigerated). Shape into pockets or diamonds as desired and transfer to prepared baking sheet. (See below.)
  3. Brush the shaped pastries with egg wash and cover loosely with lightly oiled plastic wrap. Place in a warm area of the kitchen (around 78-80F — no hotter than 80F or the ) to proof until doubled in size and layers are very visible — about 2-3 hours. Prepare your filling of choice while the pastries proof, if you haven’t already.
  4. When the pastries are nearly finished proofing, preheat oven to 425F with a rack in the middle. Pipe desired filling into the center of the pastries, about 1-2 Tbsp each. Top with fruit, pressing lightly to adhere. Sprinkle with turbinado sugar if desired.
  5. Bake at 425F for 10 minutes, then turn the oven down to 375F and bake for another 10-20 minutes, or until well risen and browned. Brush the fruit with simple syrup after removing from oven, if desired. Cool for about 10 minutes before dusting with powdered sugar and serving. Danishes are best eaten the day they’re baked, but reheat well the day after in a 350F oven for 5-10 minutes.
For shaping:
  1. For the “pocket” shape, dab a little filling or egg wash in the center of the square. Fold the two opposing corners into the center, pressing fairly firmly to stick. Repeat with the opposite corners. If the corners pop open during proofing, gently press them back down before adding filling.
  2. For the “diamond” shape, gently fold the pastry square on the diagonal to form a triangle, making sure the corners line up. Using a sharp knife, make two cuts parallel to the sides of the triangle, leaving about 1/4″ of pastry on the edges. Don’t let the cuts meet or you will end up with two pieces of pastry! Unfold the dough and orient the square so it is like a diamond. Fold one edge over so it meets the cut you just made. Repeat with the other edge to form a diamond. You can watch me forming this shape in my Instagram stories — look for the Diamond Danish highlight.
single diamond danish
pocket danish 2


Cranberry Cream Cheese Turnovers

cranberry cream cheese turnovers

If it were up to me, every weekend would start with homemade pastries. Taking a little extra time in the morning to make something beautiful, buttery, and delicious is a special form of indulgence. Now that the weather is a bit cooler, I’ve been trying to get in a little lamination practice. It’s actually quite difficult for me to find all-butter puff pastry around here, so I’ve been making this rough puff recipe (with two extra folds) as practice for making the real thing later on this winter.

If you can make pie dough, you can make rough puff. It’s a great thing to have on hand for weekend pastry cravings or quick appetizers. But if you’ve got easy access to all-butter puff pastry, certainly go that route if you prefer.

I’ll be honest: when making morning pastries I often don’t measure my filling ingredients. Usually I use a bit of whatever I have lying around: in this case, it was some leftover liquid cheesecake from Christina Tosi’s All About Cake, and the dregs of a bag of fresh cranberries. I think leftover cranberry sauce would be great here (as long as it’s not too runny), or even another thick jam. I do think a tart fruit works really well in these turnovers — it’s a perfect foil to the rich pastry and tangy cream cheese. At any rate, two tablespoons of filling for each pastry is about right. And since I assume most of you don’t have liquid cheesecake lying around, I’ve provided some classic cream cheese filling measurements.

One final thing — I’ve finally put together an Amazon page with some of my favorite baking supplies! I hope you’ll take a look if you’re looking for some gifts for the bakers in your life (or for yourself ;)). These are the tools and books I use most often in my own kitchen and am happy to recommend. Please check it out!

Cranberry Cream Cheese Turnovers

Makes 8 large turnovers

Ingredients:

  • 2 sheets of puff pastry, thawed if frozen (homemade or storebought)

For the cream cheese filling:

  • 113g cream cheese, softened (about half a block)
  • 2 Tbsp sugar
  • Dash of vanilla extract
  • Pinch of kosher salt
  • Squeeze of lemon juice

For the cranberry filling:

  • 1 c cranberries
  • 30g granulated sugar
  • 30g dark brown sugar
  • Juice of half a lemon
  • Pinch of salt

To finish:

  • 1 egg, whisked with a splash of milk or water
  • Turbinado or sanding sugar

Method:

  1. Preheat oven to 400F with racks in the upper and lower third, and line two large baking sheets with parchment paper or silicone baking mats.
  2. Roll each sheet of pastry into a large square about 1/8 – 1/4″ thick (10-12 inches). Trim the edges to neaten and cut each square in quarters for a total of eight squares. Refrigerate pastry while you prepare the fillings.
  3. For the cream cheese filling, combine the cream cheese, sugar, salt, and vanilla in the bowl of a stand mixer fitted with the paddle attachment. Mix on low until smooth. Scrape down the sides and add lemon juice a tsp at a time to taste.
  4. For the cranberry filling, combine all ingredients in a small bowl and mix to combine.
  5. Place about 1 Tbsp cream cheese filling and 1 Tbsp cranberries on each square. Brush the edges lightly with the egg wash. Fold each square diagonally to form a triangle. Use a fork to crimp the edges to seal. Refrigerate turnovers for 15 minutes, or until pastry is firm.
  6. Brush the tops lightly with egg wash and sprinkle generously with sugar. Bake for 20-30 minutes, rotating the pans halfway through, or until pastry is well browned. Cool slightly on a wire rack before serving.