Note: This post contains affiliate links.
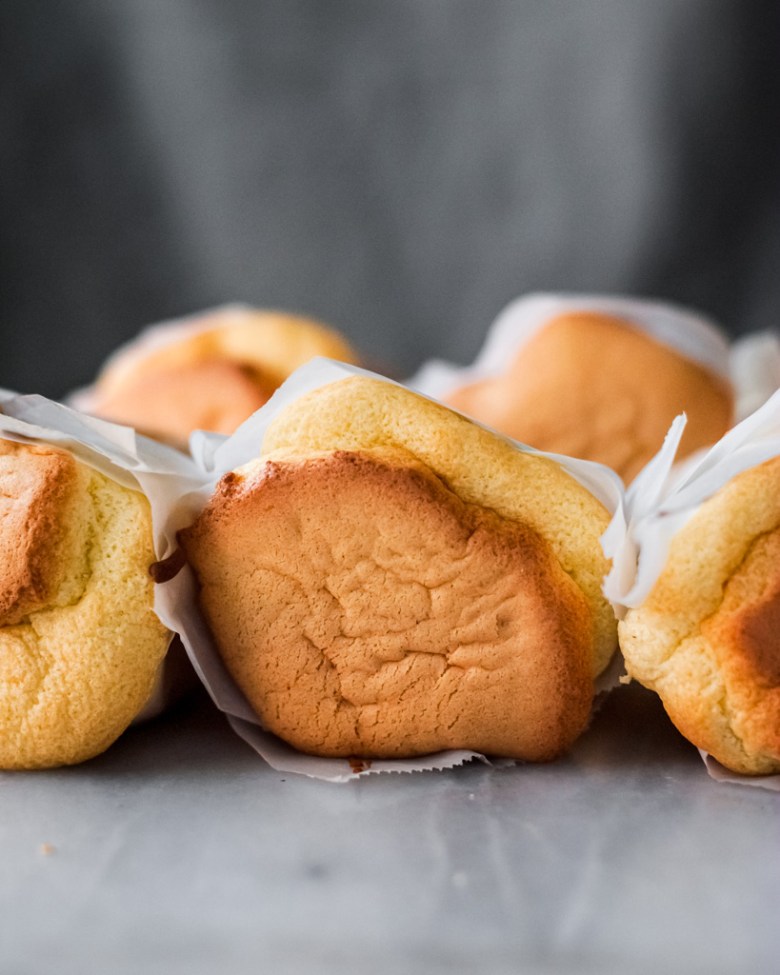
Mildly sweet and impossibly fluffy, these paper-wrapped sponge cakes have been a favorite of mine since childhood. Along with gai mei bao (coconut cocktail buns) and dan tat (egg tarts), these simple cakes were a must-buy every time we visited a Chinese bakery. After years of attempting to recreate these treats at home, I’m so happy to finally share this recipe with you.

Tang-mian or “cooked dough” method
For this recipe, I use a technique known as tang mian, or cooked dough. Basically, the flour is “cooked” with heated oil and milk before getting mixed with other ingredients. Pre-coating the flour with fat limits gluten formation and yields an extra fluffy, moist, and cottony-textured cake. I’m not sure exactly where this technique originated, but it’s been popular amongst Asian bakers for quite some time. I’ve been experimenting with tang-mian recently and appreciate the textural difference particularly in tall cakes (less so in roll cakes, but that’s another recipe for another day). Try it and see what you think!
Keys to sponge cake success
As with all sponge-style cakes, the keys to success for these cupcakes are properly whipped egg whites and good folding technique.
This cake batter doesn’t contain any leavening agents (i.e. baking powder or soda). Instead, the rise all comes from the meringue — egg whites and sugar that are whipped to stiff peaks and folded into the batter.
I also use cold egg whites for this recipe. While most North American sponge or chiffon cake recipes direct you to use room temperature eggs, Asian cake recipes often call for using cold egg whites. Cold egg whites take longer to whip to stiff peaks, but this allows time to form a very fine and strong meringue with minimal risk of overbeating (a pinch of cream of tartar helps too). I mix on no higher than medium speed for.a smooth meringue with very small, even bubbles — this results in velvety-textured, smooth cake with no unsightly holes. You want to whip the meringue to stiff, shiny peaks for this recipe. This article from Fine Cooking pictures the various stages of meringue — very helpful!
Once you’ve created your perfect meringue, the trick is to incorporate it into the rest of the ingredients while still retaining the structure and air you’ve worked so hard to create. I start by whisking a small amount of meringue into the yolk batter to “temper” it, then scraping the yolk batter over the meringue and using a whisk to fold the two mixtures together. When just a few streaks of white remain, I switch to a silicone spatula and finish folding until the batter is all one color. You can also fold the meringue into the yolk batter in a few portions; but after making many, many chiffon and sponge cakes I find this method is more efficient — plus, I don’t end up with any film of yolk batter at the bottom of my mixing bowl. But use whatever folding method you prefer!
The molds

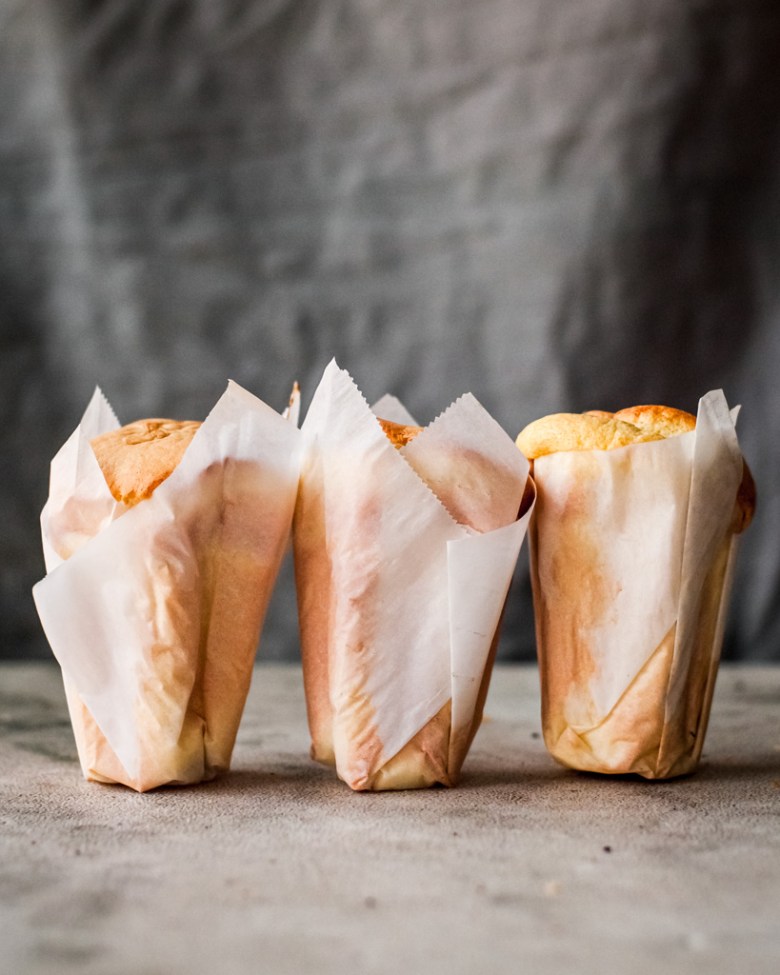
If you grew up eating paper-wrapped sponge cakes, you may know that they are typically baked in flower-shaped individual tins. These tins are taller than typical cupcake molds and give these cakes their iconic shape. I got these flower cake molds from Hong Kong via a very kind friend. They are just under 2 3/4″ tall, just under 3″ wide at the top, and 1 7/8″ wide at the bottom (7cm tall, 7.1cm wide on top, 4.5cm wide on bottom).


Here are a few sources and ideas for finding for these tins:
- These LoBake molds are the exact tins I have.
- If you have an Asian kitchen supply store or restaurant supply store in your area, check to see if they carry these molds or something similar. Search for popover molds, rum baba molds, dariole molds, or individual pudding cups. Many of these stores may not list their entire inventory online, so call or visit and bring some photos with you. If you’ve found some tins in your area, please comment with the name/city of the store!
- The closest things I’ve seen on Amazon are these popover molds (size D), these pudding molds, and these individual tumblers. These flower-shaped molds are the same shape and brand as mine, but bigger.
Because I have such strong memories associated with these paper-wrapped cakes, using the proper molds absolutely enhanced my enjoyment of making them. The memories are not just about the taste of the cake — it’s the look and feel of them in your hand, the memory of peeling off the paper and slowly shredding off long pieces. If you have similar nostalgia and want to recreate this specific food memory, I think it’s 100% worth it to track some down.
HOWEVER! You can bake this batter in other cupcake or popover tins or even oven-safe paper cups — the cakes will still taste good. Here’s how I would calculate how much batter to fill a different-sized tin.
- Weigh how much water it takes to fill your mold to the top and note the number in grams. For reference, one of my flower-shaped tins holds 180g of water, filled right to the top. You’ll sse these two numbers to calculate about how much batter to use per tin and your yield.
- For example, one of my regular cupcake wells fits 100g of water. 100/180 = ~0.56. So, one of my regular cupcake wells holds 56% of the volume of one flower tin.
- I use ~90g of batter per flower-shaped tin. Based on the previous calculation, I need 56% of that amount to fill a regular cupcake well. 90 x 0.56 = ~50. So I would use about 50g per cupcake mold, for a yield of 10-11 cupcakes. (90 x 6 = 540, total batter yield. 540 / 50 = 10.8. The recipe makes a little more than 540g to account for some loss in the bowls and utensils, so you should be able to get 11.)
- Please note that the yield and baking time will vary depending on the size of your tin(s). Smaller, shallower cakes will bake faster than taller, thicker cakes.
It’s important to line whatever molds you use with parchment paper that extends the top edge. These delicate cakes rise quite a bit during baking and need the support. For my molds, I cut 7.5″ square papers out of parchment and followed this lining technique from Christine’s Recipes. For best results, take the time to crease the papers and get them to lie as flat as possible within the mold so batter doesn’t flow between the folds of the paper. I do NOT recommend using the method where you squish a paper into the mold using a similar-sized cup; though you can use a second mold to press the paper in tightly once you’ve folded and creased it.
Baker’s notes:
- For best results, weigh your yolks and whites for this recipe. I use large eggs that typically weigh about 60g with shell, but even so I have noticed a surprising variance in how much large eggs weigh from brand to brand.
- Cake flour helps achieve the very cottony, fine texture that is characteristic of these cakes. I do not recommend replacing with all-purpose. Cake flour tends to clump so I I sift it twice, once before adding to the milk-oil mixture and another time when I add it to the liquid.
Chinese Bakery Style Paper-Wrapped Sponge Cakes
Makes 6 large flower-shaped cupcakes (please read notes under “The Molds” if using different tins)
Ingredients:
- 84g whole milk
- 50g neutral oil (such as grapeseed or canola)
- 1/8 tsp kosher salt
- 1 1/2 tsp vanilla extract
- 100g cake flour, sifted
- 100g egg yolks (from about 5 large eggs), cold
- 150g egg whites (from about 5 large eggs), cold
- 1/4 tsp cream of tartar (optional — can sub with 1 tsp lemon juice)
- 84g granulated sugar, preferably caster or superfine
Method:
Preheat the oven and prepare the tins: Preheat the oven to 350F with a rack in the middle. Line cupcake tins with parchment paper so the paper extends the rim of the mold (see above video for method). Place tins, evenly spaced, in a 9×13 baking pan or on a sheet tray.
Set up a bain-marie and heat milk and oil: Fill a medium saucepan with 1-2 inches of water. Bring to a simmer over medium-low heat. Meanwhile, whisk together the milk and oil in a medium heatproof bowl. Once the water reaches a gentle simmer, set the bowl over the simmering water (make sure the bottom of the bowl isn’t touching the water). Whisk over the heat constantly until the mixture reaches 150F on an instant-read digital thermometer, about 3-4 minutes. Turn off the heat and remove the bowl.
Make the yolk batter: Whisk the salt and vanilla into the warm milk-oil mixture. Sift in the cake flour and whisk until smooth. Let cool for 1-2 minutes (to avoid cooking the yolks), then whisk in the egg yolks one at a time. The batter should be smooth and shiny. Set aside.
Make the meringue: Place the egg whites in a spotlessly clean bowl — choose something large and wide as eventually you’ll be mixing all the batter in it. Using an electric handheld mixer, whisk egg whites on low until foamy. Add the cream of tartar and continue whisking on low to medium-low until the bubbles tighten and resemble shaving cream. Add the sugar a spoonful at a time, whisking all the while. Turn the speed up to medium and whisk until the meringue holds stiff, shiny peaks when the beaters are raised slowly.
Combine the two batters: Whisk the egg yolk batter briefly to loosen. Add a large spoonful of meringue and fold in using a whisk or flexible spatula. Scrape the egg yolk batter into the bowl with the remaining meringue. Use a whisk to gently but thoroughly fold the mixtures together. Avoid stirring — we want to retain as much air as possible. Once the two mixtures are about 80% combined, switch to a flexible spatula and continue folding until you have one homogenous batter with no streaks of egg white remaining.
Portion the batter: Divide the batter among the prepared tins (for my flower shaped tins, about 90g each). The tins should be filled to the top. I used a medium cookie scoop to portion the batter; alternatively you can transfer the batter to a piping bag and pipe it into the tins.
Bake the cakes: Bake until cakes are golden and springy to the touch and a skewer inserted into the center of a cake comes out clean, about 25-30 minutes. Try not to open the oven until the cakes are close to being done, or the delicate cakes may collapse. Immediately remove cupcakes from the tins and lay on their sides to cool on a wire cooling rack. This helps minimize shrinkage — a little is normal, but if cakes shrink significantly this is usually due to underbaking or a problem with the meringue/folding. Cakes are best enjoyed the day they’re baked, but leftovers can be stored for a couple days in an airtight container at room temperature or the refrigerator. Enjoy at room temperature.