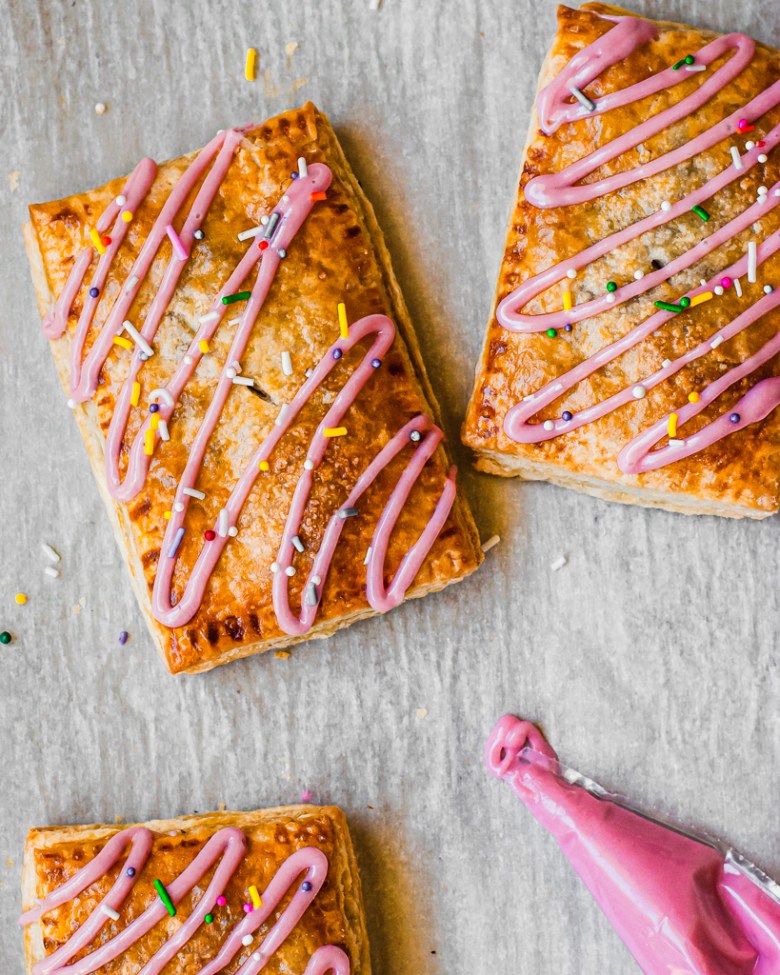
Hi, hello, and happy spring! Just popping in with a fun little recipe to add to your sourdough discard repertoire: brown butter sourdough snickerdoodles.
Sourdough discard is the portion of your starter that you would normally throw away when doing a feeding. I usually store my discard for up to a week in the fridge, using it to make anything from granola to pie crust to chocolate cake. For this recipe, you can use discard that’s at room temperature or straight from the fridge, as long as it’s not overly acidic-smelling or has formed any liquid “hooch” on top.
I prefer to bake these cookies after a short chill, just long enough to make the dough easier to portion. Since this dough does have discard in it, it will continue to ferment if left in the fridge. If you’re not planning to bake off all the cookies at once, I would recommend freezing unbaked dough balls (without the sugar sprinkle) in an airtight bag/container. Bring to room temperature and reroll each portion between your hands (this slightly warms the dough, helping the sugar sprinkle stick) before rolling in sugar and baking.
Small batch brown butter sourdough snickerdoodles
Makes 10 cookies
Ingredients:
For the brown butter sourdough snickerdoodle base:
115g unsalted butter, cubed (cold is fine)
25g milk, cold
140g all-purpose flour
1 tsp cream of tartar
1/2 tsp baking soda
1/2 tsp kosher salt (I use Diamond Crystal; use a scant 1/2 tsp for other brands or 1/4 tsp table salt)
1/2 tsp ground cinnamon
100g granulated sugar
30g light brown sugar
1 large egg yolk, cold
1/2 tsp vanilla extract
60g 100% hydration sourdough discard
For the cinnamon sugar sprinkle:
25g granulated sugar
1/2 to 1 tsp ground cinnamon (to taste)
Method:
Brown the butter: Place the cubed butter in a small, light-colored saucepan over medium-low heat. Once the butter has melted, turn the heat up to medium-high. Stir frequently with a heatproof spatula, scraping the sides and bottom of the pan as needed. The butter will crackle, foam, turn clear gold, then finally start browning. It’s done when the crackling subsides and you smell toasted nuts. This process takes about 10 minutes total, but the butter can go from browned to burnt in a flash—so keep an eye on it. Pour the butter and all the toasty bits into a medium bowl. (You should have ~92g brown butter.) Stir in the cold milk and let cool for 5 minutes.
Combine the dry ingredients: In a small bowl, whisk together the flour, cream of tartar, baking soda, salt, and cinnamon. Whisk for a good 30-45 seconds to ensure the leaveners and spices are evenly distributed.
Combine the wet ingredients: Whisk the sugars into the butter-milk mixture until combined. Whisk in the egg yolk and vanilla until smooth. Add the sourdough discard and whisk until totally smooth.
Add the dry ingredients and chill the dough: Add the dry ingredients to the wet and use a flexible spatula to mix just until no streaks of flour remain. Cover and refrigerate for about 30 minutes, or until the dough is cool but still scoopable (it will be fairly soft).
Preheat the oven and prepare pans and cinnamon-sugar: While the dough is chilling, preheat the oven to 400F with a rack in the middle. Line two baking sheets with parchment paper. Prepare the sugar coating by whisking together the granulated sugar and cinnamon.
Portion the dough: Portion the cookie dough into 10 equal golf-sized balls, about 47 grams each. Roll between hands into a smooth ball, then toss in sugar coating. Place the cookies on the prepared baking sheets about 2 inches apart. Sprinkle each with a bit more sugar coating.
Bake the cookies: Bake sheets one at a time for about 9 to 10 minutes, rotating the pan halfway through. Cookies should be puffed and the tops starting to crack, but the centers should still look a little soft. After removing the pan, bang it a couple of times on the counter to help deflate the cookies and get that classic crinkled top. Cool cookies on the pan for about 5 minutes, then transfer to a wire rack to cool completely.
Introducing: the “fast” and ultra-soft version of my soft sourdough sandwich bread! Enriched with milk, milk powder, cream, egg, and butter, this sourdough shokupan style loaf boasts a smooth, bouncy crumb and mildly sweet taste. It’s perfect for sandwiches, grilled cheese, or the best ever French toast.
Compared to previousversions of this bread, I’ve upped the amount of starter in this bread so the bulk fermentation and rising is all done in one day. You will need to build a sweet stiff levain, which I do the night before I plan to mix the dough. While I’ll still continue to use my older formulas (especially when I want to do an overnight proof), I love this new recipe for its speed!
Thanks to the warm fermentation and sweet starter, this bread is very mild with a hint of sweetness, even with a large amount of prefermented flour. I’m happy to add this formula to my arsenal and excited for you to try it!
Tips for sourdough shokupan success:
Sweet stiff levain: For all my enriched sourdough breads I prefer to use a stiff levain — this just means that there is a higher proportion of flour to water in the starter. I don’t maintain a separate stiff starter — whenever I want to make an enriched bread, I just prepare a stiff levain using my 100% hydration starter. In this particular loaf, I add a little sugar to the starter as well to tame the acidity.
Thorough kneading: For best rise and texture, the dough should be fully kneaded to windowpane stage. I first knead the dough without butter until the dough is smooth and the gluten is well-developed; then add the butter slowly and continue kneading until the dough is very strong, smooth, and supple. Please note that the exact timings will vary depending on your flour and mixer; and it is possible to overknead this dough. I suggest checking the dough every couple minutes after all the butter has been added so you get a feel for how the dough is changing and developing.
Warm fermenatation: I keep this dough warm throughout bulk fermentation and proofing, about 80-82F. Because of the high percentage of starter the dough should rise fairly steadily; if not, it may come down to strength of starter, under/over-kneading, or too cool an environment.
Fully fermented sweet starter
Dough at beginning of bulk fermentation
Dough at end of bulk fermentation
Degassing during shaping: For the tightest, bounciest crumb, the dough should be very well degassed at the shaping stage. I also keep the bench rest and shaping times short, as this dough ferments fairly quickly. If you start getting air bubbles under the skin while the dough is resting, it is harder to get a really smooth, even crumb. When rolling the dough, use quick and firm movements with the pin and try to push all the bubbles out from the dough. You shouldn’t need any flour for shaping.
Make the sweet stiff levain: In a medium bowl, mix the starter, milk, sugar and flour together to form a stiff dough. Cover the bowl and ferment the levain at warm room temperature until more than doubled in volume and puffy, about 8 to 12 hours.
Autolyse the dough: In a bowl of a stand mixer fitted with a dough hook, mix together all final dough ingredients except the salt and butter until just combined. Cover and autolyse (rest) for 20-30 minutes.
Mix the dough: Add salt, and knead dough on low until gluten is moderately developed, about 5-7 minutes. The dough will start out sticky and rough but should gradually come together and feel smooth and stretchy. Add the butter in three batches, mixing in each portion completely before adding the next. Continue kneading on low/medium-low until the gluten is very well developed and the dough passes the windowpane test. Timing will depend on your flours and mixer, but usually takes about 5-10 minutes after the butter has been added. The dough should be smooth and supple. Desired dough temperature is ~75-76F.
Bulk fermentation: Transfer to a clean and lightly oiled bowl, cover, and bulk rise at warm room temperature (80-82F) for 2 hours, or until roughly doubled.
Shape the dough: Transfer dough to a clean surface. Divide into 3 parts, shape into balls, and rest for 5 minutes, covered by lightly oiled plastic. Using a rolling pin, roll the first ball into an oval about 9″ x 5″, doing your best to degas the dough. (Roll from the center out, which should push the air bubbles to the edges. Pop any air bubble you see; this will help create a tight and smooth crumb.) Fold the two long edges to the center, slightly overlapping. Roll to a rectangle about 10″ x 4″, again doing your best to fully degas the dough, then roll up tightly like a jelly roll. Pinch seam to seal. Repeat with other two portions. (See photos above for visual cues.)
Proof the dough: Transfer rolls to a loaf pan, seam sides down. Cover loosely with plastic and allow to rise at warm room temperature (~80-82F) until dough roughly triples in volume and nearly fills the tin (if using a Pullman Pan; in a 9×5 pan it should rise about 1″ above the rim), about 3.5-4 hours.
Preheat the oven and bake the loaf: About 45-60 minutes before baking, preheat oven to 400F with a rack in the middle. After the dough has finished proofing, brush lightly with milk, transfer to oven, and bake for 20 minutes. After 20 minutes, reduce the heat to 350F and continue baking for 10-15 minutes, or until the internal temperature is at least 195F. If the loaf is browning too quickly, tent a piece of foil over the top to keep from burning. When the loaf is finished, immediately remove from the pan and turn onto a wire rack. Brush melted butter over the top and sides while the loaf is still warm, if desired (this helps create a soft crust). Allow to cool completely before slicing. Store leftovers in a sealed plastic bag.
I know, I know. Three kinds of dairy, fancy blood oranges, lots of bowls, and a few head-scratching ingredients; all for some blood orange sherbet?
I understand, it’s a big ask. But if you are willing to commit, you’ll be rewarded with the best orange sherbet of your life — intensely fruity and tangy and refreshing. The perfect shade of peachy pink, too (though exact color will vary depending on your fruit!).
The neglected world of sherbet
But first, sherbet: if you’re like me, you may have grown up on those little cups of orange sherbet swirled with vanilla ice cream (the ones with the tiny wooden paddles), or perhaps the occasional scoop of rainbow sherbet. Neither tasted much like orange or rainbows, but they had their place as a refreshing poolside treat.
Sherbet is actually a category of frozen dessert that sits between sorbet and ice cream. Basically, sherbets are fruit sorbets with some added dairy. Sherbets have the bright flavor of sorbet with just a touch of milky richness for body. They’re the perfect palate cleanser and such a fun, overlooked way to preserve the fruits of the season.
If you’re interested in sherbet (or ice cream making in general), I highly, HIGHLY recommend Dana Cree’s book Hello, My Name is Ice Cream, the original source for this recipe. Of all the ice cream cookbooks I own, it’s my favorite in terms of technical knowledge and inspired flavor combos. Although Cree delves deep into the science of ice cream making, it’s all packaged in understandable language and is considerate of the average home churner. Although she has some favorite specialized ingredients, she offers accessible alternatives for those of us who can’t source them easily.
Specialty ingredients and alternatives
Here’s the rundown of a few specialty ingredients needed for this blood orange sherbet and some alternatives if you can’t source them.
Blood oranges: Blood oranges are a variety of citrus known for their deep rosy color and extra-sweet flavor. They tend to taste a little less acidic than regular navel oranges, with undertones of raspberry. Read all about blood oranges at Ask the Food Geek. If blood oranges aren’t available or in season, you can replace the zest and juice with that of another orange-like variety (regular orange, tangerine, cara cara, clementine, etc.). For the amount of juice and zest in this recipe, I used about 5 smallish blood oranges.
Citric/malic acid: These are neutral tasting acids that come in powdered form. They definitely give the sherbet an extra refreshing zing, but you can either omit this if you prefer a less tart sherbet or replace with a squeeze of lemon juice. Citric acid is often available at the grocery store (look near the spices or in the jam/jelly making section); I found both at a beer-making shop; they are also availableonline.
Glucose or light corn syrup: Using an inverted sugar such as glucose or light corn syrup gives frozen desserts a more viscous, less icy texture. Check your local baking supply store for glucose; corn syrup is available in most grocery stores. In a pinch you can replace the inverted sugar with the same weight of granulated sugar, though the sherbet will be more sweet and icy. Read more about using inverted sugar in ice cream in this article on Serious Eats.
Xanthan gum: Don’t let the name scare you — xanthan gum is jut a natural gum that in this case works as a stabilizer, inhibiting the growth of ice crystals. Just a tiny bit drastically improves the texture and shelf life of homemade ice cream. I found mine at the local bulk store and online. If you can’t find xanthan gum, you can replace with 2 tsp of tapioca starch whisked with 2 Tbsp cold water. Stir this slurry into the dairy base after straining out the orange zest and before chilling over the ice bath. (Consult the book for even more alternatives.)
250g blood orange juice, freshly squeezed (zest before juicing)
100g buttermilk
1/2 tsp malic or citric acid or 1 tsp lemon juice (optional)
300g whole milk
100g cream
150g granulated sugar
100g glucose or light corn syrup
1 Tbsp packed blood orange zest
1/4 tsp xanthan gum
Method:
Make the blood orange-buttermilk mixture: In a small bowl, whisk together the blood orange juice, buttermilk, and acid or lemon juice (if using). Refrigerate.
Heat and infuse the dairy: In a medium saucepan, whisk together the whole milk, cream, sugar, and glucose. Cook, whisking frequently, over medium heat, until the sugar is dissolved and the mixture comes to a bare simmer. Remove from heat, stir in the orange zest, and cover. Infuse for 30 minutes.
Chill the dairy: Strain the infused base into a clean metal or glass bowl and discard the zest. Set over an ice bath and until the base is cool to the touch (50F), whisking occasionally.
Blend and chill: Whisk in the xanthan gum and blood orange-buttermilk mixture. Use an immersion blender (or transfer to a traditional blender) to blend until smooth. Cover and refrigerate for at least 4 hours, or up to 24.
Churn and freeze: Churn the chilled base according to the instructions for your machine, until the mixture has the texture of soft serve (for my machine this is about 25 minutes). Transfer to a freezer-friendly container (a loaf pan works well). Cover with parchment paper, pressing it to the surface of the ice cream so it adheres, then cover with a lid. Freeze until firm, at least 4 hours. Ice cream will keep for up to 3 months.
A few days ago, I wandered around a grocery store for the first time in what feels like forever. It’s funny the things we take for granted — I used to drag my kids to do grocery shopping regularly. For a truly gold star outing we’d visit a store with “special carts” — you know, the ones resembling fire engines or tractors complete with mini steering wheels. Yes, it would take us longer to get dressed and in the car than actually shop; but these grocery store trips were a needed diversion during the week, often fueling ideas for the week’s meals and recipes for this blog. I’ve missed it.
Anyways. I managed to snatch a few blood oranges on aforementioned trip, because if you don’t make something with blood oranges are you even a food blogger? Some of my bounty went towards these frangipane sourdough sweet rolls, a variation on my favorite sourdough cinnamon rolls.
These soft, lightly sweet breakfast rolls swap traditional cinnamon-sugar filling for nutty frangipane. Frangipane is truly one of my favorite baking components — whether piped into a tart or spread between layers of dough, it adds rich flavor and a bit of bakery pizazz to any treat (though it couldn’t be simpler to make). Frangipane is also easy to customize: swap the almonds for another ground nut, switch out the sugars, add some spices. Here I opted for fragrant honey rather than regular sugar and added a bit of blood orange zest for extra punch.
These rolls aren’t too sweet, which means you should definitely not hold back on the citrus glaze. Sadly my blood oranges weren’t particularly pink inside so I didn’t achieve that perfectly hued glaze. No big deal. Still delicious.
Baker’s notes:
If you don’t have einkorn/spelt/whole wheat flour, you can omit it and increase both the bread and all-purpose flours to 142g (284g total) in the final dough ingredients.
If you want to have these rolls ready to bake on, say, a Saturday morning, I suggest the building your stiff levain Thursday night, mixing the dough and doing the 2-hour room temp proof on Friday morning, and shaping the rolls right before going to sleep that night. Leave them out on the counter to proof overnight. Then preheat the oven and bake first thing when you get up in the morning. Note that you need a ripe, active 100% hydration starter to build the levain, so make sure your starter is nice and happy by giving it a feeding or two beforehand.
Just for fun, I baked a few of these rolls off in my Nordicware giant popover pan. The rolls turned out cute but this method was messier than I’d like; so next time if I want individual rolls I’ll just use a regular muffin tin. If you do want to try the popover pan, I’d recommend cutting the individual rolls a little smaller (into 10 or 11 pieces rather than 9) and tucking the tail underneath before placing in the pan. Also, make sure to grease the pan well before filling.
Orange and Honey Frangipane Soft Sourdough Sweet Rolls
Make the levain: In a medium bowl, mix the starter, milk, and flour together to form a stiff dough. Cover the bowl and ferment the levain at warm room temperature until more than doubled in volume, puffy, and domed, about 8 to 12 hours.
Autolyse and mix the final dough: In the bowl of a stand mixer fitted with the dough hook, mix together flours, sugar, milk powder, egg, milk, cream, and levain until just combined. Cover and autolyse (rest) for 45 minutes.
Add the salt and knead on medium-low speed until the gluten is moderately developed, about 5 minutes. The dough will start out sticky and rough but should gradually come together and feel quite smooth and stretchy. Turn the mixer to low and add the butter about 1 tbsp at a time, incorporating each batch before adding the next. Turn the speed back up to medium-low and continue kneading until the gluten is very well developed and the dough passes the windowpane test, about 10 minutes. The dough should be smooth and supple. Shape the dough into a smooth ball and transfer to a lightly oiled container.
Bulk fermentation: Cover and let rise at room temperature for 2 hours. The dough will be noticeably expanded, but not doubled. Stretch and fold the dough, cover, and refrigerate for at least 8 hours, and up to 24 hours.
Make the honey frangipane: In a small bowl, mix together the butter, honey, zest, spices, and salt (I just use a spatula). Add the egg and mix until smooth. Fold in the almond and all-purpose flour.
Shape and proof the rolls: When ready to shape, lightly grease a 9 x 9–inch (23 x 23–cm) baking pan or a 9- or 10-inch (23- or 25-cm) round cake pan (preferably aluminum).
Take the dough out of the fridge and transfer to a lightly floured surface. Roll into a 14-inch (36-cm) square, doing your best to maintain an even thickness.
Spread the filling mixture evenly over the dough, going all the way to the edges. Roll the dough up like a jelly roll, pinching to seal. Turn the roll so the seam side is down.
Cut into nine even pieces using a sharp knife or unflavored dental floss (my preferred method).
Transfer the rolls, cut side up, to the prepared pan, leaving space between each (they will grow into each other during proofing).
Cover the rolls with a piece of lightly oiled plastic wrap. Proof at room temperature, about 74-76F, until the dough is very puffy and roughly doubled, about 8 hours or overnight.
Preheat the oven and bake the rolls: About 45 minutes before you’re ready to bake, preheat the oven to 400F with a rack in the middle. Bake until the rolls are lightly golden and register 195 – 200F in the center, about 20 minutes. (Tent with foil partway through baking if browning too quickly.) Transfer to a wire rack to cool while you prepare the glaze.
Prepare the orange glaze: In a small bowl, whisk together the icing sugar and salt. Whisk in the orange juice a teaspoon time until you get a thick glaze that drizzles easily off the whisk (I used the full 1 Tbsp). Drizzle glaze over the rolls and serve immediately.
I’ve been on a pound cake bender this year, baking and tweaking and baking and tweaking to define my ideal. Pound cake may not rank high on anyone’s sexy, exciting baking list, but I love their unassuming simplicity — perfect any hour of the day, just begging to have a sliver sliced off each time you spot it on the kitchen counter.
As with the perfect chocolate chip cookie or the perfect brownie, the definition of “perfect pound cake” varies from person to person. My ideal pound cake is buttery with a dense but smooth / creamy / plush crumb. It should be moist but not overly so, and just sweet enough to enjoy without accompaniment (though a glaze can glam it up for show). Finally, a pound cake should boast a beautifully golden crust with an attractive crack down the center. Let’s dive into my formula and top tips for pound cake perfection!
My formula for plush sour cream pound cake
Traditional pound cake formulas use equal parts (by weight) butter, sugar, eggs, and flour. While you can make a delicious cake using these proportions, many modern bakers (including myself) like to tweak things a bit to create a recipe that aligns with our personal tastes. Here’s a rundown of the ingredients in my pound cake:
Fats: Pound cake equals rich, buttery flavor, so I use mostly unsalted butter in this recipe. Just a touch of neutral oil adds a little extra moisture.
Leavening: Pound cakes traditionally don’t call for any leavening, hence its characteristic dense crumb. I add a small pinch of baking powder for a little lift, but the lion’s share of the rise comes from proper creaming of the butter and sugar (more on this later).
Sugar: For cakes in general, I prefer using superfine / caster sugar as the extra-fine granules dissolve quickly during the creaming process and produce an ultra-fine texture. I usually make my own by processing regular granulated in a food processor for about a minute.
Eggs: I use a combination of whole eggs and yolks for a rich texture that’s not overly bouncy or dry from too much egg white. The yolks add a little extra fat and emulsification power, which allows for more liquid in the cake overall without compromising the structure.
Flour: For this pound cake, I use bleached cake flour. I tested with all purpose and a mixture of cake and all purpose, but using all cake flour by far produced the most even and tender crumb. All-purpose flour in Canada is usually made from hard wheat, which normally doesn’t pose much of a problem in my recipes. But in this case, I noticed that cakes made with all purpose flour would routinely have a few gummy, dense streaks and a less even crumb overall. It’s possible that bleached and lower protein all-purpose flours would work fine, but I haven’t been able to test them out yet. Cake flour tends to clump, so I always recommend sifting it before mixing. For a thorough explanation on cake flour, see this article on Serious Eats.
Dairy: My main change to the classic pound cake formula is replacing some of the fat and eggs with full-fat sour cream, which both adds flavor and keeps the cake tender for days. I add a touch of milk as well so the cake doesn’t get too heavy. I do not recommend substituting the sour cream with low-fat varieties, yogurt or any other dairy product.
Extracts/flavoring: I love the combination of vanilla and almond extracts for a classic bakery-style flavor. Use pure, not imitation, extracts — imitation almond extract in particular can taste harsh and…well, fake. If you don’t like almond extract, replace with more vanilla. As always, a bit of salt helps round out the flavor and keep the sweetness in check.
Pan size: My pan of choice is a 9x4x4 pullman pan, which results in a beautifully tall cake with straight sides. You can substitute a 9×5 loaf pan. Do not use a smaller pan or your cake may overflow; if you only have a smaller loaf pan (8×4 or 8.5×4.5), fill the pan so there’s an inch of space at the top and bake extra batter in mini loaf pans or cupcake tins.
Baker’s Notes:
Use room temperature ingredients! Ensuring all your ingredients are at room temperature is crucial to a properly mixed cake. Butter and sugar will cream up to the right texture without overmixing, and ingredients will blend properly. Butter should be cool but soft enough that it’ll hold an indent if pressed. It should not feel greasy or oily. (If you have an instant-read thermometer, you’re aiming for 60-65F.) Bring eggs and dairy out of the fridge for 1-2 hours before mixing. You can bring eggs up to temperature quickly by soaking them in warm water for a few minutes. You can warm the sour cream/milk on 30% power in the microwave in short bursts; just take care not to go too far (again, aiming for temperature around 65F).
Don’t rush the mixing process. Cream your butter and sugar until it’s noticeably expanded in volume and lightened in color. Proper aeration of the butter is what will give your cake a good rise and even crumb, so don’t cut your creaming short! Mix on medium speed and scrape down the paddle and sides of the bowl periodically to make sure no dense pieces of butter remain. When adding the eggs, go slowly — you’re trying to force liquid and fat together, two things which don’t normally like to mix. I like to lightly beat my eggs and extracts together so I can stream them in gradually. If your eggs are at the proper temperature, they should easily mix into the butter-sugar mixture without breaking. While a curdled batter isn’t the end of the world and should still result in a delicious cake, a properly emulsified batter will bake up with the best crumb and texture.
Bake the cake fully. Pound cakes are thick and dense, so they take a long time to bake — more than an hour! Start checking for doneness until your kitchen smells of buttery goodness and the cake is well risen and golden. Cracks in the surface will be pale, but not wet; a skewer inserted in the middle should come out clean.
Cool completely. The crumb of the cake will continue to set as it cools. Once the pan is cool enough to handle, turn the cake out and wrap in plastic to cool completely before serving. I find pound cakes taste best on the second/third day: the moisture is well distributed and the flavor has time to bloom.
Plush Sour Cream Pound Cake
Makes one 9x4x4 or 9×5 cake
Ingredients:
For the cake:
140g full-fat sour cream, at room temperature
50g milk, at room temperature
150g (about 3 large) eggs, at room temperature
54g (about 3 large) egg yolks, at room temperature
2 1/2 tsp pure vanilla extract
1/2 tsp pure almond extract
180g unsalted butter, at room temperature
scant 3/4 tsp kosher salt (Diamond Crystal)
1/2 tsp baking powder
300g granulated sugar (preferably caster or superfine)
28g neutral oil (I like grapeseed)
250g cake flour, sifted
For the glaze (optional):
70g icing sugar, sifted
Pinch of kosher salt
1/2 tsp hibiscus powder (optional, for color)
1-2 Tbsp milk or cream, plus more as needed
Method:
Preheat oven and prepare pan: Preheat the oven to 350F with a rack in the middle. Grease a 9×4 pullman pan or 9×5 loaf pan (I recommend aluminum, not glass or ceramic) and dust with flour, shaking out the excess.
Prep ingredients: In a medium bowl or glass measuring cup, mix together the sour cream and milk. In a glass measuring cup with a spout, lightly whisk together the eggs, egg yolks, and extracts.
Cream the butter and sugar: Place the butter, salt, and baking powder in the bowl of a stand mixer fitted with the paddle attachment. Beat on medium until smooth, about 2 minutes. Scrape down the paddle and sides of the bowl. Turn the mixer back to medium and add the sugar in a gradual stream. Once all the sugar has been added, continue mixing on medium until pale and very fluffy, about 5-6 minutes. Scrape down the paddle and sides of the bowl 2-3 times during this creaming process to ensure even mixing. Add the oil and mix well to combine.
Add the eggs: With the mixer on medium, slowly stream in the egg mixture about a tablespoon at a time, letting each addition fully incorporate before adding more. Take your time — adding too much liquid at once can cause the mixture to curdle and affect the final texture of the cake. Scrape down the paddle and sides of the bowl 2-3 times during this process. Once all the eggs have been added, continue mixing for about 30 seconds to make sure the batter is well combined.
Alternate the flour and liquid: Turn the mixer down to low. Add the flour and sour cream-milk mixture in five additions, beginning and ending with the flour. Use a flexible spatula to fold from the bottom of the bowl a few times to make sure the batter is well-mixed and no pockets of flour remain.
Bake the cake: Scrape the batter into the prepared pan. Run a chopstick or skewer through the batter to pop any large air pockets, then use an offset spatula to smooth the top. (Note: If desired, rub a butter knife with a little softened butter and slice down the center of the cake — this encourages the cake to split in the middle. Totally optional.) Bake until golden brown and a toothpick inserted into the middle of the cake comes out clean, about 65-85 minutes. (This is a fairly tall and rich cake; err on the side of a few extra minutes in the oven to make sure it’s fully baked through. The pullman pan will take a little longer than a 9×5 pan.)
Cool the cake: Cool the cake for 15 minutes in the pan, then run a thin knife around the edges and turn onto a wire rack. Wrap in plastic and allow to cool completely, at least 3 hours or overnight.
Glaze (optional) and serve: If glazing, unwrap cooled cake and place on a serving platter. Whisk together the icing sugar, salt, and hibiscus powder (if using) in a small bowl. Drizzle in liquid of choice a couple teaspoons at a time, whisking well after each addition, until you reach the desired consistency. Pour or drizzle over cake. Allow glaze to set for 10 minutes before slicing and serving. Store leftovers in an airtight container at room temperature for up to 5 days.
Hello! Just dropping in here with a new cookie recipe for you all: caramelized white chocolate and walnut! These are a quick-and-easy, must-have-cookies-ASAP recipe — it uses melted butter and cold eggs, so you can whip them up on a whim.
These cookies are a variation on the triple chocolate peppermint cookies I posted in December, but here we’re highlighting caramelized white chocolate (or blonde chocolate) — some melted straight into the dough, and more folded in at the end for maximum impact. Caramelized white chocolate has been a trending flavor in the dessert world for about a decade now — while plain white chocolate tends to taste overly sweet and one-note, roasting it produces more complex and toasty flavors. You can make your own caramelized white chocolate by simply chopping up high quality white chocolate and baking it (stirring often) at a 250F until golden and toasty (see this tutorial from David Lebovitz). Or you can buy something like Valrhona Dulcey.
To complement the caramelly sweetness of the chocolate, I added toasted walnuts and a generous pinch of flaky salt. If you don’t have walnuts, I think either toasted hazelnuts or pecans would work nicely here — or even macadamia nuts if you’re a fan of the white chocolate macadamia nut pairing! And while flaky salt is normally an optional garnish, I highly HIGHLY recommend it here. It really helps balance out the cookie and veer it ever so slightly into the salty-sweet category.
After mixing the dough, just a short chill (30 minutes in the fridge, or even 10 minutes in the freezer) helps control spread and produces cookies with a thick, blondie-ish centers. If you bake them straight after mixing, the cookies will spread more and not be quite as soft overall. In the photo below, the top cookie was baked from dough that was chilled for half an hour; the bottom cookie was baked straight after mixing.
These cookies don’t brown much, so just keep an eye on them and bake just until the edges are set but the centers still look soft. They’ll continue to cook and set up on the pan. Enjoy slightly warm with a cup of black coffee (or milk)!
Baker’s notes:
For perfectly round cookies, use a round cookie cutter slightly larger than your cookie or even a spoon or offset spatula to nudge the cookies into shape right after baking. You must do this right when the cookies come out of the oven when they are still a bit malleable.
Don’t want to bake all the cookies off at once? You can keep unbaked dough balls in the fridge for up to 3 days or freeze for longer storage. For cookies chilled longer than half an hour, I find they spread best if you bring them to room temperature before baking (just pull them out while the oven is preheating).
150g chopped caramelized white or blonde chocolate (such as Valrhona Dulcey), divided
175g (1 1/3 c plus 1 Tbsp) all-purpose flour
1/2 tsp baking powder
1/2 tsp baking soda
3/4 tsp kosher salt (Diamond Crystal)
120g granulated sugar
30g light brown sugar
1 large egg, cold
1 large egg yolk, cold
1/2 tsp vanilla extract
100g walnuts, toasted and chopped
Flaky salt, for garnish
Method:
In a small saucepan, melt the butter over low heat. You’re not trying to brown it or drive off any moisture, so don’t let it boil — pull it off when there are still a couple unmelted bits left and let the residual heat finish the job.
While the butter is melting, place the espresso powder and 50g of the chopped caramelized white chocolate in a large bowl. Once the butter has melted, pour it over the espresso-chocolate mixture. Whisk until the chocolate has melted. Let cool for about 5 minutes.
Whisk the sugars into the butter until smooth and combined, followed by the egg and egg yolk. Whisk in the vanilla extract.
In a separate bowl, whisk together the flour, baking powder, baking soda, and salt. Add the dry ingredients to the wet and fold together until just combined. When just a few streaks of flour remain, add the remaining 100g caramelized white chocolate and walnuts. Mix just until evenly distributed. Cover and chill for half an hour, or until firm but not solid.
While the dough is chilling, preheat the oven to 350°F (175°C) with a rack in the middle and line two large baking sheets with parchment paper. Portion the dough into 15 ping-pong sized balls, about 50 grams each. (At this point, the dough balls can be refrigerated for up to 3 days or frozen for longer storage. For best results, bring dough to room temperature before baking — see notes above.) Place the cookies on the prepared baking sheets about 2½ inches apart and sprinkle the tops generously with flaky salt.
Bake the cookies one sheet at a time until the edges are set but the centers are still soft and barely set, 10-11 minutes (the cookies will not brown much). Rotate the sheet in the oven halfway through baking. Cool the cookies on the baking sheets for about 5 minutes, then transfer to a wire rack to cool completely. Store leftovers in an airtight container for up to 3 days.
When it comes to donuts, I’m a sucker for the good old-fashioned sour cream glazed variety. I remember my parents buying clamshell packs every so often from Safeway; and as we didn’t have sweet breakfasts too often, those were real treat days!
I’d never really considered making cake donuts at home (confession: I don’t like the smell from deep frying so I make my husband do that part ;D). But when I got my friend and fellow blogger Kelsey’s lovely new cookbook The Farmer’s Daughter Bakes, her sour cream cardamom donuts immediately caught my eye. I’m so glad we made these — they’re so easy and delicious (the spelt and cardamom add a sophisticated woodsy flavor that I love), and absolutely perfect with coffee.
The Farmer’s Daughter Bakes
Let’s talk a little more about Kelsey’s book — it’s amazing! Kelsey grew up (and continues to work) on a farm in British Columbia, and her book is filled with recipes, photos, and stories inspired by the seasonal produce she and her family grow. The Farmer’s Daughter Bakes is packed full of fruit-forward recipes I can’t wait to try; and I love how there are little nuggets of gardening/preserving advice peppered throughout the pages. Congrats on your beautiful book, Kelsey — I look forward to baking through the seasons with it! Be sure to visit Kelsey’s wonderful blog and snag a copy for yourself.
Baker’s Notes:
I don’t have a deep fryer or electric skillet (Kelsey’s preferred frying methods – see note at the bottom of the recipe), so I used a Dutch oven to fry the donuts. 350F was my temperature sweet spot using this method. As Kelsey suggests, definitely fry a test donut so you can adjust the temperature as needed.
I’m a big sucker for nutmeg in donuts so I also added some freshly grated nutmeg in the dough. So good!
I rolled the chilled dough between two pieces of parchment paper — this worked really well and kept flouring to a minimum. I ended up with 8 regular sized donuts plus a bunch of donut holes (I could have gotten more regular ones but was lazy about rerolling).
I like a generous coat of glaze on both sides of the donuts so I made a 1.5 batch of the glaze.
120g (1/2 c) full-fat sour cream, at room temperature
125g (1 c) all-purpose flour
125g (1 c) spelt flour
1/2 tsp salt (I used 1 tsp Diamond Crystal kosher salt)
1 1/2 tsp baking powder
1/4 tsp ground cardamom
Neutral oil, for frying (I used canola)
For the glaze:
120g (1 c) powdered sugar, sifted, plus more as needed
30g (2 Tbsp) milk, plus more as needed
Pinch of salt
1/2 tsp vanilla extract
1/4 tsp ground cardamom, or to taste
Method:
Make the donuts: In the bowl of a stand mixer fitted with the paddle attachment, cream together the butter and sugar on medium-high for 2 to 3 minutes. Reduce to low and add the egg. Mix until will combined. Add the sour cream and mix together on low. Be sure to scrape down the sides and bottom of the bowl with a spatula to ensure everything is evenly combined.
In a separate bowl, whisk together the all-purpose flour, spelt flour, salt, baking powder, and ground cardamom. With the mixer on low, slowly add the flour mixture to the wet and mix until almost combined. Remove the bowl from the stand mixer and use a spatula to finish mixing the dough together. The dough will be sticky, and that’s just right! Cover the bowl with plastic wrap and transfer to the fridge for about 1 hour, or until you can roll it out easily.
Line a large baking sheet with parchment paper. When the dough is chilled, roll it out onto a lightly flour surface to 1/2-inch thickness. Use a donut cutter or two round circle cutters (one large and one small) to cut the donut shapes. Place donuts onto the parchment-lined baking sheet as your work. Gently press together any leftover dough scraps, roll them out again, and cut more donuts. When all the dough is used up, place the baking sheet into the fridge to chill.
In a deep fryer, an electric skillet, or a large, heavy bottomed pan, heat the oil to 350-375F. There should be enough oil that your donuts will float about 2 inches above the bottom, while being about half immersed. Line a wire cooling rack with a few sheets of paper towel to absorb the oil, place the rack over a large baking sheet (this will catch any large oil drips) and move it beside the fryer. If you aren’t using a deep fryer with a basket, then a spider strainer works perfectly for dropping the doughnuts into the oil as well as removing them.
Once your oil is up to temperature, remove the donuts from the fridge and fry 2 or 3 at a time, being careful not to crowd them. They should initially sink to the bottom of the fryer and then float for the majority of the cook time. Always try frying a test donut first. Allow the test donut to cool slightly, and then cut it open to check its doneness. If you oi is too hot, the donut may get too dark but be undercooked inside; but if it’s not hot enough, it will take too long to cook and you’ll end up with an oily donut. Fry the donuts for about 2 minutes per side, or until golden brown. Remove from the oil and place onto the paper towel-lined cooling rack. Repeat with all the donuts.
While the donuts are cooling, make the glaze. In a medium bowl, whisk together the powdered sugar, milk, vanilla extract, and cardamom. Add ore milk or powdered sugar if necessary until the desired consistency is reached. Place a wire cooling rack over a baking sheet to catch the excess glaze, and dip each donut in the glaze and place onto the rack. The glaze will set in 5 to 10 minutes, and they’ll be ready to serve. As with all donuts, these are best served immediately or at least the same day.
Note: A deep fryer works best, although I’ve use an electric frying pan for many years as well. These both control the temperature for you, and I find them safer to use compared to a pot on the stove. If you use a pot on the stove, make sure it’s a heavy-bottomed one, which will absorb and distribute heat more evenly and help keep the temperature steady. You will need a candy/deep fryer thermometer on hand to keep an eye on the temperature.
Whether you’re looking for a Valentine’s treat or something sweet to chase away the winter blues, these strawberry mango cream puffs are the perfect baking project! They are so, so fun to make and incredibly fresh and delicious. Thanks to a couple magical ingredients, these sweet little pastries boast an intense fruity flavor that will transport you to a tropical location (or at least bring to mind memories of warmer days!).
Pâte à choux
Pâte à choux, or choux pastry, is really a magical thing. Mastering choux opens up a whole world of cream puffs, eclairs, crullers, gougeres and other delicious pastries; so it’s really worth spending time to get comfortable making it. (I’ve even got a whole chapter of choux recipes in my cookbook!) Honestly, making choux is not hard; as long as your recipe is solid you just need to make it a few times to get a sense of the visual cues and dough consistency, and to work out the best practices for your oven. If you’re new to choux, I recommend reading this tutorial at IronWhisk and this article on Serious Eats for a plethora of useful tips. Then just practice! Once you’ve got it, you’ve got it.
Craquelin
If you’ve ever wondered how professional bakeries get perfectly round cream puffs with that pretty crackly top, the answer is craquelin! Craquelin is basically a simple cookie dough. You roll it out thinly, then punch out little round cookies the same size as your piped choux dough. These cookies are placed on top of the choux right before baking; as the pastries bake, the craquelin bakes onto the puff, crisping and cracking along the way. Craquelin adds a hint of sweetness and texture (plus extra wow factor!) to your cream puffs, but feel free to omit it.
Specialty Ingredients
To make these strawberry mango cream puffs as written, you’ll need a couple of special ingredients. The first is strawberry couverture chocolate — I used Valrhona Strawberry Inspiration. This type of chocolate is made with freeze dried fruit for an intense and natural fruit flavor. It is truly delicious — I have to hide mine to keep my kids from snacking on it! I bought mine from a local baking supply store, but Strawberry Inspiration is readily available online. If you can’t source this ingredient, you can substitute regular good-quality white chocolate and make a whipped white chocolate ganache instead.
The second specialty ingredient is freeze-dried mango. I got freeze-dried mango at Trader Joe’s, but again it’s fairly easy to find online or at specialty food shops. You cannot substitute regular dried fruit or puree in this recipe as the water content and flavor intensity is not the same. However, you can substitute another freeze-dried fruit or just omit the freeze-dried fruit if you prefer; the filling will still be delicious.
Baker’s Notes
While there are a lot of components in this recipe, none of the steps are very hard and you can spread out the work over a couple of days. I like making the strawberry ganache and craquelin a day ahead, then the rest of the components the day of serving. I’ve also included make-ahead notes in the recipe for additional options.
If you’re short on time, you can make just one of the fillings! If you do just the strawberry ganache, I would cut off the top third of each puff with a serrated knife, then pipe the filling inside. Replace the tops after adding the filling. Alternatively, fill the puffs with lightly sweetened whipped cream, pastry cream, or ice cream.
I have large baking sheets and can bake off this entire batch at once. Depending on the size of your baking sheets, you may need to bake on two sheets. I prefer to bake one sheet at a time for best results. The second sheet of piped choux can be kept at room temperature while the first bakes (wait until right before baking to put the craquelin on). Raise the oven temperature back up to 425F before baking the second sheet. Alternatively, bake both sheets at the same time on racks in the upper and lower thirds. Bake the puffs for at least 25 minutes before rotating the sheets.
150g eggs (about 3 large), at room temperature and lightly beaten to combine
For the mango cream:
50g freeze dried mango
50g granulated sugar
78g cream cheese, cold and cubed
Pinch of kosher salt
300g heavy cream, cold
To finish:
Sprinkles, freeze-dried fruit bits, fresh fruit slices (optional)
Method:
Make the strawberry ganache: Finely chop the strawberry inspiration chocolate and place in a heatsafe bowl. In a small saucepan over medium heat, warm the cream until steaming. Remove from heat and pour over the chopped chocolate. Let stand for 1 minute, then gently whisk until combined. Cool to room temperature, then press a sheet of plastic wrap against the surface and refrigerate until completely chilled, at least 4 hours and up to 5 days.
Make the craquelin topping: In a small bowl, beat the softened butter and brown sugar until smooth. Add the flour and mix until a dough forms. Scrape dough onto a piece of parchment paper. Place another piece of parchment paper on top and roll dough to about 1/16″ thickness . Freeze while you prepare the choux. (Craquelin can be made up to 1 month in advance; freeze, well wrapped, until ready to use — no need to defrost.)
Make the choux pastry: Preheat the oven to 425F with a rack in the middle and line a large baking sheet (see baker’s notes) with parchment paper.
Combine the water, milk, butter, sugar, and salt in a medium saucepan. Bring to a strong simmer over medium heat, stirring occasionally. As soon as the mixture is simmering, remove the pot from the heat and dump the flour in all at once. Stir vigorously with a wooden spoon or spatula until the flour is completely incorporated.
Return the pot to low heat. Continue stirring vigorously until the mixture clears the side of the pot and forms a ball and a thin film forms on the bottom of the pot, about 2 to 3 minutes. The dough should register 170-175F on an instant-read thermometer and be stiff enough that if you stick a small spoon in it, the spoon remains upright. Immediately transfer the dough to the bowl of a stand mixer fitted with the paddle attachment. Mix the dough on low speed for 1 to 2 minutes to release the steam. An instant-read thermometer should read no warmer than 140F —any hotter and you’ll cook the eggs when adding them!
When the dough has cooled sufficiently and with the mixer still on low, add about one-third of the beaten eggs in a slow, steady stream. Mix until the egg has been completely absorbed, then add more egg 1 tbsp at a time, mixing each addition in completely before adding more. When you’ve added most of the egg and the dough has taken on a glossy sheen, check the dough consistency—a finger dragged through it should leave a trough and a peak of dough should form where the finger is lifted. Once the dough passes this test, it’s ready. You may not need all the egg—I usually have 1 to 2 tbsp leftover.
Transfer the dough to a piping bag fitted with a large round piping tip. Pipe mounds of dough about 1 3/4 in diameter on the prepared baking sheet, leaving about 2 inches between each.
Cut the craquelin rounds: Once all the puffs have been piped, remove the craquelin dough from the freezer. Let stand at room temperature for a minute or two to soften slightly, making it easier to cut. Use a round cutter the same diameter as the puffs to cut out circles of dough, one per puff. Gather and reroll the scraps as needed. Place one craquelin round on each puff, pressing lightly to adhere.
Bake the choux: Bake for 15 minutes, then reduce the heat to 375F and continue baking for another 20-25 minutes, or until the puffs are completely golden brown and feel hollow when you pick one up. About 5 minutes before the puffs are done, use a skewer or small knife to poke a small hole in each puff to help them crisp (avoid opening the oven door before this as the heat loss may cause the puffs to collapse!). Once the puffs are done, turn the oven off, prop open the door, and allow to cool in the oven for about 5 to 10 minutes. Transfer to a wire rack to cool completely. (You can freeze baked choux buns in an airtight container for up to 2 months; defrost at room temperature right before filling. You can make them a day ahead and store at room temperature for up to a day, but you’ll want to recrisp them in a 325F oven for about 10 minutes as the pastry will soften. Cool completely before filling.)
Make the mango cream: In the bowl of a food processor, combine the freeze-dried mango and sugar. Pulse until the mango has broken down into a fine powder, about 1 minute. Add the cream cheese and salt and pulse to combine. Scrape down the sides of the food processor. Add the cold cream and process until the mixture resembles very thick yogurt, about 45-60 seconds. Be very careful not to over-process as you’ll end up with a fruit butter! Transfer to a piping bag and refrigerate until needed.
Whip the strawberry ganache: Using a handheld mixer or whisk, whip the chilled strawberry ganache until it thickens, lightens in color, and holds medium-stiff peaks. Transfer to a piping bag fitted with a french star tip. Refrigerate until needed.
Assemble the strawberry mango cream puffs: Use a chopstick to poke a hole into the bottom of each puff. Snip off the tip of the piping bag holding the mango cream. Insert the tip into the hole and pipe in the mango cream until the puff feels heavy. Repeat until all puffs have been filled. Pipe a swirl of whipped strawberry ganache on top. Garnish with sprinkles, chopped bits of freeze-dried fruit, or slices of fresh fruit. Enjoy immediately, or refrigerate and enjoy within 4 hours of assembly. The puffs will keep in an airtight container in the refrigerator for 1-2 days, but the pastry will get progressively soggier with time.
The first time I sipped earl grey tea (not sure exactly when, maybe as a preteen?), I thought it was vile. I don’t quite remember why — maybe the unexpected citrus notes, maybe the particular cup I had was brewed way too strong, who knows. All I know is that it turned me off from earl grey for at least a decade.
Well, many years and cups of caffeinated drinks later, I finally gave earl grey another chance and am happy to report a complete change of heart (er, taste?). It’s actually become one of my favorite flavors to infuse into baked goods; it adds such a lovely hint of brightness and sophistication that pairs equally well with either fruit or chocolate.
Infusing earl grey flavor
This recipe is a twist on the classic caramel slice or millionaire’s shortbread, a three-layer bar cookie with a shortbread base, caramel middle, and chocolate topping. Many caramel slice recipes use condensed milk as the basis for the caramel layer; but since I wanted to add the earl grey flavor, here I make a classic caramel with earl grey infused cream. At first I tried infusing both the caramel and chocolate, but the flavor wasn’t as prominent as I wanted. So I ended up nixing the earl grey in the chocolate and adding some tea to the shortbread for the right balance.
When adding tea directly to a baked good as in the shortbread, I prefer using leaves from regular old tea bags (Twinings is my go-to for earl grey). The leaves are small and unobtrusive. But for infusions, I prefer loose leaf. There will naturally be some cream (or butter) that sticks to the tea leaves during straining, but using the larger loose leaf tea seems to minimize the loss. However, if you don’t have both kinds of tea I would opt for tea bags in this recipe — you may just need to top up the cream a bit after the infusion.
Baker’s Notes:
You will need a digital thermometer to make the caramel layer. For candy-making I prefer the clip-on style; I have both a Polder and Thermoworks Dot and both work well. While you want to use a pot large enough to prevent overflow, using one that’s too large can make it difficult to get an accurate reading with the probe. A 2.5L saucepan is my favorite size for this amount of caramel. As always, use caution when working with hot sugar — have all your ingredients scaled out nearby and keep small children and animals out of the kitchen.
I use a small amount of corn syrup in both the caramel and chocolate layers. In the caramel, the corn syrup helps prevent crystallization. In the chocolate topping, it adds a little shine. You can omit it if you don’t have it; just increase the sugar in the caramel to 200g. No need to adjust other quantities for chocolate layer.
I prefer to let the chocolate layer set completely at room temperature (about 4 hours or overnight) rather than refrigerating it so the caramel won’t be too hard to slice through neatly. If you’re in a rush and need to refrigerate it to set, make sure to let the slab sit at room temp for at least 15 minutes to let the caramel soften a little.
Love earl grey in baked goods? Check out the earl grey bundt cake and the earl grey variation of the chocolate caramel tart in my cookbook Baked to Order!
160g (2/3 c) heavy cream (35% fat), plus more if needed
8g earl grey tea (1 3/4 Tbsp loose leaf, or about 4 regular tea bags)
1/2 tsp fine sea salt
1/2 tsp pure vanilla extract
180g (1 c minus 1 Tbsp) granulated sugar
20g (1 Tbsp) corn syrup
60g (1/4 c) water
42g (3 Tbsp) unsalted butter, at room temperature
For the chocolate topping:
75g (3/4 c) good-quality dark chocolate (~50-60%), chopped
50g (3 1/2 Tbsp) butter
7g (1 tsp) corn syrup
Method:
Preheat the oven and prepare the pan: Preheat your oven to 350F with a rack in the middle. Lightly grease a 9×5 loaf pan or 9×4 pullman pan and line with two pieces of criss-crossed parchment. Ensure all sides of the pan are lined and leave at least 2-inches of overhang on the long sides to ensure easy removal. Lightly grease the parchment.
Make the earl grey shortbread: In the bowl of a stand mixer fitted with the paddle attachment, combine the butter, icing sugar, tea, salt, and orange zest. Beat on low to combine, then raise the speed to medium and beat until smooth and combined, about 2-3 minutes. Scrape down the paddle and sides of the bowl a couple times during this process. Add the flour and mix on low just until combined and no streaks of flour remain. Scatter the dough evenly into the prepared pan and use your fingers or a small glass to press the crust firmly and evenly across the bottom. Use a fork to prick the dough all over. Chill until just firm, about 10 minutes in the freezer or 30 minutes in the refrigerator.
Bake the shortbread until lightly golden and set, about 25-30 min. Cool on a wire rack while you prepare the caramel layer.
Make the earl grey caramel: In a small saucepan, heat the cream over medium heat just until steaming. Stir in the tea, remove from the heat, and cover. Let cream infuse for 30 minutes. Strain the cream to remove the tea, pressing on the tea to extract as much cream as possible. Measure 130g of cream back into the small saucepan (add additional cream if necessary to reach the correct amount). Stir in the salt and vanilla. Place back over medium heat and bring back to a bare simmer, then turn off the heat, cover, and keep warm while you prepare the rest of the caramel.
In a medium (I used a 2.5L) heavy-bottomed saucepan, combine the sugar, corn syrup, and water. Place over medium heat and stir with a fork to ensure the sugar is evenly moistened. Once the mixture starts to bubble, stop stirring. Place the lid on the pot and let boil, covered, for 3 minutes. After 3 minutes, remove the lid and continue boiling until the mixture turns the color of a copper penny. Once the caramel reaches this color, remove the pan from the heat. Slowly pour in about a third of the cream mixture, stirring constantly. Take care as the mixture will bubble up! Once the first portion of cream is smoothly incorporated, slowly drizzle in the remaining cream followed by the butter, stirring constantly the entire time. Once the caramel is smooth, clip on a digital thermometer and return the pot to medium heat. Cook the caramel, stirring and scraping the pot frequently, until it reaches 250F. Immediately remove from the heat and pour over the shortbread. Do not scrape the pot; those bits of caramel tend to overcook and may leave hard bits in your squares. Let caramel cool completely before preparing the chocolate layer — about 4 hours at room temperature or 30 minutes in the refrigerator.
Prepare the chocolate layer: Combine the chocolate, butter, and corn syrup in a small, microwave-safe bowl. Heat in 20-second bursts, stirring well between bursts, until 80% melted; then continue stirring until completely melted and smooth. Pour over the set caramel, tilting the pan to spread the chocolate in an even layer. Let set at room temperature, about 4 hours. (You can speed this along and refrigerate for about an hour, but let stand at room temperature for about 15-30 minutes before cutting.)
Slice the bars: Once the chocolate has set, use a sharp chef’s knife to cut into desired sizes. For the cleanest slices, heat the blade and clean after each cut. Store in an airtight container in the refrigerator for up to 5 days or freeze for longer storage; bring to room temperature before eating.
We will get to madeleines, I promise. But first, please humor me for a trip down memory lane. Six years ago, I bought the cooktildelicious.com domain and published my first recipe blog post. This blog is older than all my children, and has certainly lived longer than any of my previous blogs (which date back to the days of Geocities and LiveJournal; am I dating myself?). Historically I haven’t done much to celebrate blog birthdays. It’s right on the heels of the holidays and we’re usually unpacking from trips and resetting from vacation eating. But after a quiet staycation with a few extra days to just sit and reflect/navel gaze/catch up on cheesy holiday rom-coms, I spent a few moments gathering my thoughts on what this little corner of the web has meant for me.
The face of this blog hasn’t changed a whole lot since its inception. No redesigns, no fancy recipe plugins. (I would love to give it a refresh but there are many items in my house higher on the “need to clean” priority list.) I don’t have an editorial calendar for posts, though I have a running list of recipe ideas and the occasional scheduled sponsored post/partnership. The scope of this blog has shifted slightly — as the name suggests, I originally intended to post more cooking/savory recipes. But baking quickly took over, and this blog became a love letter to that.
2015
2017
2018
2019
2020
2021
Blogging in this space has changed my life. It’s provided opportunities to connect with and learn from bakers around the world. Without this blog there would be no book. Most importantly, though, it’s reminded me of the importance and joy of learning and cultivating a creative hobby.
We live in a strange time when, at least here in North America, it’s hard to resist turning a hobby into a side hustle. The moment we show some skill at baking/photography/basketweaving/insert-creative-venture-here, the voices — internal and external — start suggesting, “You should sell that.”
But there’s also nothing wrong with just letting a hobby be a hobby, with making things simply for the joy of making them, with learning new skills just to learn. There’s nothing wrong with making and decorating a cake just because you want to eat cake on a Tuesday, and decorating makes you happy. You don’t have to make a profit to legitimize your passion.
This doesn’t you shouldn’t earn money from a hobby or that you should work for free “just because you do this for fun.” Absolutely not! But making the switch from hobby to business shouldn’t be done lightly. If you run a business, you’ll have less time to devote to creative projects that actually interest you because it’s hard work and time-consuming to run a business!
My brother’s wedding cake
At the Great Canadian Baking Show audition!
Recipe development for President Butter
My cookbook
Recipe development for The Bake Feed and Bob’s Red Mill
Occasionally I’ve wondered if I should “take this thing to the next level” but a quick reality check always confirms that I’m right where I’m happiest right now, chasing kiddos and baking for fun. And if I have a little time at the end of the day — lucky me, here’s this place write about it and share with you.
I know I am extremely blessed that I’m able to spend time on this blog and pursue baking as a hobby. Time, energy, health, and finances are all privileges I recognize daily; and I’m especially grateful for a husband who provides honest, level-headed perspective when I’m tempted to take on more than I should.
I’m not sure where baking and blogging will take me next, but I hope to continue curating this space for years to come. As my children get older I’m even more invested in trying to preserve recipes and create food memories (the original impetus behind starting this blog). I’m grateful to all of you who have read and tried recipes here — your feedback has made me a better baker and writer. Thank you for spending time with me.
Citrus and honey madeleines: simple is best
If you made it this far: congrats, your reward is a madeleine recipe! Last year the lovely people over at USA Pan kindly gifted me a madeleine pan, something I’d been keen on adding to my bakeware collection. Madeleines are essentially mini cakes, delightfully light but buttery and perfect with tea. I hadn’t actually eaten many madeleines before last year, but had often admired their iconic shape: shell-like on one side, and humped on the other. Receiving the pan was just the excuse I needed to nerd out on madeleines. I spent a few weekends reading and analyzing dozens of madeleine recipes and baking off different batches to compare methods. I tried flavors like brown butter, apple cider, jasmine, and espresso; I glazed and didn’t glaze.
Many madeleines and sticks of butter later, I’ve concluded that I like unglazed, classic citrus and honey madeleines the best. I also think madeleines are ideally enjoyed about 5 minutes after coming out of the oven: at this point they’re still just a little warm and the contrast between the crisp, shell-like side and soft, buttery interior is most pronounced. “Fancy” flavors often don’t fully develop until a baked good is completely cooled; so with madeleines I just keep it simple.
Madeleine recipe ratios and mixing methods
Above: I tried coffee, apple cider, and brown butter madeleines but in the end I kept going back to a simple citrus flavor.
In terms of ratios, madeleine recipes are pretty similar across the board: roughly equal parts melted butter, eggs, sugar, and flour. The batter is usually mixed using either the classic genoise technique (whisking eggs and sugar until tripled/ribbon stage, then folding in flour and butter) or by simply whisking all the ingredients together.
While the genoise method does yield airier madeleines, I don’t think the difference is good enough to warrant the more finicky technique. I did find that briefly warming the eggs and sugar over a bain-marie (pot of simmering water) helped create a beautifully glossy emulsified batter with minimal mixing, so I recommend that extra step.
The coveted madeleine hump
One of the endearing characteristics of a madeleine is the hump. It’s just aesthetics, and non-humped madeleines are just as tasty. But if you’re going to make madeleines you might as well shoot for the ideal shape! The main trick to getting a voluptuous hump is temperature: specifically, cold pan and cold batter + hot oven. I recommend chilling your batter and pan overnight for best results. I also found baking madeleines in the top third of my oven produced the most pronounced humps.
Using just the right amount of batter per well is also key to a good hump. You need enough batter so that when the cake rises there will be enough batter to produce the hump; but not so much that it will overflow the well. Madeleine pans come in all shapes and sizes so it may take a couple tests to figure out the ideal amount for yours.
I place the madeleine pan on a preheated sheet pan to make it easier to rotate during baking.
Pure citrus oil is one of my secret weapons for getting a punchy citrus flavor into baked goods — a little goes a long way. I use Boyajian lemon oil and orange oil most often.
You can store the madeleine batter in the fridge for a couple of days and bake them off in batches. Re-butter and chill the pan between batches (15-20 minutes in the freezer is sufficient).
Citrus & Honey Madeleines
Makes about 16 medium madeleines
Ingredients:
113g unsalted butter, divided
1 tsp lemon or orange zest
100g all-purpose flour
3/4 tsp baking powder
1/4 tsp fine sea salt
100g (about 2 large) eggs, at room temperature
80g granulated sugar
20g honey
1/8 tsp lemon or orange oil (optional)
Method:
Melt the butter: In a small saucepan, melt the butter over low heat. You’re not trying to brown it or drive off any moisture, so don’t let it boil — pull it off when there are still a couple unmelted bits left and let the residual heat finish the job. Once melted, measure out 100g for the batter and add the citrus zest. Transfer the remaining butter to a small bowl and refrigerate to solidify slightly while you finish preparing the rest of the batter (you will use this extra butter to brush the madeleine pan).
Set up a bain-marie and prep dry ingredients: Fill a medium saucepan with 2-3 inches of water and bring to a simmer over medium-low heat. Meanwhile, sift together the flour, baking powder, and salt into a medium bowl and whisk together thoroughly.
Warm the eggs and sugar: Once the water is at a gentle simmer, whisk together the eggs, sugar, and honey in a medium heatproof bowl. Set the bowl over the simmering water (make sure the bottom of the bowl isn’t touching the water) and whisk over the heat constantly for 1-2 minutes until the mixture is smooth and just slightly warmed, about 95F. Turn off the heat and remove the bowl.
Mix the madeleine batter: Sift the dry ingredients into the egg-sugar mixture in two additions, using a whisk to gently but thoroughly combine. Add the butter-zest mixture in three additions, whisking gently to fully combine after each addition. Whisk in the citrus oil, if using. The batter should be shiny and smooth, with no visible streaks of flour or butter. Use a flexible spatula to fold the batter several times to ensure everything is evenly mixed.
Transfer the batter to a piping bag (or press a piece of plastic wrap against the batter). Refrigerate at least four hours, or up to 2 days.
Prepare the madeleine pan: Use the reserved softened butter to brush each well of the madeleine tin. Freeze until ready to bake the madeleines.
Preheat the oven and fill the molds: Preheat the oven to 425F with a rack in the upper third. Place a large baking sheet on the rack while the oven is preheating.
When the oven is ready, remove the prepared madeleine pan from the freezer. Fill each well about 3/4 full (24-25 grams in my madeleine pan). Don’t spread the batter to the edges; it will spread on its own in the oven.
Bake the madeleines: Place the filled pan on the preheated sheet pan and immediately turn down the oven temperature to 400F. Bake until the madeleines are well risen and firm and the edges are golden, about 11-12 minutes. Rotate the pan halfway through baking. Transfer to a wire rack to cool for a couple minutes, then gently pry madeleines out of the tin. Madeleines are absolutely best enjoyed while still warm, about 5-10 minutes after baking; but leftovers will keep in an airtight containers for a couple of days.