Chocolate-freckled coffee and rye whisky ice cream

coffee rye whisky ice cream

I’ve been obsessed with making ice cream for the past year or so, ever since one of our friends kindly gave us her ice cream maker. I grew up in an ice-cream loving household; birthday cakes were often boxes of ice cream decorated with candy (even though more than half of us are lactose intolerant).

I’d hemmed and hawed for a couple summers about getting an ice cream maker — was it worth the space? Would I really use it? And now that I have one, I honestly can say I only regret not having one sooner!

(Side note: Yes, there are lots of “no churn” ice cream recipes out there. And ways to get around not having an ice cream maker. If you can’t or don’t want to invest in a machine, might I suggest you explore semifreddo recipes? They have a beautiful smooth and mousse-like texture, and aren’t as sweet/heavy compared to typical no-churn recipes involving sweetened condensed milk and whipped cream.)

Once you find some base recipes you like, homemade ice cream is all about experimenting and creating your own flavors. Try flavoring the base with an infusion or addition, add a mix-in or three, or both! For this chocolate-frecked coffee and rye whisky batch, I infused the dairy with whole coffee beans, mixed in a little rye whisky before churning, then added in some melted chocolate at the end of churning to create chocolate “freckles.” So. Delicious. I can’t wait to make this one again!

A few notes:

  • The base here is adapted from my go-to Philadelphia-style (eggless) ice cream base from Salt and Straw. It’s super easy to make, but it does require xanthan gum, corn syrup/glucose, and milk powder. I don’t recommend skipping these ingredients because they work together to create a beautifully smooth, non-icy ice cream that lasts well in a home freezer. I can easily source all three ingredients at my local bulk food stores and supermarket.
  • There are a lot of ways to flavor ice cream with coffee, but what I particularly liked about this cold infusion method was that the coffee flavor is super clean and not bitter at all. (You also don’t end up with a brown-colored ice cream that screams “COFFEE” which I thought was kind of nice.) I recommend weighing out the coffee beans before you add them, and then weighing them after they’re strained out. The coffee beans will inevitably soak up some of the liquid, so you’ll want to replace it before churning. Weighing the coffee beans will tell you exactly how much liquid to add back.
  • For best results, use fresh coffee beans. They don’t need to be super fancy or single origin, but fresh beans will impart the most flavor. I like to use an espresso roast, but use whatever you like.

One last note: my cookbook, Baked to Order, is now available for pre-order! It comes out November 17, 2020, and contains 60 sweet and savory recipes, with variations for every mood and craving. I can’t wait to tell you more about it in the coming months, but in the meantime please find more info on the Baked to Order cookbook page. Thank you so much for your support!

Chocolate-freckled coffee and rye whisky ice cream

Makes about 1 quart/liter

Ingredients:

  • 100g (½ c) granulated sugar
  • 15g (2 Tbsp) milk powder
  • ¼ tsp xanthan gum
  • ¼ tsp kosher salt
  • 330g (1 1/3 c) whole milk, plus more as needed (divided)
  • 40g (2 Tbsp) corn syrup or glucose
  • 113g (1/2 c) whole coffee beans
  • 330g (1 1/3 c) heavy cream, plus more as needed (divided)
  • 30-45g (2-3 Tbsp) rye whisky
  • 90g (1/2 c) bittersweet chocolate, chopped
  • 1 1/2 tsp neutral vegetable oil

Method:

  1. Make the coffee ice cream base: In a medium saucepan, whisk together the sugar, milk powder, xanthan gum, and salt. Whisk in 330g milk and the corn syrup.
  2. Heat over medium, whisking constantly, until the mixture is steaming and slightly thickened and the sugar is dissolved, about 3 minutes.
  3. Remove the saucepan from the heat, add the 113g whole coffee beans, and cover. Infuse in the warm milk for 5-10 minutes. Pour the milk mixture and coffee beans into a heatproof container and stir in the 330g heavy cream. Cover and transfer to the refrigerator to infuse for 12 hours.
  4. Churn the ice cream: When you are ready to churn your ice cream, strain out the coffee beans with a fine mesh sieve. Weigh the coffee beans and subtract 113g — this is how much liquid was absorbed by the beans, and how much liquid you need to add back to the strained base via the rye whisky and extra milk/cream. (My beans weighed 213g, so I needed to add about 100g of liquid back. I added 40g of rye whisky, 30g milk, and 30g cream.)
  5. Churn the base according to the instructions for your machine, until the mixture has the texture of soft serve (for my machine this is about 20-25 minutes). While the ice cream is churning, melt the chocolate and oil together in the microwave or over a double boiler. During the last minute of churning, drizzle in the melted chocolate in a thin, steady stream.
  6. Transfer ice cream to a freezer-friendly container (a loaf pan works well). Cover with parchment paper, pressing it to the surface of the ice cream so it adheres, then cover with a lid. Freeze until firm, at least 6 hours. Ice cream will keep for up to 3 months.  

Buttermilk Chiffon Cake with Berries and Cream

buttermilk chiffon cake

I love a good chiffon cake — honestly, I’d probably eat it over a regular butter cake 95% of the time. Chiffon cake is light and fluffy but still moist, thanks to a bit of oil in the batter. It’s also best served simply. Regular buttercreams are too heavy for this style of cake, so I prefer to top chiffon cakes with some good old whipped cream and a handful of summer’s best berries.

A couple of notes:
  • This cake is a simple one-layer affair, though you could easily double everything and turn this into a naked 2-layer cake as well.
  • I used buttermilk in both the cake and whipped cream for a lovely tang that complements the berries. If you don’t have any on hand, substitute the buttermilk in the cake with water or regular milk (or try half water, half lemon juice plus the zest of a lemon for a lemon-flavored chiffon). You can substitute sour cream or Greek yogurt for the buttermilk in the whipped cream, or just use more heavy cream.

Buttermilk Chiffon Cake with Berries and Buttermilk Whipped Cream

Makes one single-layer 8-inch cake

Ingredients:

Buttermilk chiffon cake:

  • 75 g cake flour
  • 90 g granulated sugar (preferably caster), divided
  • ¾ tsp baking powder
  • ¼ tsp kosher salt
  • 60 g buttermilk
  • 40 g neutral vegetable oil, such as grapeseed or canola
  • ½ tsp pure vanilla extract
  • 2 large egg yolks, at room temperature
  • 3 large egg whites, at room temperature
  • ¼ tsp cream of tartar

For the buttermilk whipped cream:

  • 180g heavy cream, cold
  • 60g buttermilk, cold
  • 1-2 Tbsp granulated sugar (optional)

To assemble:

  • 1 1/2 to 2 cups (250-300 g) fresh berries, rinsed and cut if large
  • 1-2 Tbsp granulated sugar

Method:

For the buttermilk chiffon cake:

  1. Preheat the oven to 350°F (175°C) with a rack in the lower third. Line an 8-inch (20-cm)-round cake pan with parchment and lightly grease the parchment, but otherwise do not grease the pan. (I like to use a pan with 3-inch sides as this helps the cake top stay nice and flat, but one with 2-inch sides should work as well.)
  2. Sift together the cake flour, 65 grams sugar, baking powder, and salt in a large, wide bowl. Whisk to combine. Make a well in the center of the dry ingredients. Add the buttermilk, oil, vanilla, and egg yolks to the well, and whisk until smooth.
  3. In a separate bowl, beat the egg whites and cream of tartar on medium-low speed until foamy. Increase the speed to medium, and whisk until soft peaks. With the mixer still on medium, slowly add the remaining 25 grams caster sugar. Increase the mixer speed to medium-high and beat until you have glossy, firm peaks.
  4. Using a flexible spatula or whisk, carefully fold the egg whites into the egg yolk batter one third at a time. Mix just until the batter is homogeneous and no white streaks remain.
  5. Scrape the batter into the prepared pan and smooth the surface with an offset spatula. Give the pan a couple raps on the counter to dislodge any big air bubbles.
  6. Bake until the cake is puffed and golden and a skewer inserted in the center comes out clean, about 25 to 30 minutes. Cool completely in the pan on a wire rack. Once cooled, run a thin spatula around the edge of the cake to loosen, then carefully turn out of the pan and remove the parchment. Use immediately, or wrap in plastic and refrigerate for up to 3 days.

For the buttermilk whipped cream:

  1. Combine all ingredients in a medium bowl. Whisk to medium peaks. Use immediately.

To assemble:

  1. Mix together the berries and sugar and allow to macerate for about 10 minutes.
  2. Place the cake on a serving platter. Dollop on the whipped cream and use a spoon or offset spatula to spread over the top. Top with macerated berries (leave the juices behind). Serve immediately.
buttermilk chiffon cake top down

Graham Cracker Snickerdoodles

graham cracker snickerdoodle

People often ask how I come up with ideas of what to make. I have many sources of inspiration — cookbooks, Instagram, the supermarket (moreso when it was normal to go there and just browse…one day, one day) — but perhaps the most common one is that I need to use something up. In this case, it was a small bag of graham cracker crumbs that wasn’t enough for making a pie crust or anything else semi-useful. I happened to be in a cookie-making mood (pretty common these days), so I figured I’d just chuck them in my snickerdoodle dough and see what happened.

Well, the cookies were good but not quite right; but now of course the idea of graham cracker snickerdoodles was stuck in my head. So yes, I had to go get more graham crackers to continue testing and tweaking the proportions of this recipe. And yes, now I have another small bag of graham cracker crumbs just waiting to be the muse for another recipe. Vicious cycle, tough job, someone’s gotta do it!

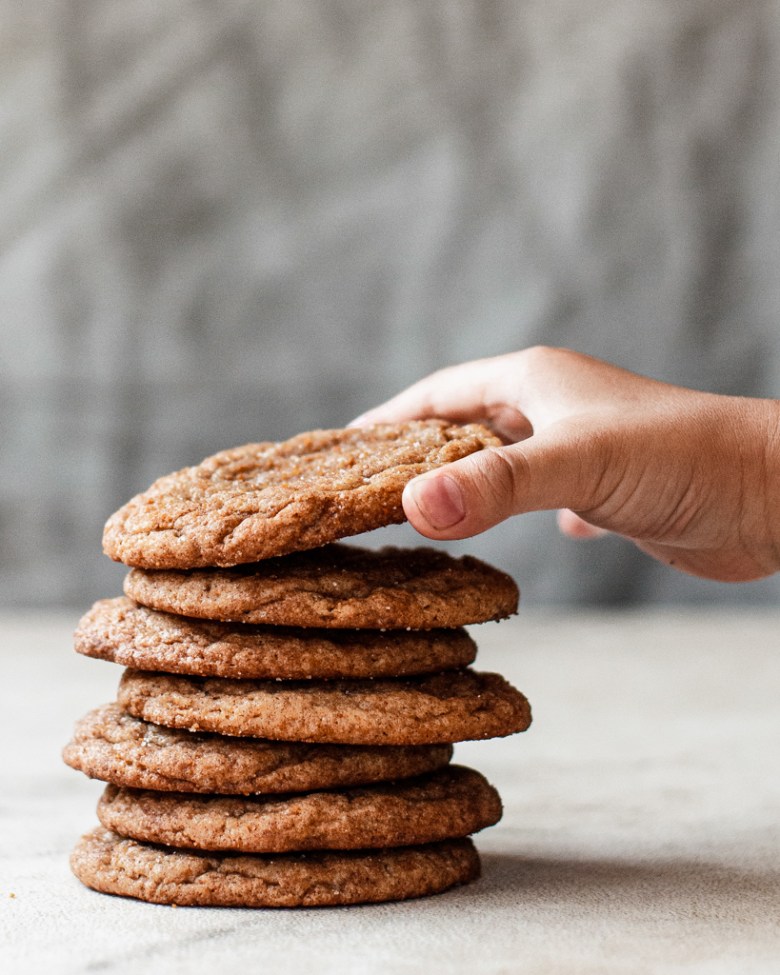
Anyways, about these graham cracker snickerdoodles. These cookies combine the soft chew and slight tang of a classic snickerdoodle with the pleasant wheatiness and honey-cinnamon vibes of a graham cracker. They’re the perfect mid-afternoon snack, though one of these days I’m going to test the theory that they’d make pretty fine ice cream sandwiches as well.

A few notes:

  • In the spirit of graham crackers, I use a whole wheat flour for the cookie dough. Traditionally graham flour is coarse and unsifted wheat flour, but here I’ve gone with my favorite sifted red fife flour from Flourist. It has a lovely flavor and texture, and works very well as a 1:1 swap for all-purpose flour in baked goods. I think any soft white wheat flour would work nicely here, or simply use all-purpose.
  • There are also actual graham crackers inside and out — some mixed into the cookie dough, and some in the sugar sprinkle used to roll the cookie dough balls in before baking. Don’t go overboard and add too many graham cracker crumbs to the actual dough — the dough will be too overloaded and won’t spread properly (I speak from experience). A digital scale is (and always is) your friend here.
  • If you don’t want to bake all the cookies off at once, you can refrigerate the dough up to 5 days or freeze for longer storage (in both cases, wait until right before baking to toss in the sugar sprinkle). It’s difficult to get the sugar sprinkle to stick to dough that is too cold, so I suggest taking the dough out of the freezer/fridge while preheating the oven. Roll the dough balls in your hands to slightly warm up the dough before rolling in the sugar sprinkle and baking.
graham cracker snickerdoodle stack

Graham Cracker Snickerdoodles

Makes about 12 cookies

Ingredients:

For the snickerdoodle dough:
  • 113g (1/2 c) unsalted butter, at room temperature
  • 66g (1/3 c) granulated sugar
  • 66g (1/3 c) light brown sugar
  • 20g (1 Tbsp) honey 
  • 1 tsp cream of tartar
  • 1/2 tsp baking soda
  • 1/2 tsp ground cinnamon
  • 1/2 tsp kosher salt
  • 1 large egg, at room temperature
  • 1 tsp vanilla extract
  • 170g (1 1/3 c) white whole wheat flour or sifted wheat flour (I like Flourist sifted red fife)
  • 50g (1/2 c) finely ground graham cracker crumbs
For the sugar sprinkle:
  • 15g (1 Tbsp) finely ground graham cracker crumbs
  • 15g (heaping 1 Tbsp) granulated sugar
  • 1/4 tsp ground cinnamon

Method:

  1. In the bowl of a stand mixer fitted with the paddle attachment, combine the butter, sugars, honey, cream of tartar, baking soda, cinnamon, and salt. Mix on low to combine, then increase the speed to medium and cream until light and fluffy, about 3-4 minutes. Scrape down the sides of the bowl and the paddle a couple times during this process to ensure even mixing.
  2. Reduce the mixer speed to low and add the egg and vanilla. Increase the speed to medium and mix until smooth. Scrape down the bowl and paddle.
  3. With the mixer on low, add the flour and graham cracker crumbs. Mix just until combined. Use a flexible spatula to stir from the bottom of the bowl a few times to make sure everything is well-mixed and there are no pockets of unincorporated flour. Cover and chill until firm but still scoopable, about 45 minutes.
  4. While the dough is chilling, preheat the oven to 375°F with a rack in the middle and line two baking sheets with parchment paper. In a small bowl, whisk together the graham cracker crumbs, granulated sugar, and cinnamon for the sugar sprinkle.
  5. Portion the dough into twelve ping-pong sized balls, about 45 grams (3 tbsp) each. Toss each in the sugar sprinkle, coating completely. Place the cookies on the prepared baking sheets about 2½ inches (6 cm) apart.
  6. Bake the cookies one sheet at a time until the edges are golden but the centers are still soft and pale, about 10 to 12 minutes. Rotate the sheet in the oven halfway through baking. Immediately after baking, sprinkle on a bit more sugar sprinkle if desired. Cool the cookies on the baking sheets for about 5 minutes, then transfer to a wire rack to cool completely. Store leftovers in an airtight container.

Berry buckwheat crumb bars

berry crumb bars

Crumb bars, crumble bars, streusel bars — whatever you call them, I’m a fan. Mostly because they belong to my favorite food category, rustic fruit bressert (that’s breakfast and/or dessert).

COVID lockdown has made it extra challenging this year to keep track of the date, but thankfully the seasons still change. We are in the middle of berry season here in Ontario. And while I wasn’t sure if our annual traditions of strawberry and cherry picking would be possible this year, happily we managed to do both.

My family loves fresh fruit like candy, so I wasn’t sure I’d be able to actually make anything with the berries. But I squirreled away just enough to make these delightful berry crumb bars. I had some for breakfast and some for dessert and can confirm they go down equally well for either.

A few notes:
  • As with most fruit desserts, I love adding some wholegrain flour for extra flavor. If you don’t have buckwheat on hand, try rye, einkorn, or spelt! Or just substitute with more all-purpose if you don’t have any whole grains stocked.
  • For the filling, I used a mix of (very ripe) strawberries, cherries, and some miscellaneous frozen berries that I had lurking in the freezer. I fully defrosted the frozen berries and drained off the extra liquid to avoid a soggy crust.
  • Because my fruit was mostly quite ripe and juicy, I didn’t need to add much sweetener. If your fruit isn’t so ripe, adjust the sugar to taste or try mixing with a little jam.
berry crumb bars stacked

Berry buckwheat crumb bars

Makes one 8×8 pan

Ingredients:

For the crumb mixture:
  • 190g (1 1/2 c) all purpose flour
  • 60g (1/2 c) buckwheat flour
  • 1 tsp kosher salt
  • 50g (1/4 c) granulated sugar
  • 50g (1/4 c) light brown sugar
  • 200g (14 T) unsalted butter, cold and cubed
  • 30g (1/3 c) rolled oats
  • 30g (1/4 c) sliced almonds (or other chopped nuts)
  • 30g (2 Tbsp) turbinado sugar
For the fruit filling:
  • 400g (~2 1/2 c) mixed berries, finely diced (if frozen, thaw and drain before using — see notes above)
  • 13g (1 Tbsp) sugar (or to taste)
  • 12g (1 1/2 Tbsp) cornstarch
  • Pinch of salt
  • Squeeze of lemon juice

Method:

  1. Preheat the oven to 375°F with a rack in the middle. Line an 8 x 8-inch pan with two long criss-crossed pieces of parchment, leaving a couple of inches of overhang on all sides. (This will make it easy to remove the bars later.) Lightly grease the parchment.
  2. In the bowl of a food processor, combine the flours, salt, and sugars. Pulse to combine. Scatter the cold, cubed butter over the top. Pulse until the mixture forms clumps but is not completely smooth (this took me about 20-25 short pulses).
  3. Transfer about a third (~180g) of the mixture to a separate bowl. Add the oats, almonds, and turbinado sugar and use your fingertips to quickly pinch in, forming a clumpy streusel. Refrigerate until needed.
  4. Transfer the remaining two-thirds (~360g) of the mixture to the prepared pan. Use your fingers or the bottom of a small glass or measuring cup to press the crumbs evenly into the bottom of the pan. Prick all over with a fork. Bake for about 10-15 minutes, or until just set. Transfer to a wire rack while you prepare the fruit filling (no need to let it cool completely).
  5. To make the filling, stir together the fruit, sugar, cornstarch, salt, and lemon juice. Spoon the fruit mixture evenly over the par-baked crust, then sprinkle evenly with the reserved streusel mixture.
  6. Bake until the crumb topping is golden and the fruit juices are bubbling in the center, about 45-50 minutes. Allow to cool completely on a wire rack before slicing (for cleanest results, chill for an hour in the refrigerator). Refrigerate leftover bars in an airtight container for up to 5 days; serve cold or at room temperature.

Mango ice cream

mango ice cream

Last week I asked my 4-year-old whether he preferred chocolate or vanilla, and he replied “mango.” This is coming from a kid who really likes chocolate, so you can imagine just how deep his mango love runs. At any rate, mango desserts reign supreme in this household — whether it be mango cake, mango pudding, or this creamy and delicious mango ice cream.

This is a Philadelphia-style, or eggless ice cream. The base is super easy to make and comes together in under 10 minutes (assuming you use canned mango puree — more on that in a second). I gravitate towards Philadelphia-style ice cream when fruits are involved — as much as I love custard bases, the eggy richness tends to dull fruit flavors a bit. Not here — the mango is fresh and present!

A couple of notes:

  • I am all about using canned mango puree (or pulp). It’s super smooth and relatively cheap, and the flavor is really consistent. I’ve made a lot of mango puree over the years and it’s just not my favorite thing to do — you have to strain it to get it super smooth, and if your mangoes are a bit “meh,” the flavor of your final dessert will be lacking as well. I get my mango puree from our local Asian supermarket. Alphonso and Kesar varieties are the most common here, and both work great. Make sure you’re getting pulp or puree, not juice.
  • Of course, if you’re swimming in fresh mangoes and want to make your own, that’ll work too — just dice, blend in a food processor, and make sure to strain it for the best texture. You might have to add a little sugar to taste if your mangoes are not super sweet.
  • This ice cream base is adapted from one of my favorite ice cream cookbooks from Salt & Straw. It does ask for a few “special” ingredients — namely milk powder, corn syrup, and xanthan gum. These all help create a nice, smooth texture and increase shelf-life. I can get all these ingredients from my local supermarket, but they are all fairly easy to find online as well.
  • Note that this recipe makes a good amount of ice cream, about the max my 1.5 quart Cuisinart ice cream maker can handle. If your ice cream maker has a smaller capacity, you may want to churn in two batches or reduce everything by 1/4 to 1/3.

Mango ice cream

Makes a generous 1 quart/liter / Base recipe adapted from Salt & Straw

Ingredients:

  • 100g (½ c) granulated sugar
  • 15g (2 Tbsp) milk powder
  • ¼ tsp xanthan gum
  • ¼ tsp kosher salt
  • 330g (1 1/3 c) whole milk
  • 40g (2 Tbsp) corn syrup
  • 330g (1 1/3 c) heavy cream
  • 330g (1 1/3 c) mango puree (I prefer canned)

Method:

  1. Make the mango ice cream base: In a medium saucepan, whisk together the sugar, milk powder, xanthan gum, and salt. Whisk in the milk and corn syrup.
  2. Heat over medium, whisking constantly, until the mixture is steaming and slightly thickened and the sugar is dissolved, about 3 minutes. Pour into a heatproof container and whisk in the heavy cream and mango puree. Refrigerate until cold, at least 4 hours or up to 3 days.
  3. Churn the ice cream: Churn the chilled base according to the instructions for your machine, until the mixture has the texture of soft serve (for my machine this is about 25 minutes). Transfer to a freezer-friendly container (a loaf pan works well). Cover with parchment paper, pressing it to the surface of the ice cream so it adheres, then cover with a lid. Freeze until firm, at least 6 hours. Ice cream will keep for up to 3 months.

Homemade Toaster Strudels

toaster strudels

In the world of packaged breakfast pastries, I have always maintained that toaster strudels > pop tarts. Give me flaky pastry and cream cheese icing over non-flaky pastry and royal icing any day, please and thank you!

My homemade version of toaster strudels feature all-butter rough puff pastry, a pleasantly tart fruity filling, and a colorful squiggle of cream cheese icing. If you want to serve these for breakfast I recommend making the pastry and jam the night before for best results — the pastry needs time to chillax (chill and relax), and you want your filling completely cold before assembling. Of course, if you wanted to serve these as dessert you could do this all in one day!

I filled my strudels with a thick rhubarb and berry jam, since that’s the fruit I had on hand. It was pleasantly tart, which contrasted excellently with the rich pastry and sweet icing. I also added a splash of elderflower liqueur for a fresh floral note — totally optional, but highly recommended if you have it on hand!

If you don’t have rhubarb and berries, you could sub in your favorite jamm-able fruits or even use some storebought preserves. If you’re using fresh fruit, cook down the filling enough so that it holds its shape, which will make assembly much easier. I’d love to try these with sour cherries and stone fruits later this summer! If you’re really looking to save time, you could also use store-bought puff pastry (for a standard box with 2 pieces, I’d cut each sheet into 6 rectangles). However, unless you spring for all-butter store bought puff pastry (which tends to be pricey), I highly recommend taking the time to make the rough puff — the taste is so much better!

Now, I will admit that pop tarts edge out toaster strudels in presentation — who can compete with colorful icing and sprinkles? So I stole a note from the pop tart playbook and added both for a little extra cheer to my pastries. My kids’ eyes practically popped out of their heads when they saw the pastries, and they were so excited to decorate their own. In other words: TOTALLY WORTH IT.

Homemade Toaster Strudels

Makes 6 strudels

Ingredients:

For the strudels:
  • 120g chopped rhubarb
  • 160g mixed berries (fresh or frozen)
  • 40g granulated sugar
  • Juice of half a lemon
  • Pinch of salt
  • 1 1/2 tsp elderflower liqueur (optional)
  • 1/2 recipe rough puff pastry
  • 1 egg, whisked with 1 tsp milk or water and a pinch of salt, for egg wash
  • Extra granulated sugar, for sprinkling
For the icing:
  • 60g cream cheese, at room temperature
  • 60g icing sugar, sifted
  • Pinch of salt
  • 1/2 tsp vanilla extract
  • Gel food coloring (optional)
  • Sprinkles (optional)

Method:

  1. Make the filling: In a medium saucepan, combine the rhubarb, berries, sugar, lemon juice, and salt. Cook over medium-high heat, stirring and mashing the fruit frequently, until the mixture comes to a boil. Reduce the heat to medium-low and continue cooking, still stirring frequently, until the mixture is very thick and the fruit has completely broken down, about 6-8 minutes. Remove from heat and add the elderflower liqueur, if using. Transfer to a heat-proof container. Cool to room temperature, then cover and refrigerate until completely cold, at least 1 hour.
  2. Assemble, bake, and ice the strudels: On a well floured surface, roll the pastry into a long rectangle slightly larger than 9″ x 19.5″. The pastry should be between 1/8″ and 1/4″ thick. Trim the edges to neaten, then use a pastry wheel or sharp knife to cut the pastry lengthwise into 2 long rectangles (each about 4.5″ x 19.5″). Cut each rectangle into 6 equal pieces. You should end up with twelve 4.5″ x 3.25″ rectangles. Transfer the rectangles to a parchment-lined sheet pan and chill for 10 minutes. Meanwhile, preheat the oven to 400F with a rack in the middle.
  3. Once the pastry has chilled, brush the edges of 6 rectangles with egg wash. Divide the filling among the 6 rectangles, about a heaping tablespoon each. Use the back of a spoon to spread into an even layer, keeping the egg washed edges exposed. Top each rectangle with one of the remaining rectangles, pressing the edges firmly to seal. Trim the edges with a sharp knife to neaten, if needed. Use the tines of a fork to crimp the edges all around. Freeze the strudels until the pastry is firm, about 20-30 minutes.
  4. When ready to bake, brush the strudels evenly with egg wash. Use a sharp paring knife to cut a small venting hole on the top of each one. Sprinkle the tops generously with granulated sugar. Stack the baking sheet on top of a second baking sheet to keep the bottoms from scorching during baking.
  5. Bake the strudels for about 25-30 minutes, or until the pastry is deeply golden. Rotate the sheet halfway through baking for even browning. Transfer the sheet to a wire rack to cool for 10-15 minutes before icing.
  6. When ready to ice, beat together the cream cheese, icing sugar, salt, and vanilla until smooth. Beat in a drop of food coloring, if desired. Transfer icing to a small piping bag and snip a small hole off the end. Pipe the icing onto the strudels and garnish with sprinkles, if desired. Let icing set for about 5 minutes before serving. Strudels are best served the day they’re baked.

A simple sourdough chocolate cake

sourdough chocolate cake no sprinkles

Simple. Small-batch. Sourdough. Chocolate. Cake. That’s all there is to this recipe, but it seems to be everything we’re craving right now.

This is a riff on the chocolate cake that will be in my cookbook, scaled down and adapted to use sourdough discard, AKA the portion of starter that you normally discard every time you do a feeding. I usually collect all my discard in a container in the fridge and use it within a week or before it starts to develop an overly acidic smell / layer of liquid “hooch” on top.

For the best cake texture, I like to use discard that has fallen and no longer bubbly. The discard is just here for flavor and not leavening; and using a super active starter can make for a “bready” texture — not what we want here.

I frosted this cake with about a cup of silky fudge frosting I had left in the freezer, but you could certainly enjoy this plain, with a simple dusting of icing sugar, or maybe some whipped cream and berries. Whatever you pair it with, I hope you enjoy!

sourdough chocolate cake slice

Sourdough Chocolate Cake

Makes one single-layer 8″ cake

Ingredients:

  • 57g (1/4 c) unsalted butter
  • 28g (2 Tbsp) neutral vegetable oil
  • 120g (1/2 c) 100% hydration ripe sourdough starter
  • 1 tsp vanilla extract
  • 63g (2/3 c) rye flour (all-purpose works too) 
  • 34g (1/3 c) Dutch-processed cocoa powder
  • 160g (3/4 c) light brown sugar
  • 1/2 tsp kosher salt
  • 3/4 tsp baking soda
  • 1 large egg, at room temperature
  • 80g (1/3 c)sour cream, at room temperature
  • 60g (1/4 c) hot coffee

Method:

  1. Preheat the oven to 350°F with a rack in the middle. Grease an 8-inch round cake pan and line the bottom with parchment paper, then grease the pan again and dust with cocoa powder.
  2. In a small saucepan, melt the butter over low heat. When the butter has melted, remove from the heat and whisk in the oil, starter, and vanilla. Allow to cool slightly while you prepare the rest of the ingredients.
  3. Sift together the flour, cocoa powder, brown sugar, salt, and baking soda in a large bowl. Set aside.
  4. Whisk the sour cream into the butter mixture, followed by the egg. Whisk the wet ingredients into the dry until combined. Add the hot coffee and whisk just until smooth.
  5. Scrape the batter into the prepared pan and bake for 28-35 minutes, or until a skewer inserted into the center comes out with just a few moist crumbs. Transfer to a wire rack to cool. Once the pan is cool enough to handle, run an offset spatula around the edges and turn the cake out to finish cooling completely.
sourdough chocolate cake sliced

Funfetti Rice Krispie Treats, and Some News!

Hello, hi, it’s been a hot minute since I’ve posted here! I hope you all are staying safe and well during this crazy, confusing time. A lot of you are baking bread and making sourdough starters, which is certainly a bright spot amongst all the madness. As the days start to meld together, the rising and falling of my own starter provides a comforting rhythm to the days.

I’ve been baking a lot, though in smaller batches since I can’t give away extras as easily any more. Banana bread and brownies always, plus a lot of new recipes for my cookbook.

Sorry, I buried the lede there — I’m working on a baking cookbook! I can’t share too many details right now, except to say it’s a collection of 60+ recipes from cookies to cakes to yeasted and sourdough breads to pastries. It’s been a wild ride (I didn’t expect finding butter and eggs to be one of the challenges I’d face, but there you go) and I’ve questioned my sanity more than a few times. But now that the first draft of my manuscript is almost finished I’m starting to feel excited! There’s still a lot of work to do, but I can’t wait to see it all come together in the coming months.

I wanted to share a recipe for some funfetti rice krispie treats that I made a couple months back (pre-social distancing…) for a bake sale. These are a colorful variation of my brown butter rice krispie treats, and they never fail to put a smile on my face. If you want to add a sweet-salty kick you could sub some (or all) of the rice krispies with lightly crushed Ruffles potato chips. SO GOOD.

Funfetti Rice Krispie Treats

Makes one 8×8 or 9×9 pan

Ingredients

  • 113g / 8 Tbsp unsalted butter
  • 400g / 10 cups mini marshmallows, divided
  • 1/2 teaspoon coarse kosher or sea salt
  • 1 tsp vanilla extract (use artificial if you want to emphasize the funfetti flavor)
  • 160g / 6 cups crispy rice cereal, such as Rice Krispies (about half a 12-ounce box)
  • 40g / 1/4 c rainbow sprinkles, plus more for the top

Method

  1. Line an 8×8 or 9×9 pan with foil. Lightly butter or oil the foil for easy removal. Measure out all your ingredients — this is a quick and simple recipe, but once you start, you do need to move quickly!
  2. In a large pot over medium-low heat, brown the butter. Place the cubed butter in a large, light-colored pot over low-medium heat. Once the butter has melted, turn the heat up to medium-high. Stir frequently with a heatproof spatula, scraping the sides and bottom of the pan as needed. The butter will crackle, foam, turn clear gold, then finally start browning. It’s done when the crackling subsides and you smell toasted nuts.
  3. When the butter has browned, immediately take the pan off the heat and add the salt, vanilla, and 8 cups of marshmallows. Stir constantly until the marshmallows are melted and you have a smooth mixture. If the residual heat from the butter isn’t enough to melt the marshmallows completely, turn the heat back to low.
  4. Add the cereal and stir until evenly coated with the marshmallow mixture. Stir in the remaining two cups of mini marshmallows, followed by the 1/4 c rainbow sprinkles. Don’t overmix once you add the sprinkles or the colors will bleed.
  5. Immediately scrape the mixture into the prepared pan and, using a greased silicone spatula or a piece of greased parchment/wax paper, press it firmly into an even layer. Garnish with extra sprinkles. Let cool completely at room temperature before cutting into squares.
  6. Store in an airtight container and eat within 3 days. I’ve heard you can refrigerate or freeze them, well wrapped, for longer storage, though they haven’t lasted long enough around here for me to test that.

Linzer cookies

Linzer cookies are one of those classic Christmas cookies I’d never gotten around to making until recently. I love sandwich cookies, but to be honest they can be time-consuming with all the chilling / rolling / stamping / filling. I recommend making them on an afternoon when you don’t have a ton of other baking to do; just throw on your favorite tunes and enjoy the process.

A couple notes:
  • This dough contains a high proportion of nuts, which makes it very delicious but also extremely delicate. I found it easiest to roll between pieces of plastic and chill overnight before cutting and baking. I also recommend using simple cookie cutter shapes (i.e. circles and squares) for best results (I used this set).
  • Linzers are traditionally made with almonds and raspberry jam; I used walnuts because I had a lot on hand and filled them with the ends of jam jars I always have lurking around in the fridge.
  • You can bake these cookies several days in advance (store them at room temperature in an airtight container), but I recommend filling them on the day you plan to serve them as the cookies will gradually soften once they’re filled.
  • If you don’t want to bother rerolling the scraps, you can shape leftover dough into thumbprint cookies instead. Just roll into balls, indent with your thumb or the back of a wooden spoon, and bake until golden. Fill indents with jam once cooled.

Linzer Cookies

Makes about thirty 2-1/2″ sandwich cookies

Ingredients:

  • 105g (scant 1 c) toasted walnuts, chopped
  • 75g granulated sugar
  • 75g light brown sugar
  • 1 teaspoon kosher salt (Diamond Crystal)
  • 281g all purpose flour
  • 225g unsalted butter, cold and cubed
  • 1 large egg plus 1 large egg yolk, cold
  • 2 teaspoons pure vanilla extract
  • 1/2 – 3/4 c jam or preserves
  • Icing sugar, for dusting

Method:

  1. In the bowl of a food processor, combine the walnuts, sugars, and salt. Pulse together until the nuts are finely ground and the mixture is the texture of damp sand.
  2. Add the flour and pulse to combine.
  3. Scatter the butter cubes over the top and pulse until the butter is well incorporated, with no large pieces remaining. Scrape down the sides of the food processor a couple times during this process.
  4. Whisk together the egg, egg yolk, and vanilla. Add to the flour mixture and pulse just until a dough starts to form.
  5. Transfer about half of the dough to a piece of plastic wrap. Pat into a square about an inch thick. Place another piece of plastic wrap on top and roll the dough to about 3/16″. Lift and replace the top piece of plastic occasionally to avoid creases in the dough. Repeat with other half of dough. Slide one sheet of dough onto a baking sheet (still sandwiched between pieces of plastic) and slide the second sheet of dough on top. Refrigerate until cold, about 3 hours or up to 24.
  6. When ready to bake, preheat the oven to 350F and line two large baking sheets with parchment paper. Remove one sheet of dough from the fridge. Peel off the top piece of plastic, invert the dough onto one of the parchment-lined baking sheets, and peel off the other piece of plastic. Use a 2 1/2″ round cookie cutter to punch out as many rounds as possible. Remove the excess dough and set aside. Repeat with the second sheet of dough. Use a small round or other decorative cutter to punch out the centers of half the circles. Reroll and repeat process with dough scraps until you’ve used up all the dough (follow rolling process in step 5, chilling as necessary). If the dough is still firm, proceed straight to baking; otherwise, chill first until firm, about 15 minutes.
  7. Bake sheets one at a time for about 15 minutes, or until cookies are just barely golden on the edges. Cool cookies on the sheet for 5 minutes before transferring to a wire rack to cool completely.
  8. Sift icing sugar over the cookies with the center cutouts. Using a small spoon or offset spatula, spread about a teaspoon of jam on the flat sides of the bottom cookies. Top each with a sugared cookie. Serve immediately, or store in an airtight container between layers of parchment or wax paper until serving. I recommend filling cookies the day you plan to serve them (see notes above).

Sourdough Epi Wreath

sourdough epi wreath with ribbon

Just popping in to share this simple, festive bread idea for your holiday baking inspiration! A bread wreath is perfect as a dinner table centerpiece (just put a bowl of good salted butter in the middle!) or edible gift. You can also use this technique with larger or smaller pieces of dough (the bake time might change slightly), though I like the crust-to-crumb ratio of this size plus the fact that it’s the size of an actual wreath! This would also work well with any lean bread dough that’s not too slack (hydrated).

Sourdough Epi Wreath

Makes 1 medium wreath

Ingredients:

Method:

  1. Turn the dough out onto a lightly floured surface. Shape into a loose round. Cover and let rest for 10 minutes. Meanwhile, prepare a sheet pan with parchment paper and lightly dust with semolina / cornmeal. (Note: I like to double up on baking sheets for these wreaths to keep the bottom from scorching.)
  2. Degas and shape into a tight, smooth boule (round). Lightly flour your hands and use your thumbs to poke a hole in the center. Gently stretch the dough to widen the circle. The wreath should be about 10 inches across and the hole in the center at least 4 inches (it’ll shrink back a bit when you put it down).
  3. Place the wreath on a prepared sheet, seam side down. Lightly mist with oil and cover with plastic wrap. Allow to rise at room temperature until the wreath is puffy and has increased by about 50% (this takes me about 1.5-2 hours). About an hour before baking, preheat the oven to 500F with a baking stone on the center rack and sheet tray on the bottom of the oven.
  4. When the wreath is ready to bake, have ready a measuring glass with hot water and a pair of sharp kitchen scissors. Dust the top of the wreath with rice flour. Use the kitchen scissors to cut the dough at a sharp angle (30-45 degrees) almost all the way through the dough. After snipping, pull the point away from the center (towards you). Repeat all the way around the wreath.
  5. Transfer the wreath to the oven and carefully pour about 1 cup of hot water into the sheet tray on the bottom of the oven. Bake for 5 minutes, then turn the heat down to 450F and bake for another 20-25 minutes or until the wreath is golden brown and sounds hollow when tapped. Transfer to a wire rack to cool.
sourdough epi wreath