Friends, I’m pretty excited about these sourdough English muffins. I’ve futzed with English muffins on and off for a few years but nothing has quite ticked all the boxes for me. When it comes to these stovetop-griddled breads, I have two main criteria: first, NOOKS AND CRANNIES. No close-textured interiors here — I want irregular holes for soaking up all that butter or egg yolk (because, sorry bagels, English muffins are THE breakfast sandwich bread).
Second, English muffins should be super easy to pull off for breakfast. While I’m usually up early, I am not a morning baker — I’m not going to spend 2 hours before breakfast mixing and proofing to get something on the table! My English muffins need to be prepped and ready to cook as soon as I roll out of bed.
These English muffins solidly meet both these criteria; and they’re naturally leavened to boot (FLAVOR). I’ve made probably 5 batches in the last couple of weeks to ensure they hold their own toasted/untoasted, in breakfast sandwiches, and as vehicles for butter and jam. Safe to say my sourdough English muffin recipe hunt has ended. I hope you enjoy them as much as we do.
Keys to successful English muffins
Cut > Individually shaped: I am a bit obsessive about having evenly portioned breads and buns and no wasted dough; so my first instinct was to individually shape all my English muffins. However, I’ve come around to the roll out and cut method for this particular dough. Roll+cut involves less dough handling, which results in more nooks and crannies. Since we’re cooking these on the stovetop instead of in the oven, absolute evenness is less important– you can just pull off any muffins that may be cooking a little faster than the others. If you want zero wasted dough, you can use a bench knife to cut these into squares instead of punching out rounds. I’m partial to rounds, though; so I just punch out as many as I can, then gently smoosh the scraps together and cut that into equalish portions.
Don’t roll too thick: Roll to a 1/2″ thick, no more. The muffins will rise in the pan and be the perfect thickness when done. If you start too thick it’s more likely you’ll end up with burnt outsides and undercooked centers.
Oil it up: This dough is on the soft and sticky side, so don’t skimp on oiling surfaces/parchment paper/your cutter/your hands when handling.
Low and slow heat: Finding the right temp for your stove and pan takes a little Goldilocks-ing. I use a cast iron pan and keep the heat on the low the entire time. You’re aiming to cook the muffins for about 4-5 minutes per side; so if you notice them browning too fast turn down the heat. If you cook your English muffins in multiple batches like I do, you may need to turn down the heat for the second batch.
Baker’s Notes:
This recipe is adapted from Dessert Person by Claire Saffitz (her recipe version is yeasted; so I converted to sourdough and modified the mixing method slightly). Claire recommends scalding the milk but I didn’t find that necessary. I do bring the milk to room temperature before mixing the dough (a couple short pulses in the microwave does the trick) to speed up fermentation.
Because this dough is loose, I love using the paddle attachment to get it started and develop the dough quickly. If you use a dough hook the entire time, the dough will take quite a bit longer to knead.
To have these muffins ready for breakfast, I usually start mixing the dough in the afternoon the day prior.
240g ripe, active sourdough starter (100% hydration)
240g milk, at room temperature (I’ve tried whole, 2%, and buttermilk and all worked fine!)
40g honey
260g bread flour
35g whole wheat flour (spelt or einkorn work beautifully too!)
6g kosher or sea salt
28g unsalted butter, at room temperature
Cornmeal, for dusting
Neutral oil, for coating
Method:
Mix the dough (afternoon, day 1): Combine all ingredients except butter in the bowl of a stand mixer fitted with the paddle attachment. Mix on low to hydrate all the flour, then increase the speed to medium and mix until the dough is strong enough to gather around the paddle, about 3 minutes. Scrape down the paddle, cover, and rest for 5 minutes.
Switch to the dough hook. With the mixer on low, add the room temperature butter in two batches, incorporating the first addition completely before adding the next. Once the butter is incorporated, raise the speed to medium and mix until the dough is smooth, shiny, and stretchy, about 3 minutes. This is a fairly soft and sticky dough, but it should be strong enough to hold together and be easily picked up in one piece. If not, beat in additional bread flour a teaspoon at a time until the dough comes together.
Bulk fermentation: Transfer dough to a clean, well-oiled container. Let rise at warm room temperature until roughly doubled. With a dough temperature of 77F, this takes me about 3.5 hours; actual time will vary depending on the strength of your starter and dough temperature.
Shape and cold-proof the dough: When the dough has doubled, line a sheet pan with a silicone mat or oiled parchment paper. Dust generously with cornmeal. Turn the dough carefully onto the prepared pan, doing your best not to degas it too much. (Minimal handling will yield the best nooks and crannies!) Oil the top of the dough and your fingers, and gently press the dough out to a rectangle 1/2″ thick. (I aim for dimensions just over 7″ x 12″; this way I can get about seven 3.5″ English muffins from my first pass.) Grease another piece of parchment and set it over the dough. Cover the whole sheet in plastic or tuck the edges of the parchment around the edges of the dough so it won’t dry out. Refrigerate overnight (8-16 hours).
Cut and cook the English muffins (morning, day 2): Heat a large ungreased cast iron or non-stick skillet (two, if you have them) over low heat. Use an oiled 3.5″ oiled round cookie cutter to cut out rounds from the dough (it’s ok to twist the cutter to make sure the whole edge is cut). I find it easiest to retain a round shape if I transfer the muffins to the skillet as I cut them; so if you’re cooking in batches just cut as many rounds as you can fit in your pan at once. Once you’ve cut as many rounds as you can out of the dough, gently press the scraps together and cut more, or just use a bench scraper to cut the dough into equal-ish pieces (I do this to minimize waste!).
Cook the muffins until puffed and the tops are starting to turn matte at the edges, about 4-5 minutes; flip and cook another 4-5 minutes or until both sides are golden brown and the center registers 200F. The trick is to find and maintain your sweet spot temperature so that the muffins cook completely and brown, but don’t scorch. This takes some practice! In general, low and slow is better. (If you find your muffins are scorching before the centers can cook through, you can pop them in a 350F oven for a few minutes to finish cooking. For future batches, lower the stovetop heat.)
Transfer cooked muffins to a wire rack. Cool to room temperature before fork-splitting and devouring (I like these best untoasted when fresh). Store any leftovers in a plastic bag for up to 2 days; split and toast before enjoying!
If you’re a fan of AsianASMR YouTube channels, you’ve probably encountered some version of double fromage cheesecake over the years. Popularized by Japanese bakery chain LeTAO, double fromage cheesecake is made up of a sponge cake layer, topped with a layer of baked cheesecake, topped with a layer of cheesecake mousse (or no-bake cheesecake). Once set, the entire cake is dusted with leftover sponge cake crumbs. As with many Asian-style cakes it’s light and lightly sweetened — perfect for warm summer evenings.
LeTAO has actually shared their original recipe on YouTube (it’s in Japanese, but you can get a general idea from the subtitles). With their recipe as a guideline, I created this strawberry version by adding a layer of strawberry gelee between the two cheesecakes and strawberry puree to the cheesecake mousse. To pack a stronger strawberry punch, the whole cake is lightly frosted with strawberry whipped cream and strawberry-speckled cake crumbs (strawberry shortcake Good Humor bar vibes, anyone?).
This strawberry double fromage cheesecake isn’t hard to make, but it does take some time for the different layers to set. You can make it leisurely over one day, or break up the work over a couple days to fit your schedule.
Baker’s Notes:
You’ll need strawberry puree for the strawberry gelee and strawberry cheesecake mousse layers. I made my own by simply whizzing up some fresh strawberries in a blender, but you can use store-bought puree or use frozen berries (thaw before blending). I like to strain my puree to get rid of the seeds, so I always start with 50% more berries (by weight) than what I need for the recipe. (In this case, I suggest starting with 225g fresh strawberries). Freeze any extras for a later use, or just toss into your next smoothie or swirl into yogurt!
I absolutely love the flavor combination of strawberries and elderflower, so I used some IKEA elderflower syrup in both the gelee and mousse. You could use another brand or even elderflower liqueur (like St-Germain). No biggie if you don’t have it, though — subs are in the recipe!
Strawberry Double Fromage Cheesecake
Makes one 6″ cake | Adapted from LeTAO and Baked to Order
Ingredients:
For the sponge cake:
45g milk
30g neutral oil (I used grapeseed)
1/8 tsp kosher salt
1/2 tsp vanilla extract
3 large eggs, separated (cold is fine)
1/4 tsp cream of tartar
75g granulated sugar, preferably caster or superfine
80g cake flour, sifted
For the baked cheesecake:
165g full-fat cream cheese, at room temperature
50g granulated sugar
1/4 tsp kosher salt
1 large egg, at room temperature
2g (1/2 tsp) vanilla extract
3g (3/4 tsp) lemon juice
80g sour cream, room temperature
5g (2 tsp) cake flour
For the strawberry gelee:
2g (scant 3/4 tsp) powdered gelatin
10g cold water
85g strawberry puree (strained or unstrained, depending on your preference)
Preheat the oven to 350F with a rack in the middle. Line the bottom of a round 8″ cake pan (with at least 2″ sides) with parchment. Lightly grease the parchment, but don’t grease the sides of the pan.
Combine the milk, oil, and salt in a small saucepan. Heat over low until warm (but not hot) to the touch. Remove from heat, add the vanilla, and keep warm while you prepare the rest of the batter.
Place the egg whites in a large, spotlessly clean stainless steel bowl. (You will eventually be mixing all the cake batter in this bowl, so pick one that’s nice and wide.) Using a handheld electric mixer, mix the egg whites on low until foamy. Add the cream of tartar and continue whisking on low to medium-low until the bubbles tighten and resemble shaving cream. Add the sugar a spoonful at a time, whisking all the while. Turn the speed up to medium and whisk until the meringue holds stiff, shiny peaks when the beaters are raised slowly.
Add the egg yolks one at a time, whisking on low after each addition. Mix just enough so the color is homogenous.
Sift in the flour in 2 batches. Use a balloon whisk or flexible spatula to fold the flour in after each addition. Fold just until the flour is mixed in, doing your best not to deflate the batter. Take extra care to scrape the sides and bottom of the bowl, as flour likes to hide and stick there!
Scoop about 1/2 a cup of batter into the milk-oil mixture. Whisk to combine — no need to be gentle about this; you’re just “tempering” the liquid so it’s more similar in consistency to the rest of the main batter, making it easier to fold the two together with minimal deflation.
Drizzle half the milk-oil mixture around the perimeter of the main batter. Use a balloon whisk or flexible spatula to fold in. Repeat with the remaining milk-oil mixture. Fold just until no streaks of liquid remain and you have one homogenous batter. (Again, scrape the sides and bottom of the bowl thoroughly!)
Scrape the batter into the prepared pan and smooth the top. Whack the pan firmly on the counter 2-3 times to break any large air bubbles.
Bake until golden and springy to the touch, about 30 minutes. Remove from the oven and immediately drop the pan onto the counter from a height of 12″. (This helps minimize shrinkage.) Let cool for about 10 minutes on a wire rack, then run a thin spatula around the edge. Leave in the pan to cool completely.
Right before preparing the baked cheesecake batter, cut the cake horizontally so you have a round about 1/2″ thick (save the rest of the cake for another use). Use a 6″ cake ring to punch out a circle of cake. Remove the excess cake around the outside of the ring; but do not discard. Remove cake and clean the ring. Line the ring with parchment paper and place on a cake round or sheet pan. Place cut round on the bottom of the ring.
Trim the brown parts off the cake you removed from outside the ring; wrap and refrigerate or freeze — you’ll use this for decorating the outside of the cake.
Make the baked cheesecake:
Preheat the oven to 300F with one rack in the middle and one below.
In a medium bowl, combine the cream cheese, sugar, and salt. Mix on medium-low with a handheld electric mixer. Scrape down the sides, add the egg, and mix until smooth. Add the vanilla and lemon juice, and mix until smooth. Add the sour cream and mix until well combined. Add the flour and mix until smooth.
Pour the batter into the prepared ring. Tap the pan on the counter several times to dislodge any large air bubbles.
Transfer the cheesecake to the middle rack in the oven. On the rack below, place a cake pan filled with about 2 inches (5 cm) of hot water. Bake until the edges are set but the center still gently wobbles, about 30 minutes. Cool to room temperature on a wire rack, then refrigerate uncovered until cold (at least 2 hours).
Make the strawberry gelee:
When the cheesecake has chilled completely, prepare the strawberry gelee. In a small bowl, sprinkle the gelatin evenly over the cold water. Let stand for 5 minutes to bloom.
In a small saucepan, combine the strawberry puree, elderflower cordial, and sugar. Heat over medium until the sugar has melted and the mixture is steaming but not boiling. Remove from heat and add the bloomed gelatin. Stir until the gelatin has completely dissolved, then scrape into a heatproof jug or container. Let cool for 10 minutes, then pour over the baked cheesecake layer. Chill while you prepare the strawberry cheesecake mousse.
Make the strawberry cheesecake mousse:
Whip the heavy cream until just before soft peaks. Chill while you prepare the rest of the mousse.
In a small bowl, sprinkle the gelatin evenly over the cold milk to bloom. Set a sieve over a clean, heatsafe bowl.
Fill a small saucepan with an inch of water and bring to a simmer over medium heat. In a heatproof bowl (that will fit over the saucepan without the bowl touching the water), whisk together the egg yolk, sugar, and elderflower cordial (or water). Heat, whisking constantly, until the mixture thickens and registers 155F on a digital thermometer. (This is to pasteurize the egg yolk.) Remove from double boiler and whisk in the gelatin mixture until completely dissolved. Whisk in the cream cheese and strawberry puree. Strain into the prepared bowl.
Using a flexible spatula, fold in the whipped cream in two portions, just until homogenous. Pour over the gelee layer. Refrigerate until set, at least 4 hours (or overnight).
Finish the cake:
When the mousse has set and you’re ready to decorate, make the strawberry whipped cream. Combine the cream and ground freeze-dried strawberries in a small bowl and whip to medium-firm peaks. (You can also do this in a mini food processor — grind the strawberries to a powder, if whole, then add the cream and pulse until thick like yogurt. It doesn’t take long!) Refrigerate until ready to use.
To make the strawberry crumbs, pulse the reserved cake scraps in a food processor until fine (or press through a sieve). Stir in the freeze dried strawberries.
To decorate, remove the cake ring and parchment paper. Frost the entire cake with a light coat of the strawberry whipped cream. Immediately press the strawberry crumbs all over the sides of the cake (you can do the top too, if you like, but I kept it naked). Transfer any remaining strawberry whipped cream to a piping bag fitted with a French star tip. Pipe a few swirls on top and garnish with fresh strawberries. Refrigerate until ready to serve. Cake is best the day it’s assembled, but you can refrigerate leftovers in an airtight container for up to 3 days.
Hello Ontario strawberry season, my unofficial start to summer! Every June I start stalking the websites of our local farms waiting for the announcements that The Strawberries Are Here. I love picking all types of fruit, but strawberries might be my favorite. Pulling back the leaves to find those extra-ripe-and-red ones hiding in the middle of the plants, keeping an eye on the kids to make sure they aren’t sampling more than is socially acceptable — strawberry picking is an experience I relish every year.
One of my must-bakes every strawberry season is a fraisier (cc: this berry basil fraisier from the archives and a strawberry elderflower version in my book), but this year I wanted to work on some other desserts that would showcase the beauty of in-season strawberries. When working with such perfectly ripe fruit, my motto is always “Less is more!” If your strawberries are perfectly candy-sweet, I think it’s a shame to cook them or overshadow their flavor with any strong flavoring.* Enter: this fresh strawberry sable breton tart with vanilla bean mousse.
*If you’re picking pounds and pounds, ok, I get it. Just promise me you’ll enjoy at least a portion of them as unadulturated as possible!
Sablé breton
Sablé breton, or French-style shortbread, straddles the line between cake and cookie, thanks to richness from egg yolks and butter and lift from baking powder. It makes a wonderful tart base; it’s sturdy and actually holds up fairly well to refrigeration. (Once topped it does soften with time, but doesn’t get as soggy as some other tart crusts do.) I roll out my dough, cut out the pastry with a cake ring and bake the base directly in the ring for the cleanest look and easiest unmolding. However, you can also press the dough evenly into a cake ring or parchment-lined cake pan.
With this amount of pastry, I got one 6″ tart plus three 3.5″ tartlets. Alternatively, you could use all the dough to make one 8″ tart, or bake off extra dough as cookies. One last thing — for the best-tasting sablé breton, I stick with tradition and use European style (84% butterfat) cultured salted butter. If you don’t have salted butter on hand, increase the salt to 1/4 tsp.
Vanilla Bean Mousse
For the creamy element, I borrowed a page from the ever-genius Bravetart with a egg-white vanilla bean mousse. The mousse starts with what is essentially a pastry cream made with just egg whites. (Conveniently, you’ll need the exact amount of egg whites leftover from the sablé breton. Recipe development score!) This may seem odd, as classic pastry creams usually rely on egg yolks for flavor and richness. However, Stella Parks notes in her book that egg whites can thicken pastry cream just as well as yolks. The resulting custard just has a more neutral, clean flavor — perfect for letting infusions take center stage. Here we’re sticking with classic vanilla. It’s definitely worth breaking out a real bean here — your mousse (and tasters) will thank you! You’ll use half the seeds for the pastry and the rest plus the pod for the mousse.
All the beautiful strawberries
Base, check; cream, check — the only thing left is to pack the tart full of as much fresh strawberry goodness as possible. I fill the center with lots of finely diced strawberries mixed with a touch of jam, then pile the top with the prettiest berries I have — I like to keep the stems on a few of them just for aesthetics. You can brush the decorative berries with some warmed apricot jam if you want a little shine or if you’re storing the tart for more than a couple hours (this will keep the berries for drying out).
Light, elegant, and fresh, this strawberry sablé breton tart with vanilla bean mousse has joined the fraisier as one of those desserts I’ll anticipate every strawberry season. I’m also dreaming up some other fruit-mousse combos — cherry and chocolate? Peach and brown sugar? Lychee and coconut? Stay tuned!
Fresh Strawberry Sablé Breton Tart with Vanilla Bean Mousse
Makes one 6″ tart plus a few small tartlets, or one 8″ tart
Ingredients:
For the vanilla bean mousse:
170g whole milk
113g heavy cream (35% milk fat)
Seeds of 1/2 vanilla bean, plus pod
65g granulated sugar
1/4 tsp kosher salt
17g cornstarch
60g (from about 2 large eggs) egg whites (reserve yolks for sable breton)
14g unsalted butter
1/2 tsp vanilla extract
85g heavy cream, cold
For the sablé breton base:
125g all-purpose flour
5g (1 1/4 tsp) baking powder
40g egg yolks (from about 2 large eggs), at room temperature
80g granulated sugar
1/8 tsp fine sea salt (increase to 1/4 tsp if using unsalted butter)
Seeds of 1/2 a vanilla bean (reserve remaining seeds and pod for mousse)
85g salted European-style butter, very soft
For the fresh strawberry filling:
150g fresh strawberries, stemmed and finely diced
40g (2 Tbsp) seedless strawberry preserves (or other complementary flavour)
To finish:
Fresh strawberries
1-2 Tbsp apricot preserves (optional)
Method:
Make the vanilla mousse:
Set a fine-mesh strainer over a medium heat-safe bowl or container.
In a medium saucepan, combine the milk and 113g heavy cream and bring to a simmer over medium heat. Meanwhile, place the sugar in a medium bowl and rub in the vanilla bean seeds. Add the empty vanilla bean pod to the heated dairy; then remove from heat, cover, and infuse for 30 minutes (or up to 1 day, in the refrigerator).
Remove the vanilla bean pod and scrape any pulp back into the saucepan. Bring dairy back to a simmer over medium heat. Meanwhile, whisk the salt and cornstarch into the vanilla-sugar until well combined. Whisk in the egg whites.
Once the dairy reaches a simmer, remove from heat. Pour about half the dairy in a slow, steady stream into the egg white mixture, whisking constantly to avoid cooking the eggs. Scrape the warmed egg white mixture back into the saucepan. Cook over medium heat, whisking constantly, until the custard thickens and starts to bubble. Once bubbles appear, continue whisking the custard on the heat for one full minute to cook out any starchiness. Strain into the prepared container. Whisk in the butter and vanilla extract. Press a piece of plastic wrap directly against the surface of the custard and cover. Refrigerate until cold, at least 4 hours (or up to a week).
Once the base is chilled, whip the remaining 85g heavy cream to medium peaks. Stir the custard base until smooth; then gently fold in the whipped cream until well combined. Transfer mousse to a piping bag fitted with a large round or open star tip for at least an hour before assembling tarts. (Mousse can be prepared up to 5 days in advance.)
Make the sablé breton base:
In a small bowl, whisk together the flour and baking powder. Set aside.
In the bowl of a stand mixer fitted with the whisk attachment (or using an electric hand mixer), combine the egg yolks, sugar, and vanilla bean seeds. Whisk on medium-high speed until pale and thickened, 2-3 minutes. With the mixer still running, add the butter a tablespoon at a time. Mix until well combined. Scrape down the sides of the bowl. Add the dry ingredients and fold in with a flexible spatula just until no streaks of flour remain.
Scrape the dough onto a piece of parchment or silicone mat and place a piece of plastic wrap on top. Roll out the dough into a round between 1/4″ and 1/2″ inch thick, peeling off and replacing the plastic wrap every few rolls to avoid getting creases in the dough. Transfer the dough (with the plastic wrap on top) to a sheet pan and refrigerate until firm, at least 1 hour (or up to 5 days).
When ready to bake, preheat the oven to 350F with a rack in the middle. Flip the dough over (the plastic will now be on the bottom) and peel off the parchment or silicone mat. Then replace the parchment and re-invert the dough. (This step ensures the dough isn’t stuck to the parchment or silicone.) Transfer the parchment with the dough on it back to the baking sheet and remove the plastic wrap. Use a 6″ cake ring to punch out a circle of dough. Remove the excess dough around the outside of the ring, but keep the cut round inside the ring. Use a fork to poke the dough in the ring all over. Press the remaining dough into tartlet molds or refrigerate/freeze for later use.
Bake the sablé breton until golden, about 25-30 minutes for the 6″ round (about 20 minutes for smaller tartlets). Let cool completely in the molds before assembling.
Assemble the tart:
When ready to assemble the tart, mix together the diced strawberries and jam. Spread the filling on the tart base, leaving about a 1″ border. Pipe the mousse around the edge and over the filling. Decorate with fresh strawberries as desired (you can brush the berries with warmed apricot jam for a little shine). Refrigerate until ready to serve. Tart is best enjoyed the day it’s assembled. Store leftovers in an airtight container for up to 3 days. The pastry will soften with time, though it becomes more cakelike rather than soggy — not a bad thing at all!
Two funfetti recipes in a row — who am I, even? Well, I am very much the mother of young children and today’s recipe is all for (and because of) them and their sprinkle-loving hearts.
My kids love watching Cupcake Jemma on YouTube. If you’re not familiar with her, Cupcake Jemma is a baker in London who owns the bakery chain Crumbs and Doilies, known for their colorful and often over-the-top cakes, cookies, and bars. She and her team put out a recipe video every week, often for one of the bakery’s signature treats. Recently they did a video on edible cookie dough. My older kids lost their minds and begged to make some. But then they remembered another CJ video for cookie dough brownies. You can guess how things progressed.
While I obviously love baking and desserts, I don’t love really sweet things and honestly the idea of over-the-top, loaded brownies made my teeth hurt. But I didn’t want to quench the kids’ excitement and creative spirit, so we made these funfetti cookie dough brownie with a ruby ganache top (because color).
Honestly, these turned out better than I expected. Yes, they are sweet and indulgent, and I recommend enjoying them into teeny tiny squares (like, literally, 64 tiny ones). The funfetti cookie dough adds an interesting…grittiness (if you’ve eaten cookie dough, you know what I mean) that isn’t unpleasant, despite how it sounds. The ruby chocolate ganache not only adds color but also a gentle acidity that helps temper the sweetness of the bar. I also used a scaled-down recipe of my go-to brownie (from Baked to Order) as a base — it’s fudgy and not overly sweet, perfect in this application.
These cheerfully indulgent bars would be perfect for a birthday party or bake sale. Store extras in the freezer for when you need a bite of cheer (or want to earn a few mom points).
Baker’s Notes:
The ganache topping is made with ruby chocolate (previously seen in this Chocolate Raspberry Mousse Cake), which is naturally pink. You can find it in some grocery/specialty food stores or online. If you don’t have access to ruby chocolate, you can substitute a semisweet chocolate (~50-60% cocoa solids).
The ruby chocolate color does fade when heated, so I added a drop of fuschia gel coloring just to brighten it up a touch. Totally optional.
To make cookie dough that’s safe to eat, you need to bake the flour to kill off any harmful bacteria. I do this before baking the brownies to give the heated flour time to cool off before mixing the cookie dough.
For very clean slices, make sure your assembled brownies are very well chilled. Use a hot, sharp knife and wipe it off between slices!
Funfetti Cookie Dough Brownies
Makes one 8×8 pan | Cookie dough and concept adapted from Cupcake Jemma; brownie base adapted from Baked to Order
Ingredients:
For the brownie base:
57g bittersweet chocolate (I use 70%), chopped
57g unsalted butter
50g neutral oil
63g all-purpose flour
40g Dutch-processed cocoa powder
113g granulated sugar
44g light brown sugar
1/2 tsp kosher salt
2 eggs, cold
1 tsp pure vanilla extract
1/2 tsp espresso powder
For the edible funfetti cookie dough:
120g unsalted butter, at room temperature
95g granulated sugar
45g light brown sugar
1/2 tsp kosher salt
1/2 tsp pure vanilla extract
1/8 tsp pure almond extract
30g plain yogurt, buttermilk or sour cream (I used half buttermilk, half sour cream)
100g heat-treated all-purpose flour (from 105g flour baked at 325F for 10 minutes and cooled completely)
Preheat the oven to 325°F with a rack in the middle. Spread 105g of all-purpose flour in an even layer on a sheet pan. Bake flour for 10 minutes. Cool completely before using.
Make the brownie base:
Raise the oven temperature to 350°F. Line an 8 x 8-inch pan with foil or parchment, leaving about 3 inches of overhang on two sides, and lightly grease.
Place the chopped chocolate in a small glass measuring cup with a spout.
Place the butter in a small, light-colored saucepan over medium-low heat. Once the butter has melted, turn the heat up to medium-high. Stir frequently with a heatproof spatula, scraping the sides and bottom of the pan as needed. The butter will crackle, foam, turn clear gold, then finally start browning. It’s done when the crackling subsides and you smell toasted nuts. This process takes about 8 minutes total, but the butter can go from browned to burnt in a flash—so keep an eye on it. Pour the butter and all the toasty bits over the chocolate. Add the oil and set aside.
In a small bowl, whisk together the flour and cocoa powder.
Combine the sugars, salt, eggs, vanilla, and espresso powder in the bowl of a stand mixer fitted with the whisk attachment (or use a handheld mixer). Whisk on low briefly to combine, then turn up the speed to medium-high and continue whisking until the mixture is thick, pale, and roughly tripled in size, about 5 minutes.
Reduce the speed to low and drizzle in the butter-chocolate-oil mixture. Once incorporated, add the flour-cocoa mixture, mixing just to combine. Use a flexible spatula to fold from the bottom of the bowl to make sure everything is well-mixed and there are no pockets of unincorporated flour. Scrape the batter into the prepared pan. Bake until the top is cracked and glossy and a toothpick inserted in the middle comes out with just a few moist crumbs, about 17-20 minutes. Cool completely while you prepare the cookie dough layer (you can stick it in the fridge or freezer to hurry this along).
Make the edible funfetti cookie dough:
Combine the butter, sugars, and salt in the bowl of a stand mixer fitted with the paddle attachment (or use a handheld mixer, or do it by hand). Mix at medium speed until lighter in color and well combined, about 2-3 minutes. Add the extracts and yogurt and mix until well combined. Add the heat-treated flour and mix on low until combined. Using a flexible spatula, fold in the sprinkles and chopped white chocolate until evenly combined. Using an offset spatula, spread the cookie dough evenly over the cooled brownie base. Refrigerate while you prepare the ganache.
Make the ruby ganache:
Place the chopped ruby chocolate in a heat-safe bowl. In a small saucepan over medium-low heat (or in the microwave), warm the cream until steaming. Pour over the chocolate and let stand for 1 minute, then stir together to form a smooth ganache. Add gel food coloring, if desired, and stir to combine.
Assemble the funfetti cookie dough brownies:
Pour the ganache over the chilled cookie dough, tilting the pan to cover the surface evenly. Decorate with sprinkles, if desired. Chill in the refrigerator until ganache is set, about 30-60 minutes (again, you can stick it in the freezer to speed this along). For clean slices, use a sharp chef’s knife to cut the chilled brownies. Wipe the knife clean with a hot towel between slices. Store leftovers in an airtight container in the refrigerator for up to 5 days, or freeze for longer storage.
Happy weekend! Just wanted to say hi and share another fun way to use some of your sourdough discard — sprinkle (or funfetti) cake! This is my favorite soft and fluffy buttermilk cake base from Baked to Order, but rejiggered as a snack cake. Snack cake…I love that term! Basically it’s a small, typically one layer cake that is simple to put together and keep around for snacking — no party or special occasion required. Count me in!
Baker’s notes:
You can use discard that’s a few days old; I keep discard in the fridge for up to the week or until it starts to produce “hooch” (a thin, liquid alcohol byproduct on top) or smells unpleasantly acidic. For this cake, you’ll want to bring the starter back to room temperature so it mixes into the batter easily.
If you don’t have sourdough discard, increase the all-purpose flour and buttermilk by 60 grams each. No other changes needed.
I always use plain old rainbow jimmies (the long, rod-shaped sprinkles) for mixing into cakes. They tend to hold their color and not bleed into the batter as much as other styles. Save your fancy designer sprinkles for the top (I get mine from Sweetapolita)!
I used half a batch of my fave buttermilk ermine frosting here, with some freeze-dried strawberries mixed in for color and flavor. But this cake would go well with your favorite frosting — it’s a great time to use up any leftover bits you might have in your freezer. I used about 300g of frosting (a little under 2 cups), for reference. By the way, I always advocate for making a full batch of frosting and freezing whatever you don’t use in an airtight bag. It’s such a useful freezer stash item for when you want to make a few cupcakes or another snack cake. Just bring the frosting to room temperature and re-whip it before using (it may look separated or curdled at first, but it should come together after a good whip at the right temp). Frosting temperature sweet spot for me is around ~72F — much warmer than this and the frosting will be too droopy and runny; much cooler and it’ll be dense and hard to spread.
For the sourdough sprinkle snack cake: Preheat the oven to 350°F (175°C) with a rack in the middle. Line an 8×8 square aluminum baking pan with parchment paper, leaving about 3 inches of overhang on two of the sides for easy removal. Lightly grease the pan and parchment.
In a small bowl, whisk the flours together thoroughly.
In a measuring cup with a spout, whisk together the buttermilk and sourdough discard until smooth.
In the bowl of a stand mixer fitted with the paddle attachment (or using a handheld mixer), combine the butter, sugar, baking powder, and salt. Mix on low to combine, then increase the speed to medium and cream until light and fluffy, about 5 minutes. Use a flexible spatula to scrape down the sides of the bowl and the paddle a couple of times during this process. Add the oil and mix well to combine. Scrape down the bowl and the paddle.
Add the eggs one at a time, making sure each is well incorporated before adding the next. Add the vanilla and almond extracts and mix well to combine. Scrape down the bowl and the paddle.
With the mixer on low, add the flour and buttermilk mixture in five additions, beginning and ending with the flour. Use a flexible spatula to fold from the bottom of the bowl a few times to make sure the batter is well-mixed. Fold in the sprinkles.
Scrape the batter into the prepared pan and use an offset spatula to smooth the top.
Bake until the cake is puffed and lightly golden and a skewer inserted into the center comes out clean or with a few moist crumbs, about 35-45 minutes. Transfer to a wire rack to cool completely before frosting.
For the strawberry buttermilk ermine frosting: In a stand mixer fitted with the paddle attachment or using a handheld electric mixer, beat together the frosting and freeze-dried strawberry powder until smooth. Use immediately.
To assemble: You can leave the cake in the pan for easy transporting, or transfer it to a serving plate. Dollop the frosting on and use an offset spatula or back of a spoon to swirl it over the surface of the cake. Decorate with sprinkles, if desired. Refrigerate any leftovers in an airtight container for up to 3 days; bring to room temperature before serving.
Whether you call them Mallomars, whippets, krembos, Viva Puffs, mallowpuffs, pinwheels, or chocolate tea cakes, chocolate-covered marshmallow cookies are beloved childhood treats around the world. Today I’m sharing a homemade Neapolitan version, which fuses vanilla shortbread, strawberry marshmallow, and dark chocolate coating. These cookies are a blast to make and sure to delight the entire family!
These neapolitan mallomars are a little bit of a project, but none of the elements are too difficult. To divide the work I like to bake the shortbread bases one day, then make the marshmallow and dip the cookies in chocolate the next. However, you can make these in one afternoon — choose a time when you are relaxed and ready to have fun in the kitchen!
To temper or not to temper
Recently over on Instagram I asked how people felt about tempering chocolate. Most people said they’d rather not, with “I’ve never done it before” or “It takes too long” being the main reasons. I understand that working with chocolate can seem intimidating, especially if you don’t do it often — I’m definitely no expert!
But if unfamiliarity is the only thing holding you back, I encourage you to give tempering chocolate a shot for this recipe. It’s a fantastic skill to have, and nothing can truly replace the shine and snap of well-tempered chocolate. I used the cocoa butter silk tempering method this time (yes, I made my own silk because we’re still stay-at-home over here so why not). If you have the time and tools for this (sous vide machine, cocoa butter) give it a shot — I was really happy with how easy it was! But if not, this article on chocolate tempering from Sugar Geek Show walks you through a few options. Choose whichever makes the most sense for you!
However, if you’d really rather not temper you can cover the cookies with a mixture of chocolate and coconut oil, which will set nice and snappy in the fridge. If you go this route the chocolate shell will look a little less pristine and you will need to store the cookies in the fridge, but the end product will still taste wonderful.
Baker’s notes:
Freeze-dried strawberries are the key ingredient to making a vibrantly fruity marshmallow. I buy mine online, but check your grocery store or local specialty food store as well. Don’t grind the strawberries until you’re ready to make the marshmallow — the strawberry powder tends to clump with exposure to air. If you can’t find freeze-dried strawberries, you can leave it out for a plain marshmallow center.
Before dipping the cookies, I like to pour the melted chocolate into a tall, narrow vessel (like a deli quart container). Choose something microwave-safe so that if the chocolate starts to cool and thicken too much, you can reheat it gently (5 second bursts in the microwave, stirring well after each!).
Neapolitan Mallomars
Makes about 30 cookies
Ingredients:
For the vanilla shortbread:
150g unsalted butter, at room temperature
50g icing (powdered) sugar
Scant 3/4 tsp kosher salt
Seeds from one vanilla bean (optional)
1 1/2 tsp pure vanilla extract
165g all-purpose flour
For the strawberry marshmallow:
45g freeze-dried strawberries
14g powdered gelatin
76g water (for blooming the gelatin)
1 tsp pure vanilla extract
76g water (for the sugar syrup)
95g corn syrup
227g granulated sugar
1/4 tsp kosher salt
For the chocolate coating:
340g good-quality semisweet chocolate (I used Callebaut 54.5%), tempered
34g refined coconut oil (optional, if not tempering the chocolate)
Method:
For the vanilla shortbread:
Make the shortbread dough: In the bowl of a stand mixer fitted with the paddle attachment (or using a handheld mixer), combine the butter, icing sugar, vanilla bean seeds (if using), and salt. Mix on low to combine, then increase the speed to medium and beat until smooth and well-combined, about 2 to 3 minutes. Scrape down the paddle and sides of the bowl. Add the vanilla extract and beat well to combine. Turn the mixer down to low and add the flour, mixing just to combine. Use a flexible spatula to fold from the bottom of the bowl to make sure everything is well-mixed and there are no pockets of unincorporated flour. If the dough is very soft and sticky, cover and chill for about 10 minutes before proceeding.
Roll and chill the dough: Transfer dough to a piece of parchment paper and pat into a square about 1-inch (2.5-cm) thick. Place another piece of parchment on top and roll dough to about ¼-inch (6-mm) thick, lifting the top piece of parchment occasionally to avoid creases in the dough. Slide dough onto a baking sheet (still sandwiched between pieces of parchment). Refrigerate until firm, at least 30 minutes or up to 2 days.
Cut and bake the shortbread cookies: When ready to bake, preheat the oven to 350F with a rack in the middle. Line a large cookie sheet with parchment paper (I reuse one of the sheets sandwiching the cookie dough). Use a 1 3/4″ round cookie cutter to cut circles, gathering and rerolling the scraps until the dough is used up. Place cookies on the prepared sheet, spacing about 1″ apart (they won’t spread much).
Bake cookies until set and the edges are lightly golden, about 15 minutes. Cool completely on a wire rack before assembling.
For the strawberry marshmallow:
Make the freeze-dried strawberry powder and prep your tools: Place the freeze-dried strawberries in the bowl of a food processor. Pulse until they form a fine powder. Set aside. Fit a piping bag with a 1/2″ round tip. Arrange all the cooled shortbread cookies on a parchment-lined sheet pan. (Once the marshmallow is whipped, you must immediately pipe it onto the cookies before it starts to set.)
Bloom the gelatin: In a small, wide bowl, mix the gelatin with 76g cool water and the vanilla extract. Stir to combine, making sure all the gelatin is saturated. Leave to bloom while you prepare the sugar syrup.
Cook the sugar syrup: In a medium (3-3.5L) heavy-bottomed saucepan, combine the remaining 76g water, corn syrup, sugar, and salt. Stir to combine. Place over medium heat. Stir occasionally with a heat-proof spatula or fork until the mixture starts bubbling, then stop stirring (stirring a boiling sugar syrup can encourage crystallization). Clip on a digital thermometer and continue cooking the syrup until it reaches 250F.
Cool the syrup: Once the syrup reaches temperature, carefully pour the hot syrup into the bowl of a stand mixer, using a flexible, heat-resistant spatula to scrape the pot. Let the syrup cool until it registers 212F on a digital thermometer, about 4-5 minutes.
Whip the marshmallow: Once the syrup has cooled to 212F, scrape the bloomed gelatin into the bowl. Carefully transfer the bowl to the mixer fitted with the whisk attachment. Whisk on medium low until the gelatin has melted, then increase the speed to medium-high and whisk until the mixture is fluffy, thick, and roughly tripled in volume and the mixer bowl has cooled to room temperature, about 10 minutes. Turn off the mixer and add the strawberry powder. Mix for about 15-30 seconds, or until powder is evenly mixed in. Grease a flexible spatula or plastic bowl scraper and scrape the marshmallow into the prepared piping bag.
Pipe the marshmallow: To pipe the marshmallow, hold your piping bag at a 90-degree angle about half an inch above a cookie. Squeeze until a mound of marshmallow covers the entire base, then slowly pull up as you stop squeezing. Repeat with the remaining cookies. You can leave the marshmallows with little peaks, or use a damp finger to flatten them down. Let set at room temperature, uncovered, until set and no longer sticky — about 45-60 minutes. (If you have any remaining marshmallow, pipe it onto a piece of parchment and let it set overnight; then cut into cubes and toss with equal parts cornstarch and icing sugar. Store in an airtight container.)
For the chocolate coating:
Prepare the chocolate: When you’re ready to dip the cookies, temper chocolate using your preferred method. Alternatively, chop the chocolate into small, even pieces. Heat the chopped chocolate and coconut oil together in 20-second bursts in the microwave, stirring well in between, until just melted. Be careful not to overheat.
Dip the cookies: Place a piece of parchment under a large wire cooling rack. Holding a cookie by the base, dunk into the chocolate to completely coat marshmallow. Hold upside-down for a few seconds to let any excess chocolate drip off back into the bowl, then place cookie-side-down on the wire rack. Repeat with remaining cookies. If using tempered chocolate, let cookies set at cool room temperature for about an hour before enjoying. If using chocolate-coconut oil coating, refrigerate for about 15 minutes until set. Store leftover cookies in an airtight container for at least a week. Tempered chocolate cookies can be kept at room temperature; chocolate-coconut oil-coated cookies should be stored in the refrigerator.
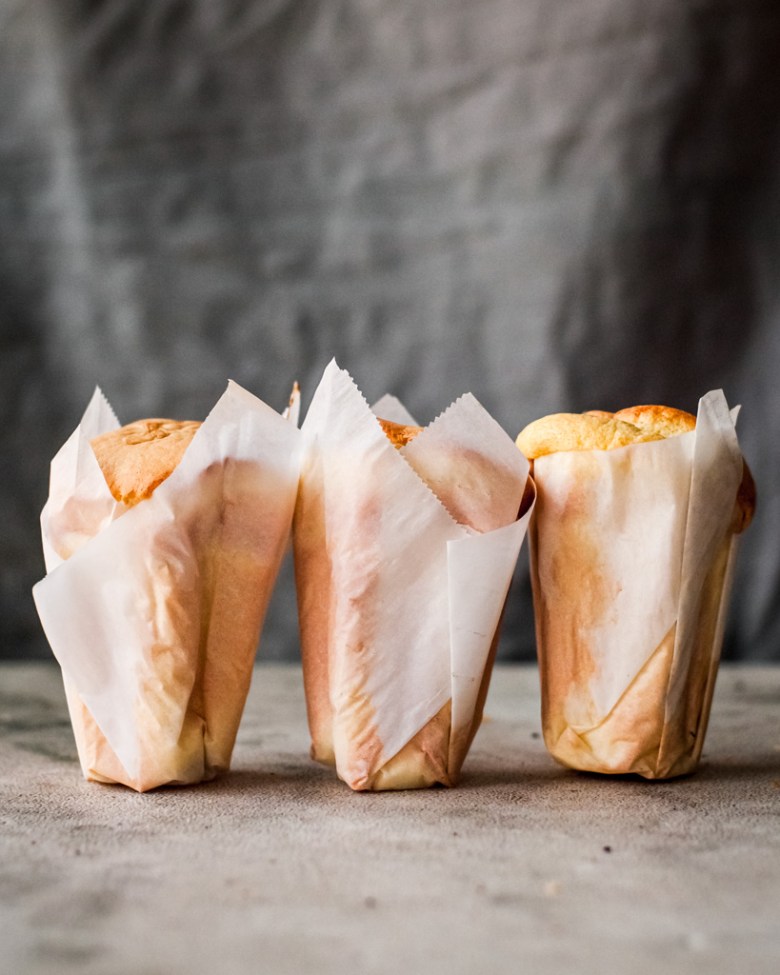
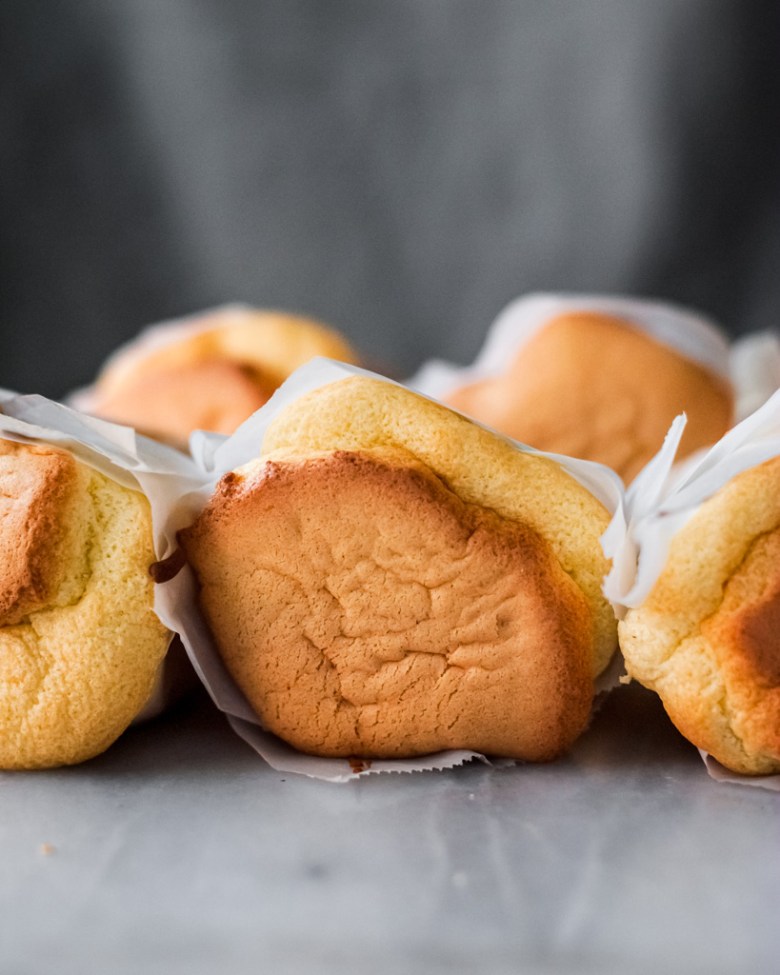
Mildly sweet and impossibly fluffy, these paper-wrapped sponge cakes have been a favorite of mine since childhood. Along with gai mei bao (coconut cocktail buns) and dan tat (egg tarts), these simple cakes were a must-buy every time we visited a Chinese bakery. After years of attempting to recreate these treats at home, I’m so happy to finally share this recipe with you.
Tang-mian or “cooked dough” method
For this recipe, I use a technique known as tang mian, or cooked dough. Basically, the flour is “cooked” with heated oil and milk before getting mixed with other ingredients. Pre-coating the flour with fat limits gluten formation and yields an extra fluffy, moist, and cottony-textured cake. I’m not sure exactly where this technique originated, but it’s been popular amongst Asian bakers for quite some time. I’ve been experimenting with tang-mian recently and appreciate the textural difference particularly in tall cakes (less so in roll cakes, but that’s another recipe for another day). Try it and see what you think!
Keys to sponge cake success
As with all sponge-style cakes, the keys to success for these cupcakes are properly whipped egg whites and good folding technique.
This cake batter doesn’t contain any leavening agents (i.e. baking powder or soda). Instead, the rise all comes from the meringue — egg whites and sugar that are whipped to stiff peaks and folded into the batter.
I also use cold egg whites for this recipe. While most North American sponge or chiffon cake recipes direct you to use room temperature eggs, Asian cake recipes often call for using cold egg whites. Cold egg whites take longer to whip to stiff peaks, but this allows time to form a very fine and strong meringue with minimal risk of overbeating (a pinch of cream of tartar helps too). I mix on no higher than medium speed for.a smooth meringue with very small, even bubbles — this results in velvety-textured, smooth cake with no unsightly holes. You want to whip the meringue to stiff, shiny peaks for this recipe. This article from Fine Cooking pictures the various stages of meringue — very helpful!
Once you’ve created your perfect meringue, the trick is to incorporate it into the rest of the ingredients while still retaining the structure and air you’ve worked so hard to create. I start by whisking a small amount of meringue into the yolk batter to “temper” it, then scraping the yolk batter over the meringue and using a whisk to fold the two mixtures together. When just a few streaks of white remain, I switch to a silicone spatula and finish folding until the batter is all one color. You can also fold the meringue into the yolk batter in a few portions; but after making many, many chiffon and sponge cakes I find this method is more efficient — plus, I don’t end up with any film of yolk batter at the bottom of my mixing bowl. But use whatever folding method you prefer!
The molds
If you grew up eating paper-wrapped sponge cakes, you may know that they are typically baked in flower-shaped individual tins. These tins are taller than typical cupcake molds and give these cakes their iconic shape. I got these flower cake molds from Hong Kong via a very kind friend. They are just under 2 3/4″ tall, just under 3″ wide at the top, and 1 7/8″ wide at the bottom (7cm tall, 7.1cm wide on top, 4.5cm wide on bottom).
Here are a few sources and ideas for finding for these tins:
If you have an Asian kitchen supply store or restaurant supply store in your area, check to see if they carry these molds or something similar. Search for popover molds, rum baba molds, dariole molds, or individual pudding cups. Many of these stores may not list their entire inventory online, so call or visit and bring some photos with you. If you’ve found some tins in your area, please comment with the name/city of the store!
Because I have such strong memories associated with these paper-wrapped cakes, using the proper molds absolutely enhanced my enjoyment of making them. The memories are not just about the taste of the cake — it’s the look and feel of them in your hand, the memory of peeling off the paper and slowly shredding off long pieces. If you have similar nostalgia and want to recreate this specific food memory, I think it’s 100% worth it to track some down.
HOWEVER! You can bake this batter in other cupcake or popover tins or even oven-safe paper cups — the cakes will still taste good. Here’s how I would calculate how much batter to fill a different-sized tin.
Weigh how much water it takes to fill your mold to the top and note the number in grams. For reference, one of my flower-shaped tins holds 180g of water, filled right to the top. You’ll sse these two numbers to calculate about how much batter to use per tin and your yield.
For example, one of my regular cupcake wells fits 100g of water. 100/180 = ~0.56. So, one of my regular cupcake wells holds 56% of the volume of one flower tin.
I use ~90g of batter per flower-shaped tin. Based on the previous calculation, I need 56% of that amount to fill a regular cupcake well. 90 x 0.56 = ~50. So I would use about 50g per cupcake mold, for a yield of 10-11 cupcakes. (90 x 6 = 540, total batter yield. 540 / 50 = 10.8. The recipe makes a little more than 540g to account for some loss in the bowls and utensils, so you should be able to get 11.)
Please note that the yield and baking time will vary depending on the size of your tin(s). Smaller, shallower cakes will bake faster than taller, thicker cakes.
It’s important to line whatever molds you use with parchment paper that extends the top edge. These delicate cakes rise quite a bit during baking and need the support. For my molds, I cut 7.5″ square papers out of parchment and followed this lining technique from Christine’s Recipes. For best results, take the time to crease the papers and get them to lie as flat as possible within the mold so batter doesn’t flow between the folds of the paper. I do NOT recommend using the method where you squish a paper into the mold using a similar-sized cup; though you can use a second mold to press the paper in tightly once you’ve folded and creased it.
Baker’s notes:
For best results, weigh your yolks and whites for this recipe. I use large eggs that typically weigh about 60g with shell, but even so I have noticed a surprising variance in how much large eggs weigh from brand to brand.
Cake flour helps achieve the very cottony, fine texture that is characteristic of these cakes. I do not recommend replacing with all-purpose. Cake flour tends to clump so I I sift it twice, once before adding to the milk-oil mixture and another time when I add it to the liquid.
Chinese Bakery Style Paper-Wrapped Sponge Cakes
Makes 6 large flower-shaped cupcakes (please read notes under “The Molds” if using different tins)
Ingredients:
84g whole milk
50g neutral oil (such as grapeseed or canola)
1/8 tsp kosher salt
1 1/2 tsp vanilla extract
100g cake flour, sifted
100g egg yolks (from about 5 large eggs), cold
150g egg whites (from about 5 large eggs), cold
1/4 tsp cream of tartar (optional — can sub with 1 tsp lemon juice)
84g granulated sugar, preferably caster or superfine
Method:
Preheat the oven and prepare the tins: Preheat the oven to 350F with a rack in the middle. Line cupcake tins with parchment paper so the paper extends the rim of the mold (see above video for method). Place tins, evenly spaced, in a 9×13 baking pan or on a sheet tray.
Set up a bain-marie and heat milk and oil: Fill a medium saucepan with 1-2 inches of water. Bring to a simmer over medium-low heat. Meanwhile, whisk together the milk and oil in a medium heatproof bowl. Once the water reaches a gentle simmer, set the bowl over the simmering water (make sure the bottom of the bowl isn’t touching the water). Whisk over the heat constantly until the mixture reaches 150F on an instant-read digital thermometer, about 3-4 minutes. Turn off the heat and remove the bowl.
Make the yolk batter: Whisk the salt and vanilla into the warm milk-oil mixture. Sift in the cake flour and whisk until smooth. Let cool for 1-2 minutes (to avoid cooking the yolks), then whisk in the egg yolks one at a time. The batter should be smooth and shiny. Set aside.
Make the meringue: Place the egg whites in a spotlessly clean bowl — choose something large and wide as eventually you’ll be mixing all the batter in it. Using an electric handheld mixer, whisk egg whites on low until foamy. Add the cream of tartar and continue whisking on low to medium-low until the bubbles tighten and resemble shaving cream. Add the sugar a spoonful at a time, whisking all the while. Turn the speed up to medium and whisk until the meringue holds stiff, shiny peaks when the beaters are raised slowly.
Combine the two batters: Whisk the egg yolk batter briefly to loosen. Add a large spoonful of meringue and fold in using a whisk or flexible spatula. Scrape the egg yolk batter into the bowl with the remaining meringue. Use a whisk to gently but thoroughly fold the mixtures together. Avoid stirring — we want to retain as much air as possible. Once the two mixtures are about 80% combined, switch to a flexible spatula and continue folding until you have one homogenous batter with no streaks of egg white remaining.
Portion the batter: Divide the batter among the prepared tins (for my flower shaped tins, about 90g each). The tins should be filled to the top. I used a medium cookie scoop to portion the batter; alternatively you can transfer the batter to a piping bag and pipe it into the tins.
Bake the cakes: Bake until cakes are golden and springy to the touch and a skewer inserted into the center of a cake comes out clean, about 25-30 minutes. Try not to open the oven until the cakes are close to being done, or the delicate cakes may collapse. Immediately remove cupcakes from the tins and lay on their sides to cool on a wire cooling rack. This helps minimize shrinkage — a little is normal, but if cakes shrink significantly this is usually due to underbaking or a problem with the meringue/folding. Cakes are best enjoyed the day they’re baked, but leftovers can be stored for a couple days in an airtight container at room temperature or the refrigerator. Enjoy at room temperature.
For obvious reasons, I haven’t made many fancy cakes this past year. It’s hard to work up the enthusiasm when sharing celebrations with your extended family and friends isn’t an option (Zoom doesn’t count). But this week was my husband’s birthday, his second pandemic one. And even if the days of the past year have crawled along ever so slowly (especially lately — pandemic fatigue is real, I tell you), it still felt necessary to acknowledge their passing. With cake.
There’s a recipe called David’s Chocolate Raspberry Cake in my book. It’s his favorite, the classic combination of deep chocolate cake, bright raspberries, and silky chocolate frosting. He would have been more than happy with that, but I was in the mood for a Project. I didn’t dare stray from the chocolate-raspberry flavor combination, so this was all about repackaging. We start with the same chocolate cake, but this time the raspberry shows up an an intense gelée, a smooth crémeux (basically a fancy set pudding), and in the rich chocolate mousse. All of that is doused in a gloriously shiny glaze and sprinkled with chocolate crumbs (which taste like oreos) for texture. It was good, very good.
Tips for making mousse cakes
It’s all about the timing
Layered mousse cakes look impressive and complicated, but they aren’t necessarily more difficult to assemble than a “regular” layer cake. While there are several components, none are difficult to prepare and most can be made ahead of time. I suggest spreading the work out over a few days to keep the process relaxed and fun. For example, this is the schedule I followed:
Day 1: Make chocolate cake (store in fridge), gelée (freeze), and crémeux (freeze)
Day 2: Make chocolate crumbs, chocolate mousse, and assemble cake (freeze overnight)
Day 3 (serving day): Make glaze, glaze and decorate frozen cake, defrost in fridge, eat!
You can definitely condense the project into 2 days. However, the key timing points are to make sure the gelée/crémeux are frozen before assembly, the mousse is used right before assembly, and the entire cake is frozen before glazing. Once glazed, the cake will need at least 2 hours in the fridge to defrost before eating.
Useful equipment
There are a few pieces of equipment that make assembling mousse cakes straightforward and produce sleek results.
Cake ring: Mousse cakes are often assembled in stainless steel rings that act as molds. I used a 6×3 cake ring.
Acetate: Also known as cake collars, these thin, transparent sheets line the cake ring and make the frozen cake easy to unmold. I used 3″ high acetate cut to fit the ring.
Instant-read digital thermometer: Important for the crémeux and mirror glaze, which are cooked or cooled to exact temperatures for best results. My favorite is the Thermapen.
Immersion blender: Not strictly necessary, but does help remove lumps from mirror glaze for a smooth finish. I use this Hamilton Beach immersion blender.
Specialty ingredients
Powdered gelatin:Gelatin is the setting agent in several layers. I generally use powdered because it’s readily available in my area. You’ll need 26g total (if you’re using packets, this is a little less than 4 packets).
Ruby chocolate: Ruby chocolate is a special variety of chocolate that is naturally pink. It has a unique fruity flavor that pairs really well with raspberries. I use Callebaut brand.
Raspberry puree: You will need 260g raspberry puree total for all the components. You can buy pre-made puree online from some specialty baking / food stores, or make your own. To make raspberry puree, I simply blended one 400g bag of frozen raspberries (after thawing). I used puree with seeds for the gelée, but strained out the seeds for the crémeux and mousse. I had just enough puree; so if you want to use all seedless I would start with ~550g frozen raspberries to ensure you have enough after straining.
Baker’s notes:
Before making the dark chocolate raspberry mousse, I recommend having your cake and gelée-crémeux layers trimmed and all your equipment for assembly ready to go. The gelatin in the mousse will begin setting as soon as you add the cream, and the longer you wait the harder it will be to spread.
I had intended to use another layer of cake but didn’t have quite enough room on after adding the gelée and crémeux. Next time I make this, I’ll put the first round of cake directly on the bottom of the cake ring and pipe mousse around it. That should give just enough room for another extra cake layer.
I didn’t use a piping bag to add the mousse and ended up missing a couple spots around the crémeux. I filled them in with some ganache before glazing, and that worked ok. But after about a day in the fridge the glaze sort of wrinkled where the ganache was (probably because it was a different density compared the mousse). So I definitely recommend using a piping bag and taking care to get all the edges filled with mousse for the cleanest finish!
The recipe for chocolate crumb makes quite a lot; feel free to cut in half or even a quarter depending on how much you want to use for garnish. I made a full batch to freeze extras for snacking and other projects.
Chocolate and Raspberry Mousse Cake with Dark Chocolate Mirror Glaze
Makes one 6×3 mousse cake (serves 8-12) | Chocolate cake recipe adapted from Baked to Order; raspberry gelée, dark chocolate raspberry mousse, and dark chocolate glaze adapted from Dominique Ansel’s Everyone Can Bake; ruby raspberry crémeux adapted from Felicia Mayden; chocolate crumb adapted from Milk
Ingredients:
For the chocolate cake (Makes one 8″ round):
57g unsalted butter, cubed
27g neutral vegetable oil
60g whole milk
1 tsp vanilla extract
125g all-purpose flour
34g Dutch-processed cocoa powder
165g light brown sugar
1/2 tsp kosher salt
3/4 tsp baking soda
80g sour cream, at room temperature
1 large egg, at room temperature
60g freshly brewed coffee
For the raspberry gelée (makes about 240g or 1 cup):
20g cold water
4g (scant 1 1/4 tsp) powdered gelatin
185g raspberry puree (with or without seeds)
30g granulated sugar
For the ruby raspberry crémeux (makes about 435g or 1 3/4 c):
Preheat the oven to 350°F (175°C) with a rack in the middle. Grease an 8-inch round cake pan and line the bottom with parchment paper, then grease the pan again and dust with the cocoa powder.
In a small saucepan, melt the butter over low heat. When the butter has melted, remove from the heat, and whisk in the oil, milk, and vanilla. Allow to cool slightly while you prepare the rest of the ingredients.
Sift together the flour, cocoa powder, sugar, salt, and baking soda in a large bowl. Set aside.
Whisk the sour cream into the butter mixture, followed by the egg. Whisk the wet ingredients into the dry until combined. Add the hot coffee and whisk just until smooth.
Scrape the batter into the prepared pan and bake until a skewer inserted into the center comes out with just a few moist crumbs, about 25-32 minutes. Transfer to a wire rack to cool. Once the pan is cool enough to handle, run an offset spatula around the edge and turn the cake out to finish cooling completely. Wrap and chill the cake in the fridge until ready to assemble.
For the raspberry gelée:
Line a 6-inch cake pan with plastic wrap. Set aside.
Bloom the gelatin: Combine the cold water and gelatin in a small bowl. Stir with a spoon until the gelatin has dissolved. Allow to bloom for 5-10 minutes.
Cook the gelée: In a medium saucepan, bring the raspberry puree and sugar to a simmer over medium heat, whisking occasionally. Once the mixture comes to a simmer, remove from heat. Add the gelatin mixture and whisk to combine, making sure the gelatin completely dissolves.
Set the gelée: Pour the gelée into the prepared pan. Freeze until firm before adding crémeux, about 1 hour.
For the ruby raspberry crémeux:
Bloom the gelatin: Combine the gelatin and 15g of the heavy cream in a small bowl. Stir with a spoon until the gelatin has dissolved. Allow to bloom for 5-10 minutes.
Make the crémeux: Place the chopped ruby chocolate in a medium heat-safe bowl and set a fine-meshed sieve over it.
Place egg yolk in a medium bowl. Heat the corn syrup in the microwave until warm. Slowly whisk into the egg yolk until smooth (warming the corn syrup helps temper the yolk).
In a small saucepan, combine the remaining 125g heavy cream and whole milk. Bring to a simmer over medium heat.
Once the cream-milk mixture comes to a simmer, slowly whisk into the egg yolk mixture until well incorporated. Scrape the mixture back into the saucepan. Cook over medium heat, whisking constantly, until the mixture reaches 180F on a digital thermometer. Remove from heat, then add bloomed gelatin and whisk to combine thoroughly. Strain mixture over the chocolate. Let sit for one minute, then whisk together to form a smooth emulsion. Add the raspberry puree and whisk in thoroughly.
Freeze the crémeux: Pour crémeux over set raspberry gelée. Freeze uncovered until top is set, about 1 hour. Press a piece of plastic wrap on top and freeze until completely solid, at least 5 hours or overnight.
For the chocolate crumb:
Preheat the oven to 300F. Line a baking sheet with parchment paper or a silicone mat.
In a medium bowl, whisk together the flour, cornstarch, sugar, cocoa powder, and salt until well combined. Add the melted butter and stir until the mixture forms small clusters.
Spread the clusters in one layer on the prepared baking sheet. (I like to squeeze some clumps together to get a mixture of bigger and smaller pieces.) Bake for 20-22 minutes, stirring occasionally to promote even baking. The clumps should be slightly moist to the touch; they will harden as they cool.
Let crumbs cool completely, then transfer to an airtight container. Store at room temperature for up to a week, or in the freezer for up to a month.
For the dark chocolate raspberry mousse:
Note: prepare the mousse right before assembling the cake.
Combine the gelatin and 35g whole milk in a small bowl. Stir until the gelatin has dissolved. Set aside to bloom for 5-10 minutes.
Place the chopped dark chocolate in a medium bowl and set a fine-meshed sieve over it.
Put the remaining 147g milk in a small saucepan. Heat over medium heat until steaming, stirring occasionally. Once steaming, remove from heat and whisk in the bloomed gelatin mixture.
Strain over the chopped chocolate. Let mixture sit, without stirring, for 30 seconds; then whisk until the chocolate has melted and the mixture is smooth. Add the raspberry puree and whisk until completel.ombined. Let cool at room temperature while you whip the cream (you want the ganache to be slightly warm when combining with the cream).
Place the cold heavy cream in a large bowl (or in the bowl of a stand mixture fitted with the whisk attachment). Whisk on medium speed until soft peaks form.
Slowly pour the ganache into the whipped cream a little at a time, gently folding it in with a spatula until just combined. Transfer to a piping bag and use immediately.
Assemble the chocolate raspberry mousse cake:
Note: I recommend preparing the cake ring and trimming the layers before making the dark chocolate raspberry mousse.
Line the inside of a 6×3 cake ring with acetate and set on a plastic-lined sheet pan. Make sure you have space in your freezer where the sheet pan can fit flat so the cake can freeze properly.
Trim the cake and gelée-crémeux rounds so both are about 1/4″ to 1/2″ smaller than the cake ring (5 1/2″ to 5 3/4″ inches in diameter). Trim the cake to about 1/2″ thickness. (Save leftovers for snacking or another project, or see baker’s notes for thoughts on using more cake layers.)
Prepare the dark chocolate raspberry mousse (see above).
Pipe about 1/2″ of mousse into the bottom of the cake ring. Lightly tap the pan to ensure there are no air bubbles and smooth the top with an offset spatula. Set the cake layer on top of the mousse and gently press into the mousse until the mousse comes over the edge of the cake a bit. Pipe in about 3/4″ layer of mousse into the cake ring covering the cake layer. Set the gelée-crémeux layer on top of the mousse, gelée side on top. Gently press into the mousse until the mousse comes up the edge of the crémeux. Pipe mousse around the edge of the gelée-crémeux, then pipe in mousse to fill the remainder of the mold. Tap pan again to remove any air bubbles. Smooth the top so it is perfectly flush with the top of the mold. (You may have a little mousse leftover — consider it a baker’s treat!)
Transfer the sheet pan to the freezer. Freeze until solid, at least 3 hours or overnight.
Make the dark chocolate glaze:
Note: prepare glaze about 1-2 hours before you want to glaze the cake, or at least 3-4 hours before serving. After glazing the cake will still need fully defrost in the fridge before serving.
Combine the gelatin and 60g cold water in a medium bowl. Stir until the gelatin has dissolved. Set aside to bloom for 5-10 minutes.
Sift the cocoa powder into a medium saucepan. Add the 75g room temperature water and stir to form a thick paste. Add a small amount of cream and whisk to loosen. Add the remaining cream and sugar and whisk to combine.
Bring to a simmer over medium heat, whisking until the sugar has dissolved. Cook, whisking occasionally, until the glaze just comes to a boil, about 3-5 minutes.
Set a fine-meshed sieve over the bloomed gelatin and pour the glaze through the sieve. Whisk to combine and melt the gelatin. Blend with an immersion blender to remove lumps and air bubbles. Press a piece of plastic wrap against the surface and cool to 95F before glazing the cake (this took me about an hour). Right before glazing, strain glaze again into a tall pouring container to remove any air bubbles — pour from a low distance for best results. (Note: glaze can be stored in an airtight container for up to a week; rewarm in the microwave to 95F before using.)
Glaze the mousse cake:
At least 3 hours before serving, unmold and glaze the cake. Line a sheet pan with plastic wrap and set a sturdy plastic container or 4″ cake pan on top. (You want something smaller than the diameter of the cake so the glaze will drip off properly, but make sure it’s level and sturdy.) Take the cake out of the freezer and remove the cake ring. Move the cake to a 6″ cake board and remove the acetate. Double check the glaze is at working temperature — at 95F — before glazing. If not, wrap cake tightly in plastic and keep in freezer until ready to glaze — the cake must be frozen and not starting to melt when the glaze is applied.
In one swift and confident motion, pour most of the glaze over the center of the cake. If everything is at the proper temperature, the glaze should flow down and cling to the sides of the cake. If there are any spots that get missed, use an offset spatula to gently smear some extra glaze on. Let set for a couple of minutes, then use an offset spatula to cut off any stray drips at the base of the cake.
Finish and serve the mousse cake
Use a cake lifter or a couple of offset spatulas to move the glazed cake onto a serving plate. (The extra glaze can be refrigerated in an airtight container for up to a week or frozen; rewarm before using.) Decorate with chocolate crumbs at this point if desired (they will adhere better when the glaze is still a little sticky). Transfer cake to the refrigerator to thaw completely before serving (at least 2 hours, or up to a couple days). Decorate with edible glitter paint, and fresh raspberries (brushed with some warmed apricot jam for shine), if desired, before serving.
Meet my favorite coffee companion. Crisp on the outside, tender and fruit-studded on the inside, these blueberry rye scones are everything I want in a breakfast treat. As with pie dough, I always make scones with a portion of wholegrain flour for an extra dimension of flavor. I love the pairing of earthy rye with berries; but spelt, einkorn, or whole wheat work fine as well. The lemon glaze is optional for me, but not for my kids. If you’re going with the glaze, feel free to add the zest of the lemon into the scone dough.
Baker’s notes:
If you’re like me and don’t even think about baking BC (before coffee), prep the scones in advance through the chilling and cutting step. Freeze directly on the sheet tray until solid, then transfer the frozen scones to a ziplock bag and bake them off as needed (they’ll likely need a few extra minutes of bake time).
3/4 tsp kosher salt (Diamond Crystal; use half as much for table salt)
1/2 tsp ground ginger
1/4 tsp grated nutmeg
85g (6 Tbsp) unsalted butter, cold and cut into 1/2-inch cubes
170g (1 1/4 c) fresh blueberries
120g (1/2 c) cold heavy cream, plus more for brushing
60g (1/4 c) sour cream, cold
1 large egg, cold
1 tsp vanilla extract
1/4 tsp almond extract (optional)
Coarse sugar, for sprinkling
For the lemon glaze (optional):
60g (1/2 c) icing sugar, sifted
2-3 tsp freshly squeezed lemon juice, plus more as needed
Method:
Make the scone dough: Line a 6-inch cake pan with plastic wrap and set aside. In a medium bowl, whisk together the flours, sugar, baking powder, salt, ginger, and nutmeg.
Add the cold, cubed butter to the dry ingredients and cut it into the dry ingredients using a pastry cutter or your fingers. You should have varying sizes of butter pieces, ranging from pea to nickel shaped. Gently fold in the blueberries.
Whisk together the heavy cream, sour cream, egg, and extracts. Pour over the dry ingredients and gently fold in with a spatula until combined. The dough should be a bit shaggy, but should hold together. If not, add more cold cream 1 teaspoon at a time until it does. Gently fold the dough onto itself until it becomes a cohesive mass.
Chill the dough and preheat the oven: Transfer dough to the prepared cake pan and freeze for about 20-30 minutes or until slightly hardened. While scones are chilling, preheat the oven to 425°F with a rack in the middle. Stack two baking sheets together and line the top one with parchment paper. (I like to bake these scones with an extra baking sheet underneath to keep the bottoms from browning too much.)
Cut and bake the scones: When scone dough is chilled, invert onto a cutting board and use a sharp knife to cut like a pie into eight wedges. Transfer scones to prepared sheet pan. Lightly brush the tops with cream and sprinkle with coarse sugar.
Bake for 22-30 minutes, rotating pan halfway through, until the tops and bottoms are golden brown. Cool on a wire rack for 10 minutes.
Glaze and enjoy: While the scones are cooling, make the glaze. Sift the icing sugar into a medium bowl. Add 2 tsp lemon juice and whisk until smooth. Add more lemon juice, a teaspoon at a time, until the glaze is smooth and pourable. Drizzle or spoon over the scones. Enjoy immediately.
Storage: Scones are best freshly baked, but you can store them well wrapped at room temperature for a few days. (I would hold off on glazing until you’re ready to eat them.) Reheat for 5 to 10 minutes in a 350°F (175°C) oven. You can also freeze scones unbaked and bake them straight from frozen (you may need to add a few extra minutes of baking time).
Many of the treats I remember my mom making came from a well-used Hawaiian church cookbook, a gift from her family in Oahu. Our family favorite was butter mochi, a popular Hawaiian dessert made from mochiko (also known as sweet rice flour or glutinous rice flour), eggs, sugar, butter and coconut milk. Imagine the chewy texture of mochi combined with the rich flavor of coconut milk and topped with a crisp, caramelized crust. So good! And bonus: butter mochi is very easy to make. The recipe I’m sharing here is based on my mom’s, with a couple small tweaks (*cough* brown butter *cough*) for extra flavor.
Mochiko: the key ingredient
Butter mochi is a fairly flexible recipe — I’ve seen versions with varying amounts of butter and sugar; some use different types of milk or include shredded coconut and other add-ins. But the one non-negotiable ingredient is mochiko (sweet rice flour, or glutinous rice flour), which is milled from long grain glutinous rice. Mochiko is a naturally gluten-free flour that is responsible for butter mochi’s signature chewy texture. I recommend Koda Farms brand as that’s the flour I used to test this recipe (and what my mom always uses as well) — it’s available at Asian/International supermarkets and online. Do NOT substitute mochiko with regular rice flour or any other flour.
Pro-tip: pan-fried butter mochi
Once butter mochi has cooled, it’s perfectly enjoyable straight from the pan. However, my absolute favorite way to eat butter mochi is to pan fry it, which crisps and caramelizes the crust even further and warms the center through — the textural contrast is perfection. Just heat a lightly oiled non-stick pan over medium-low heat and fry each side until golden (about 1-2 minutes). Cool for a minute before devouring, and thank me later.
Baker’s notes
Mochiko has a tendency to clump when added to the liquid ingredients, so I like to sift it in. Don’t be afraid to work out any flour lumps with a spatula or else you might end up with “flour bombs” in the finished butter mochi.
For clean slices, let the butter mochi cool completely in the pan before removing and cutting. I like to let butter mochi cool and set overnight for the best texture.
Brown butter mochi squares (gluten-free)
Makes one 8×8 pan (16 2-inch squares)
Ingredients:
57g (4 Tbsp) unsalted butter, cubed
One can (400ml) full-fat coconut milk
200g (1 c) granulated sugar
1 1/2 tsp pure vanilla extract
1 tsp kosher salt (Diamond Crystal — use half the amount for table salt)
1 tsp baking powder
2 large eggs (cold is fine)
225g (1 1/2 c) mochiko (sweet rice flour — I like Koda Farms brand)
Method:
Preheat oven and prepare the pan: Preheat the oven to 350F with a rack in the middle. Line an 8×8 metal baking pan with foil, dull side up. Leave a couple inches overhang on two sides for easy removal. Lightly grease the foil.
Brown the butter: Place the cubed butter in a small, light-colored saucepan over medium-low heat. Once the butter has melted, turn the heat up to medium-high. Stir frequently with a heatproof spatula, scraping the sides and bottom of the pan as needed. The butter will crackle, foam, turn clear gold, then finally start browning. It’s done when the crackling subsides and you smell toasted nuts. This process takes about 10 minutes total, but the butter can go from browned to burnt in a flash—so keep an eye on it. Pour the butter and all the toasty bits into a glass measuring cup or medium bowl. Whisk in the coconut milk.
Mix the batter: In the bowl of a stand mixer fitted with the whisk attachment (you can also use a hand mixer or a whisk), combine the sugar, vanilla, salt, baking powder and eggs. Whisk on low to combine, then increase the speed to medium and beat until the mixture is thickened and pale, about 2-3 minutes (a little longer if by hand). Reduce the speed to medium-low and gradually stream in the butter-coconut milk mixture. Mix until smooth and combined, then scrape down the sides of the bowl. Sift in the mochiko and mix on low until the batter is smooth. Use a flexible spatula to fold from the bottom of the bowl a few times to make sure the batter is well-mixed and no pockets of flour remain. If there are any flour lumps, use the spatula to press them out.
Bake: Scrape the batter into the prepared pan (it will be on the thin side) and bake until the top is golden brown and feels dry and springy to the touch, about 55-65 minutes. Transfer to a wire rack and cool completely in the pan (preferably overnight). Use a sharp knife to cut into squares; wipe the blade clean with a warm towel between slices. Store in an airtight container at room temperature for up to three days.